Why a sample seal worksheet matters before you buy bulk
A canvas tote bag sample seal approval worksheet is not paperwork for the sake of paperwork. It is the document that turns a physical sample into the one reference both sides must follow when bulk production starts. For a simple tote, that matters more than many buyers expect. Small changes in fabric weight, seam allowance, handle length, or print ink can turn the same-looking sample into a very different bulk bag.
If you buy canvas totes often, the real risk is not whether the factory can sew a bag. The risk is whether the factory can repeat the exact bag you approved at a cost that still fits the quote. A sealed sample helps procurement, merchandising, and QC speak the same language. It also gives suppliers a clean target instead of a moving brief that keeps changing after the price is set.
- Use one physical reference sample for each approved style and colorway.
- Tie the sample to a version number, approval date, and signer.
- Do not let a photo-only approval replace the physical seal unless the order is very small and low risk.
Set the base spec before anyone talks price
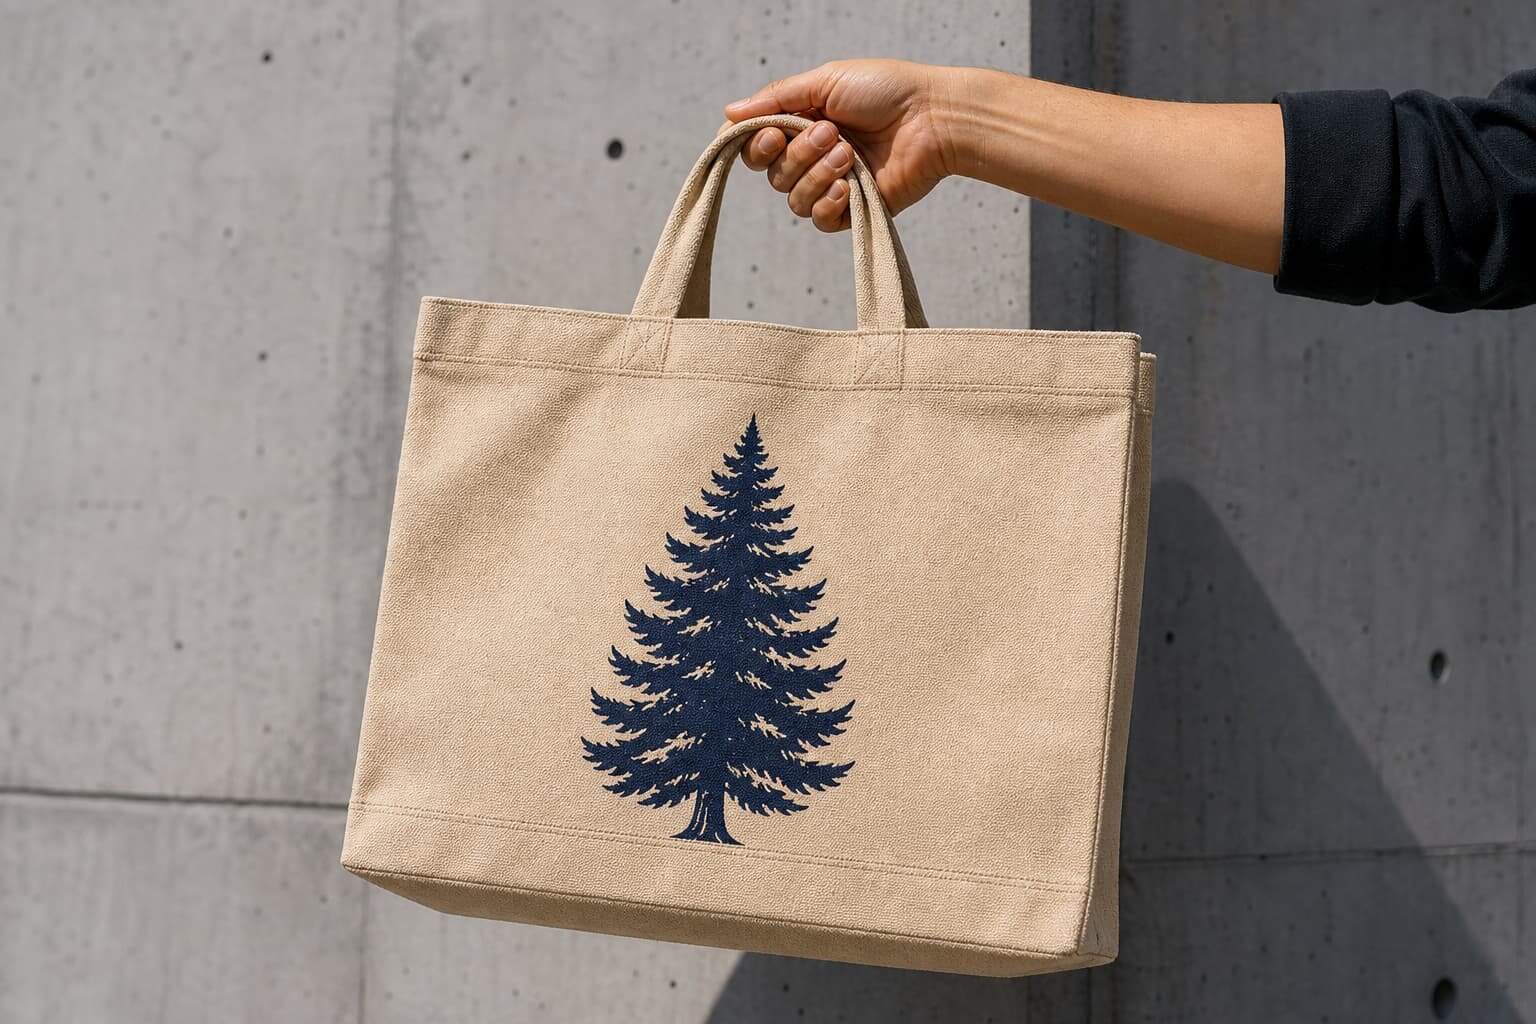
The worksheet should lock the core build first: finished size, fabric weight, color, handle type, and any pocket or closure detail. For canvas totes, the fabric choice usually drives the most visible change in feel and performance. A lighter 6 oz or around 200 GSM bag can work for short-term promotions or low-cost giveaways. An 8 oz or around 240 to 260 GSM bag is a common middle ground. A 10 oz or around 320 to 340 GSM bag gives a firmer retail hand-feel and usually holds its shape better.
Do not approve a quote that only says canvas tote bag without naming the base cloth. Ask whether the cloth is natural, bleached, dyed, or pre-shrunk, because each one affects shrinkage, color, and print clarity. If the bag is meant for a retail shelf, you also need to know the finished size tolerance. A half-inch shift may not matter on paper, but it changes carton fit, handle drop, and how the bag hangs on a rack.
- Confirm finished size, cut size, gusset depth, and handle drop.
- Lock fabric weight in GSM or ounce weight, not only by trade description.
- State whether the cloth is pre-shrunk, washed, or raw.
Lock construction details that change cost and quality
Construction details are where many sample approvals quietly go wrong. A tote can look correct at first glance and still fail in use if the handle join, top hem, or bottom seam is weak. The worksheet should show exactly how the handles are attached, whether the bag uses self-fabric or webbing handles, and how the stress points are reinforced. For higher-load bags, cross-box or bar-tack reinforcement at the handle end is usually worth the extra sewing time.
The same applies to seam finish. A factory may offer single-needle side seams, double-needle seams, or overlocked internal edges, and the cost difference is real. If the buyer does not spell out the required seam style, the factory may default to the cheapest build that still looks acceptable on a sample. That is how hidden failures show up later as popped seams, twisted handles, or a bag body that leans after a few uses.
- Specify seam type, stitch count expectation, and reinforcement points.
- Ask for handle width, handle length, and handle attachment method in millimeters.
- State whether the bag needs a hemmed top edge, lining, gusset, or closure.
Approve the print the way production will actually run it
Print approval is one of the biggest sample-seal blind spots on canvas totes. Screen print is still the most common choice for simple logos and solid blocks of color because it is efficient at scale and usually gives a cleaner unit cost after setup. Heat transfer or digital transfer can make sense for gradients, more colors, or shorter runs, but buyers need to watch for hand-feel, edge lift, and durability. Embroidery and woven labels work well for premium branding, but they change both the look and the cost profile.
The worksheet should state the print area, artwork version, Pantone target, number of colors, and acceptable registration. If the logo sits near a fold or seam, call that out because the risk of cracking rises when the fabric bends. Ask the factory how they will cure the ink, what base cloth they recommend for the print method, and whether they will send a strike-off or print sample before bulk. A good sample seal is not just about the image looking right; it is about the decoration surviving use.
- Choose screen print for simple, flat artwork and medium to high volume.
- Choose transfer methods when the design has gradients, fine detail, or short-run flexibility.
- Use embroidery or woven label only when the branding and budget support a premium finish.
- Ask for a rub test or wash check if the print sits on a high-touch area.
Turn the worksheet into a quote sheet, not just an approval note
A strong sample seal worksheet also makes supplier quotes comparable. If two factories quote the same style but one includes a 10 oz cloth, folded handles, two-color screen print, and retail polybag while the other assumes an 8 oz cloth, raw handles, and bulk packing, the prices are not comparable. Buyers should make the worksheet function like a mini specification sheet so the quote data is the same from supplier to supplier.
The best RFQs list the fabric, print method, packing, carton requirements, and sample stage separately. That lets procurement see exactly where the money is going. In canvas tote sourcing, fabric and sewing usually take the biggest share, while print, finishing, and packing can swing the final number depending on complexity. If the quote is vague, the supplier can hide cost in the method they chose, not the method you intended.
- Ask for separate line items for fabric, sewing, print, packing, carton, and sample fee.
- Request MOQ by fabric option, print color count, and packing format.
- Make the supplier quote the same pack-out and carton count you want in bulk.
- Confirm whether tooling, artwork setup, and sample corrections are included or extra.
Use sample checks that reveal real bulk risk
A sealed sample should be checked as if it were a production audit. Measure it, weigh it, inspect it, and load it. A canvas tote that looks fine on a table may behave differently once it carries product or sits folded in a carton for weeks. Buyers should verify finished dimensions against tolerance, inspect the print for edge sharpness and opacity, and check whether the handles pull the body out of square when loaded.
This is also the stage to catch issues that are expensive to correct later. Loose thread tails, uneven top hems, bad stitch tension, weak handle attachment, and inconsistent fold lines can often be fixed at sample stage, but they become large-scale waste once sewing lines are running. A sample seal worksheet should tell the factory what counts as acceptable variation and what is a reject, so the first bulk run does not become a debate.
- Measure finished width, height, gusset, and handle drop on the sealed sample.
- Check for loose threads, uneven stitching, and twisted handle attachment.
- Load-test the bag with a realistic weight for the end use.
- Inspect print alignment, cure quality, and color match under consistent light.
Do not leave packing out of the approval
Packing looks minor until the shipment arrives with the wrong fold, missing barcode, or crushed tote body. For canvas bags, the pack spec affects labor almost as much as the sewing spec. If you want retail-ready units, the factory may need to insert cardboard, add a warning label, apply a barcode, and fold each tote to a fixed size before polybagging. That changes both the quote and the line time.
If the bags ship to a distributor or wholesale warehouse, a bulk pack may be better. But even bulk pack needs a clear carton standard, a carton count target, and shipping marks that match the booking documents. The worksheet should record the exact pack format approved on the sample so nobody later claims that retail folding, insert cards, or master carton labels were only an assumption.
- Specify whether each bag is bulk packed, individually polybagged, or retail boxed.
- Approve barcode placement, carton marks, and any insert card or hang tag.
- State the carton quantity, outer carton size, and gross weight target if known.
Build lead time and change control into the sign-off
A sample seal is only useful if the timeline behind it is clear. Most canvas tote programs need more than one stage: prototype, print strike-off, pre-production sample, and final sealed sample. The worksheet should show which stage was approved and what still needs confirmation before bulk sewing starts. This matters because a factory may be ready to cut cloth before the print is fully locked, which creates rework if the artwork changes later.
Lead time is also tied to MOQ logic. A simple tote with one color screen print and standard packing may move faster than a decorated tote with multiple print areas, special labeling, or a retail pack-out. If a buyer changes the fabric or print method after the seal, the quote should be reopened. That is not a supplier excuse; it is normal production control. The worksheet should make that rule explicit so the project does not drift.
- Identify which sample stage is the final contract reference.
- Note what changes trigger a revised quote and revised lead time.
- Keep color, fabric, and packing changes out of bulk unless the cost and schedule are reset.
Common approval mistakes buyers keep repeating
The biggest mistake is approving a tote from a distance and assuming the bulk will match. Photos can hide fabric hand, stitch density, seam finish, and the way a bag stands when empty. Another common problem is mixing versions. A buyer may approve one print file, one sample bag, and one packing spec, then allow the factory to quote from an earlier revision. When that happens, everyone believes they approved the same product, but they did not.
Another mistake is treating tolerance as an afterthought. If the bag width, height, or handle drop matters to your retail shelf or ship carton, write the tolerance into the worksheet. Also watch for hidden substitutions: a different canvas weight, a different thread color, a different polybag size, or a looser pack fold. Those small deviations are what make a sealed sample fail in the warehouse, even when the bag itself looks fine.
- Never rely on a photo if the order depends on hand-feel, color, or load strength.
- Do not let older versions stay in circulation once the seal is signed.
- Write down every acceptable deviation so it does not become a default change.
A clean sign-off workflow you can reuse on every order
For procurement teams, the easiest way to use the worksheet is to treat it like a release gate. First, confirm the spec and quote. Second, inspect the sample physically. Third, mark any deviations that are acceptable and reject anything outside tolerance. Fourth, sign the worksheet and attach it to the sealed sample. Fifth, give the factory only one approved version to follow in bulk. That sequence is simple, but it prevents most of the production arguments that waste time later.
If you source from multiple suppliers, the same workflow helps you compare them fairly. The supplier with the lowest unit price is not always the best value if the fabric is lighter, the print method is weaker, or the packing is less efficient. A good sample seal approval worksheet gives you a commercial decision tool, not just a QC record. It helps you choose the quote that will survive production, shipping, and retail use.
- Release bulk only after the factory confirms the exact seal version in writing.
- Keep one buyer copy and one factory copy of the approved sample reference.
- Use the same worksheet format across seasons so future orders can be compared faster.
Specification comparison for buyers
| Spec decision | Recommended option | When it fits | Buyer risk to check |
|---|---|---|---|
| Fabric weight | 8 oz / about 240 to 260 GSM for promo, 10 oz / about 320 to 340 GSM for retail | Use 8 oz for lighter hand-feel and lower cost; use 10 oz when the bag needs better shape and carry strength | A softer fabric can shrink more, sag more, and change handle drop after wash or steam |
| Print method | Screen print for simple logos, transfer for short runs or gradients, embroidery or woven label for premium branding | Match the method to artwork complexity, run size, and wear expectations | Ink build, cracking on folds, and color shift if the factory prints on the wrong base cloth |
| Handle construction | Self-fabric handles with folded edges and cross-box reinforcement, or webbing handles for stronger carry | Use self-fabric for a clean retail look; use webbing when the bag must carry heavier loads | Handle width, handle length, and stitch density can change both cost and carrying comfort |
| Seal sample format | One physical sealed sample plus a signed worksheet with version number and date | Best for every bulk order, especially when more than one supplier is quoting | Photo approval alone often misses fabric hand-feel, seam quality, and true color tone |
| Packing format | Bulk polybag and carton for wholesale, folded retail pack with barcode and insert card for store-ready units | Choose by sales channel, warehousing method, and carton efficiency | Pack style changes labor, carton count, damage risk, and often the final quote |
Buyer checklist before sampling
- Confirm the exact tote size, including cut size or finished size, handle drop, gusset depth, and any tolerance the factory is allowed to use.
- Lock the fabric weight, weave, color, and whether the cloth is bleached, natural, dyed, or pre-shrunk.
- Approve the decoration method, artwork version, Pantone target, print area, and the exact number of print colors.
- Decide whether the sample seal covers one colorway only or every colorway and size combination in the order.
- Check the seam finish, reinforcement points, top hem, and bottom construction against a physical sample, not just a drawing.
- Ask the supplier to quote the same packing unit, carton count, barcode method, and insert requirement used on the sealed sample.
- Get sample and bulk lead times in writing, including how long strike-offs, pre-production samples, and corrections normally take.
- Record the approved sample number, approval date, and any allowed deviations in a worksheet that both sides can sign.
- Compare at least two supplier quotes on the same spec sheet so price differences are tied to real build differences, not guesswork.
- Keep one sealed reference sample with your QA team and one with the factory so bulk inspection has a common reference.
Factory quote questions to send
- What fabric weight, weave, and finish are you quoting, and what GSM or ounce weight will you use as the production base?
- Is the price based on one print color, multiple print colors, or no print at all, and what is the setup charge for each method?
- What is the MOQ for this exact fabric, handle style, print method, and packing format, and which change would raise the MOQ?
- What are the sample stages you will provide before bulk: prototype, strike-off, pre-production sample, and sealed sample?
- What dimensions and tolerance band are included in the quote, and how will you measure finished size and handle drop?
- Does the price include carton packing, master carton marks, barcode stickers, polybag, and any insert card or warning label?
- What lead time do you need for sample approval, fabric booking, bulk sewing, printing, and final packing?
- Which tests or checks do you normally do before shipment, such as seam strength, color fastness, or load check?
- What is excluded from the quote, such as freight, lab testing, tooling, artwork correction, or extra packaging materials?
- If we change the approved sample after sign-off, what cost and timeline changes should we expect?
Quality-control points to confirm
- Verify that the physical sealed sample matches the signed worksheet version, including size, fabric weight, print method, and packing format.
- Measure finished dimensions, gusset depth, and handle drop on at least a small incoming sample lot before bulk release.
- Inspect stitch quality at side seams, bottom seams, handle joins, and reinforcement points for skipped stitches, loose ends, or uneven tension.
- Check print registration, opacity, edge sharpness, and cure quality so the artwork does not crack, smear, or peel on fold lines.
- Confirm color against the approved target under consistent light, because natural canvas and dyed canvas can shift under different lighting.
- Review load behavior by filling the bag to the expected use level and checking handle comfort, seam stress, and body distortion.
- Inspect packing units, polybag seal, barcode placement, carton count, and shipping marks against the approved pack spec.
- Check odor, dust, loose threads, and surface contamination before carton close, especially on light-colored canvas.
- Confirm that all versions, sizes, and colorways are labeled clearly so the wrong item does not get sealed into the wrong carton.
- Keep a written record of any accepted deviation, because a one-time exception can become the factory's default if it is not controlled.