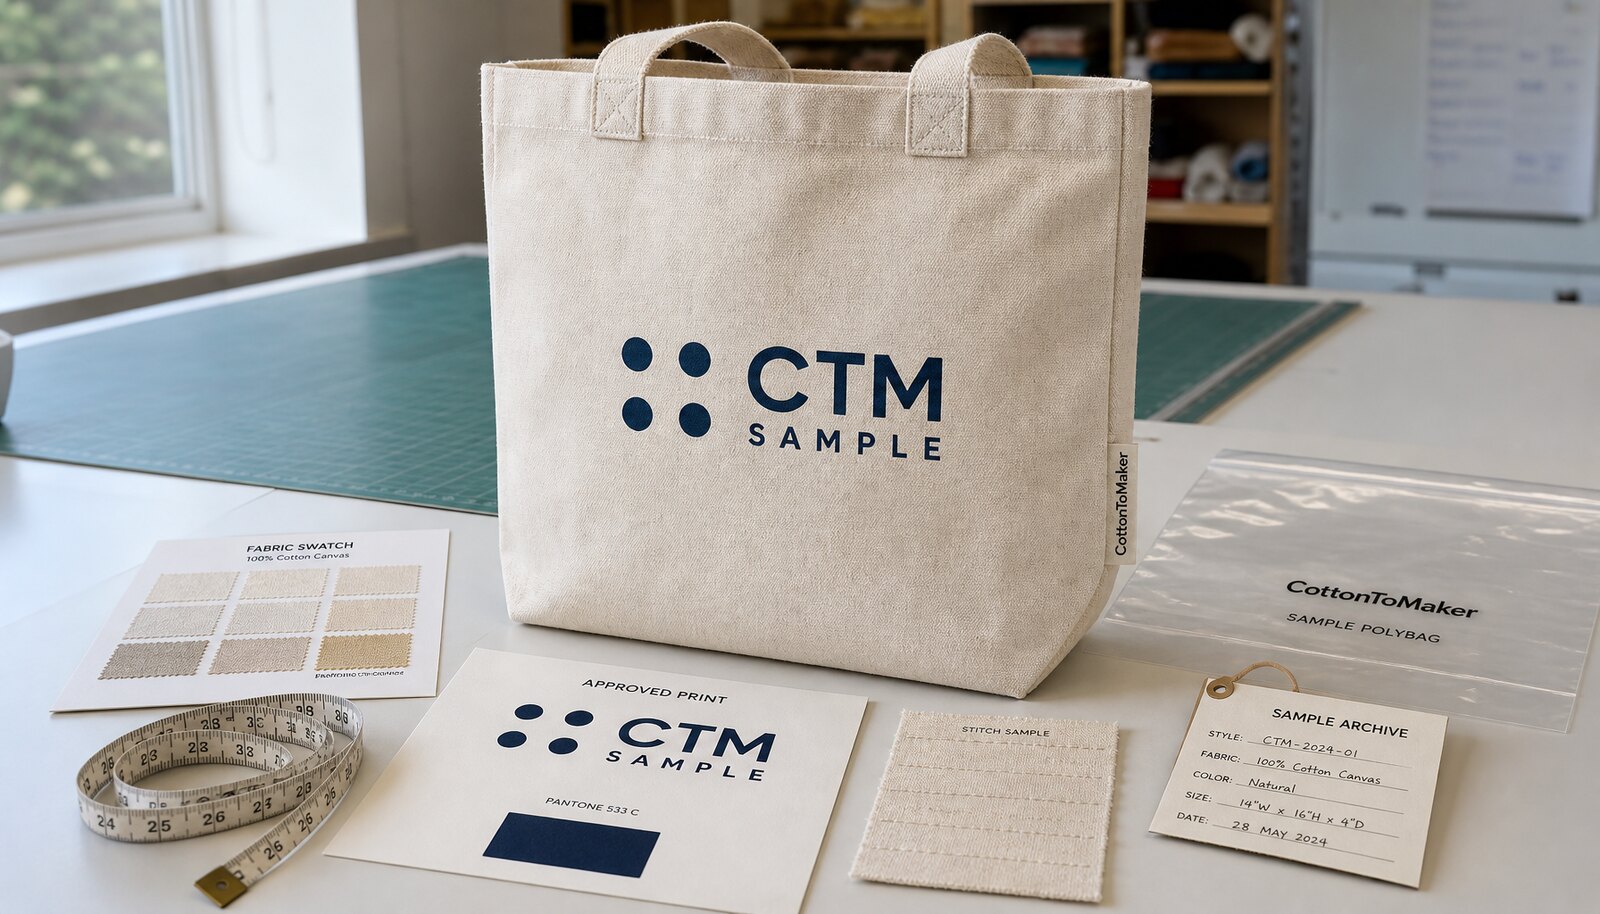
Why Sample Archive Photos Matter for Canvas Tote Bags
A canvas tote bag looks simple until three suppliers quote three different fabric weights, two different handle constructions, and four different print interpretations from the same artwork file. The sample may be acceptable in a sales photo, but procurement still needs evidence that the bulk order can be repeated. A controlled sample archive gives your team a visual and technical record of what was actually approved.
The goal is not to create pretty product images. The goal is to stop preventable disputes: wrong handle drop, thinner canvas than expected, print placed too low, side label missing, carton mark changed, or a reorder made from an outdated sample. For importers, distributors, and retail buyers, the archive becomes a working document for RFQ comparison, pre-production approval, inspection briefing, and reorder control.
- Use archive photos to compare suppliers on the same details, not just on unit price.
- Keep photos tied to style code, version number, and approval date.
- Photograph the physical sample before it is sent to another office or trade show.
- Archive rejected versions so the factory understands what not to repeat.
Set the Style Code Before Any Sample Is Made
The most common archive failure starts before the first sample photo. A buyer requests a canvas tote bag sample by email using descriptions such as natural tote, 12 oz bag, or logo shopping bag. Two weeks later, the team has several similar samples with unclear file names. When quotes arrive, nobody is certain which photo belongs to which specification. This is how old artwork and wrong handle lengths enter production.
Assign a buyer style code before sending the RFQ. The code should appear on the sample tag, supplier quote, artwork approval, archive folder, and inspection checklist. If there are fabric or print alternatives, use version control instead of changing the base name. For example, CTM-TOTE-2401-V1 can be 10 oz natural canvas with one color screen print, while V2 can be 12 oz canvas with longer handles. This makes quote comparison much cleaner.
- Include buyer style code, supplier sample code, and version number in every photo file name.
- Add the sample date and approval status, such as pending, approved, or rejected.
- Record who approved the sample and whether approval covers only appearance or full production.
- Do not let the factory start bulk cutting from a verbal approval or a WhatsApp photo only.
Photograph Fabric Weight, Texture, and Canvas Shade
Canvas tote bag quotes often hide real cost differences inside fabric language. One supplier may quote 10 oz cotton canvas, another may quote 12 oz, and a third may quote 340 GSM. Some buyers assume these are directly comparable, but conversion depends on fabric width, weave, finishing, and whether the factory uses local trade terms. Your archive should record what the fabric looks like and how it was described in the quote.
For a practical archive, take one full-panel photo and one close-up macro-style photo. The full-panel shot shows shade, slub level, and general hand feel. The close-up shows weave density, yarn thickness, and surface hairiness. If the bag is natural unbleached canvas, record that clearly. If the bag is bleached, dyed black, custom dyed, washed, or enzyme finished, the archive should say so because MOQ, shade tolerance, lead time, and shrinkage risk change.
- Record fabric as both ounce and GSM when possible, such as 10 oz cotton canvas, approximate 280-300 GSM.
- Photograph the fabric next to an approved swatch card, not only as a finished bag.
- Note whether fabric is pre-shrunk, washed, or untreated before sewing.
- Ask the factory whether bulk fabric will come from the same mill or stock lot as the sample.
Capture Measurements With Rulers in the Photo
A written spec sheet is necessary, but it does not replace measurement photos. Canvas tote bags can change shape depending on seam construction, bottom gusset, fabric stiffness, and packing method. If a sample is measured while stretched flat and bulk goods are inspected while naturally relaxed, the result can look like a size dispute even when the factory worked within tolerance.
The archive should show body width, body height, gusset depth, bottom width, handle length, handle drop, and print placement. For handle drop, measure from the top edge of the bag opening to the highest point of the handle when the bag lies naturally. For print placement, measure from the bag top edge or side seam to the artwork edge, not only to the artwork center. This helps inspectors and factories find the same reference point.
- Use a flat ruler or measuring tape visible in the photo frame.
- Photograph the bag relaxed, not pulled tight to reach the target size.
- Define tolerance in the RFQ, for example plus or minus 1 cm for body size and plus or minus 0.5 cm for print placement when realistic.
- Measure after any washing or finishing process if the tote is sold as washed canvas.
Record Print Method and Artwork Approval Separately
A front photo of the finished tote is not enough to approve the print. Screen print, pigment print, digital print, heat transfer, embroidery, woven patch, and sewn label all have different cost drivers and failure points. The archive needs to show method, color count, print size, placement, edge quality, and surface feel. Otherwise a supplier may quote one method and produce another method that looks similar in a small photo but performs differently in use.
For screen printing on canvas tote bags, photograph the print edge, ink coverage over the weave, and any registration between colors. For heat transfer, record film edge visibility and hand feel. For embroidery or woven patches, show stitch density, backing, and how the patch is attached. If the logo uses Pantone colors, the archive photo should not be treated as the only color approval because camera settings and lighting change shade.
- Archive the final artwork file name and print size together with the sample photo.
- Record the print method quoted and the print method used on the sample.
- Take one straight front photo and one angled close-up to show ink thickness or texture.
- Keep a physical print strike-off when brand color is important.
Show Handle Construction, Seam Allowance, and Reinforcement
The handle is where many tote bag complaints start. A cheaper quote may use thinner webbing, shorter handle drop, smaller seam allowance, or fewer reinforcement stitches. From the outside, two samples can look almost the same. Inside photos reveal the real construction. Your archive should include handle attachment, seam allowance, overlock quality, bartack position, and whether the handles are self-fabric, cotton webbing, canvas webbing, or another material.
For shopping totes and heavier promotional bags, reinforcement is not cosmetic. A box stitch with cross stitch, bartack, or double-row stitching may be needed depending on load expectation and fabric weight. If the bag is only for lightweight event giveaways, a simpler construction may be acceptable. The photo archive helps procurement decide whether the quote is cheaper because of efficiency or because the factory removed durability features.
- Photograph the inside top edge where the handle is sewn into the hem.
- Record handle width, handle length, handle drop, and material.
- Show reinforcement stitches clearly enough for QC to compare during inspection.
- Confirm whether loose thread trimming is included in the factory quality standard.
Include Labels, Tags, Barcodes, and Retail Details
Private label details are small, but they create large receiving problems. A missing woven side label, wrong care label position, unreadable barcode, or incorrect hangtag string can delay warehouse intake or retail launch. The sample archive should treat labels and packaging inserts as part of the product, not as afterthoughts added after the bag is approved.
Photograph each label location in context and close up. For example, if a CottonToMaker woven side label is sewn into the side seam, show both the whole side seam and a close-up of label orientation. If the buyer requires an inside care label, photograph the distance from the side seam and top hem. If the item needs a barcode sticker on the polybag, archive a scan-tested proof or at least a clear label photo tied to the SKU.
- Confirm label material, size, fold type, color, and sewing position.
- Check whether labels are included in the unit price or charged separately.
- Archive hangtag artwork, string type, safety pin method, or plastic fastener if used.
- Keep barcode placement linked to warehouse or retailer receiving instructions.
Archive Packing Method Because It Changes Cost
Packing is often excluded from early sample discussions, then becomes a cost and lead time issue after approval. A canvas tote can be packed flat, half folded, rolled, individual polybagged, bundled in master polybags, or packed directly into export cartons. Each method affects labor, carton size, freight volume, crease marks, barcode handling, and retail presentation.
Your sample archive should include the folded unit, inner pack, export carton mark, carton quantity, and any moisture control method if required. If the buyer compares quotes without packing details, one supplier may be quoting 100 pieces per carton without individual polybags while another is quoting 50 pieces per carton with retail-ready polybags and barcode labels. The unit price difference may not be a production advantage; it may simply be a packing difference.
- Photograph the tote before folding and after folding.
- Record individual polybag size, warning text, suffocation hole requirement, and barcode label position if applicable.
- Confirm carton quantity, carton size, gross weight, and net weight in the quote.
- Ask whether the final packing method will create hard creases on printed areas.
Use the Archive to Compare Supplier Quotes
A useful sample archive makes quote comparison less emotional. Instead of asking why Supplier A is higher than Supplier B, procurement can compare exact decisions: fabric weight, canvas finishing, print process, handle construction, label quantity, packing method, MOQ, and lead time basis. When the photos and quote lines match, you can see where cost is coming from.
MOQ logic is especially important. Natural canvas tote bags using stock fabric usually have a lower MOQ than custom dyed canvas, special webbing color, or custom woven labels. Multi-color printing may require setup charges or a higher economical quantity. A heavy 16 oz canvas tote may require different sewing handling than an 8 oz giveaway tote. The archive helps you ask the factory whether the MOQ is driven by fabric purchase, dyeing vat, printing setup, label production, or sewing line efficiency.
- Match each quote to the exact approved sample version, not just to the product name.
- Request a cost explanation when fabric weight, print method, or packing differs between suppliers.
- Confirm whether sample cost is refundable, included, or separate from bulk order cost.
- Ask what changes would reduce MOQ without weakening the product specification.
Build Acceptance Criteria Before Bulk Production
Archive photos become most valuable when they are tied to acceptance criteria. Without tolerances, the factory may believe the sample is only a general reference while the buyer believes it is an exact standard. A canvas tote bag needs realistic tolerances because cotton fabric, cutting, sewing, and printing all have normal variation. The RFQ should state which points are strict and which points have acceptable range.
Before deposit or production start, agree on the physical master sample and the digital archive. The master sample controls fabric hand feel, shade range, construction, and overall workmanship. The digital archive supports communication with merchandisers, inspectors, warehouses, and overseas teams. If a change is approved after the first sample, the archive must be updated. Do not leave V1 photos in the main approval folder when V3 is the real production standard.
- Define tolerance for body size, handle drop, print placement, print color, and carton quantity.
- State whether shade variation is judged against fabric swatch, lab dip, or final sample.
- Require pre-production sample approval before bulk cutting if fabric, print, or label changes.
- Attach archive photos to the inspection booking so QC checks the same details.
Specification comparison for buyers
| Spec decision | Recommended option | When it fits | Buyer risk to check |
|---|---|---|---|
| Archive photo background | Matte white or light grey board with ruler visible | Best for comparing natural canvas shade, print position, and bag shape across suppliers | Warm lighting can make unbleached cotton look cleaner than bulk fabric |
| Fabric record photo | Close-up plus full panel shot showing 10 oz or 12 oz canvas texture | Useful when comparing GSM, weave density, slub level, and shrinkage behavior | Supplier may quote by ounce while another quotes by GSM; conversion must be confirmed |
| Print approval photo | Straight front photo plus 45 degree angle close-up | Works for screen print, heat transfer, embroidery patch, and woven label placement | Photos alone do not prove color; keep physical Pantone or lab dip approval separately |
| Construction record | Inside-out photo showing seam allowance, overlock, bartack, and handle reinforcement | Important for retail tote bags, event bags, bookstore bags, and heavier shopping totes | Poor lighting hides skipped stitches, loose threads, and uneven reinforcement boxes |
| Packing archive photo | One photo of folded unit, one of inner pack, one of export carton marking | Needed for warehouse intake, distributor relabeling, and repeat order checks | Packing changes can alter carton size, freight cost, and barcode scan result |
| Sample naming system | Buyer style code plus version number plus date, for example CTM-TOTE-2401-V3 | Best for teams reviewing multiple suppliers, fabric options, and logo revisions | Uncontrolled file names cause old samples to be approved by mistake |
Buyer checklist before sampling
- Assign one style code to the canvas tote bag before requesting samples, and use the same code on RFQ, artwork, sample tag, and file name.
- Photograph the full front, full back, side gusset, bottom, inside seams, handle attachment, label position, and packed unit before approval.
- Record fabric weight in both supplier language and buyer language, for example 12 oz canvas and approximate GSM, instead of relying on one term only.
- Measure body width, height, gusset, handle length, handle drop, seam allowance, and print position from bag edge, then photograph the ruler in place.
- Keep separate photos for print color, print edge quality, print hand feel, and print placement because one front photo cannot prove all four points.
- Include the final folded shape, polybag method, carton quantity, carton mark, barcode label, and any retail hangtag in the sample archive.
- Do not approve a canvas tote bag sample photo without confirming whether it is made from greige, bleached, dyed, washed, or pre-shrunk fabric.
- Compare the sample archive against the supplier quote before deposit: fabric weight, print method, handle material, MOQ, packing, lead time, and tolerance.
- Save rejected sample photos with rejection reason, not only approved samples, so the next sourcing round does not repeat the same mistake.
- Lock the approved sample version in writing before bulk fabric cutting, especially when multiple print colors, handle lengths, or private labels are involved.
Factory quote questions to send
- Which fabric weight are you quoting, in oz and GSM, and is the fabric greige, dyed, washed, or pre-shrunk?
- Can you provide sample archive photos for front, back, inside seam, handle reinforcement, print close-up, label, folded packing, and carton mark?
- Is the sample made on the same production line, same fabric source, same sewing method, and same print method planned for bulk production?
- What is the MOQ for this tote bag if we keep the fabric natural, and how does MOQ change for custom dyed canvas or special handle color?
- Which print method are you quoting: screen print, pigment print, heat transfer, digital print, embroidery, woven patch, or another process?
- What print size, number of colors, and placement tolerance are included in the quotation?
- What are your standard tolerances for bag size, handle drop, print position, fabric weight, and color shade?
- How many pre-production samples are included before bulk production, and what is the remake cost if artwork or fabric is changed after approval?
- What packing method is included: flat fold, half fold, individual polybag, master polybag, carton quantity, and carton size?
- What lead time starts after which approval point: deposit, artwork confirmation, fabric confirmation, print strike-off, or final pre-production sample approval?
Quality-control points to confirm
- Verify fabric weight and weave by comparing the approved sample photo, physical swatch, and quoted GSM or oz specification.
- Check canvas shade under consistent daylight or controlled light, not under yellow warehouse lighting only.
- Confirm bag measurements after flattening naturally, without stretching the fabric or pulling the handles.
- Inspect handle reinforcement for bartack, cross-stitch, or box stitch consistency according to the approved construction photo.
- Check print adhesion, edge sharpness, registration, and cracking risk based on the print method selected.
- Confirm the side label, woven label, care label, barcode, or hangtag position matches the approved sample archive.
- Review folded packing and carton quantity because packing changes can affect freight volume and retailer receiving requirements.
- Keep a signed or dated pre-production sample as the physical master, with archive photos used as the digital control record.