Why a Print Placement Memo Matters
A canvas tote bag print placement approval memo is a small document, but it controls one of the most common causes of production arguments: where the logo actually lands on the finished bag. Buyers often approve artwork as a clean digital file, while the factory produces on fabric that is cut, hemmed, sewn, folded, and packed. If nobody records the reference points and tolerances, both sides may believe they followed the order, yet the bulk goods still look wrong on the retail table.
For procurement teams, the memo is not just a design note. It is a commercial control document. It connects the purchase order, artwork file, approved sample, production worksheet, and final inspection standard. A good memo helps the importer compare supplier quotes fairly, because it forces every factory to explain whether the price includes sampling, screen setup, print positioning, sewing sequence, packing protection, and realistic production tolerance.
- Use the memo before the factory buys fabric, opens screens, or starts bulk cutting.
- Attach it to the RFQ so every supplier quotes the same artwork position and tolerance.
- Require factory confirmation if placement changes due to seam allowance, gusset depth, or handle position.
- Treat the signed memo as part of the approved sample package, not as a separate email comment.
Define the Finished Bag Before Placing the Print
Print placement should always be based on the finished canvas tote bag, not the flat fabric panel before sewing. This matters because the top hem may consume 25-40 mm of fabric, side seams may take 8-12 mm each side, and a bottom gusset may change the visible front panel height. If the artwork is positioned from the cut panel edge, it can move upward, downward, or off center after sewing.
In an RFQ, specify the finished width, finished height, gusset depth, handle length, and handle attachment style before discussing print location. A typical reusable canvas tote may use 10 oz or 12 oz cotton canvas, roughly 280-340 GSM depending on weave and finishing. Heavier canvas gives a more structured look but can reduce folding neatness and increase carton volume. Lighter canvas can be economical, but it may need extra testing for ink show-through and seam stability.
- State dimensions as finished size, for example 380 W x 420 H mm with 100 mm bottom gusset.
- Ask whether size tolerance is measured flat, opened, or after pressing.
- Confirm handle drop and stitch-box size because these affect logo clearance near the top area.
- If the bag has a side gusset, ask the factory to mark the usable front print area separately.
Choose Print References That Factory Operators Can Measure
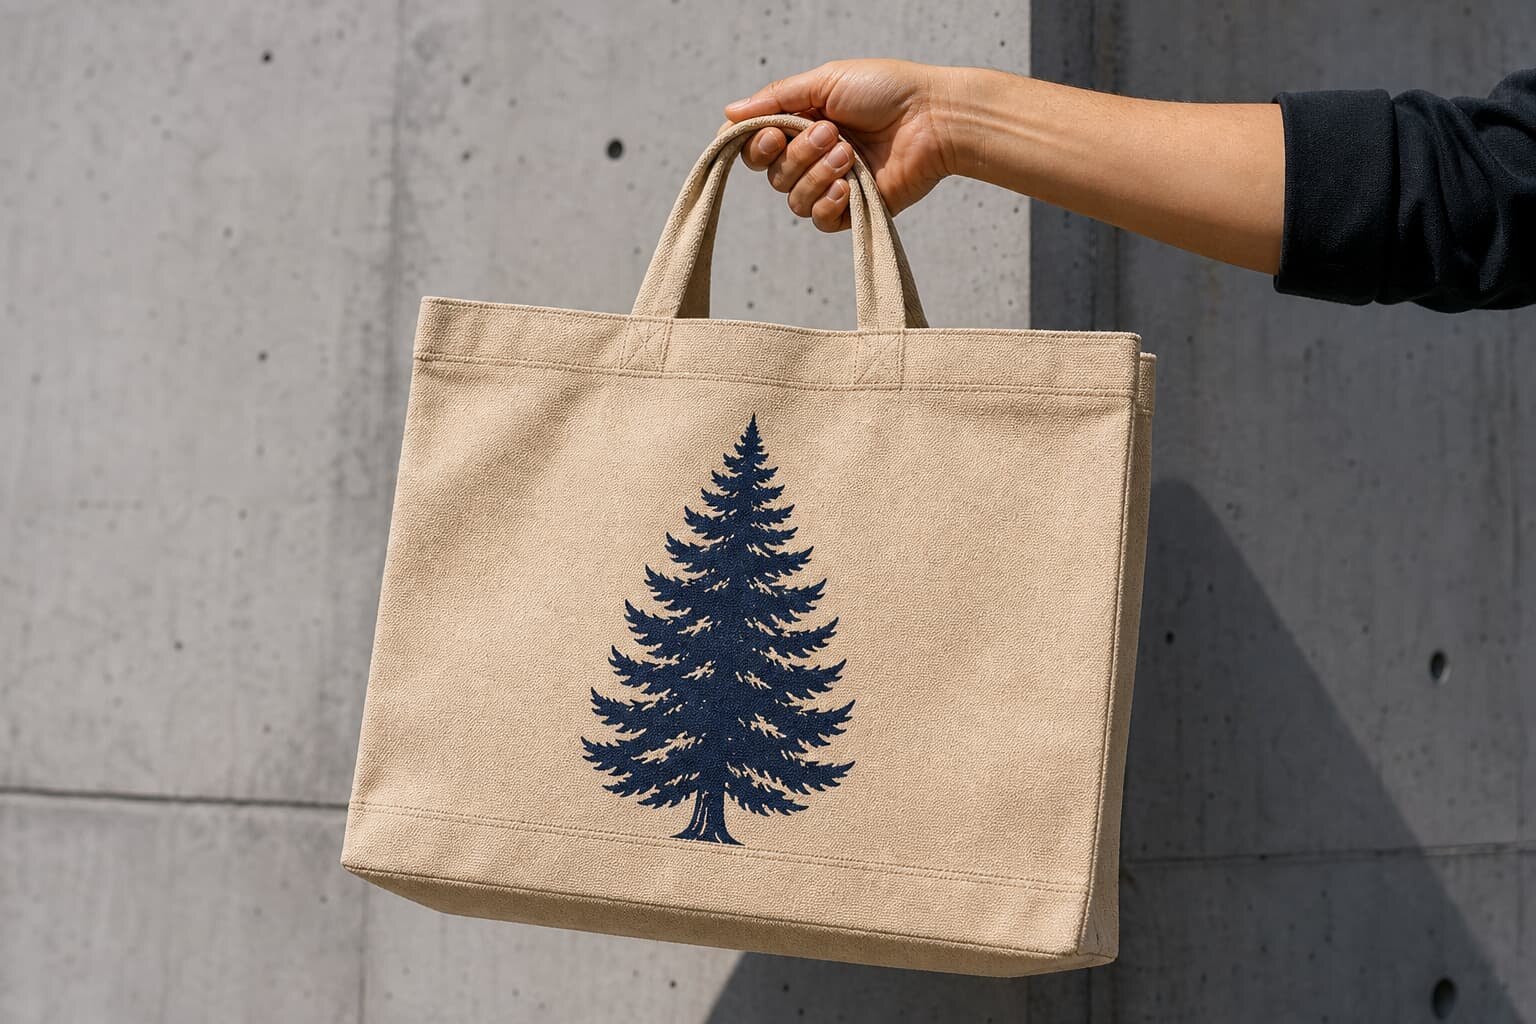
A useful approval memo does not say only center logo on front. It gives measurable references that a cutting, printing, and sewing team can repeat. For a front logo, the most practical references are distance from the finished top edge to the top of artwork, distance from each side seam to the artwork edge, and final artwork width and height. If the tote has a bottom gusset, also define the minimum distance from the bottom fold or gusset transition.
The factory should place a ruler on the pre-production sample and photograph these points. This is especially important when the print is applied before sewing, because the operator works on flat panels rather than finished bags. If printing is done after sewing, the printer needs a platen or support board that keeps the front panel flat without distorting seams, handle stitching, or the gusset area.
- Use finished top edge as the main vertical reference for standard front prints.
- Use visible side seams as the horizontal reference, not the unsewn fabric edge.
- Record artwork size separately from placement, because both can be correct or incorrect independently.
- For centered prints, still state the left and right distances expected on the approved sample.
Match Print Method to Artwork and Fabric Weight
Screen printing is usually the safest choice for bulk canvas tote bags with solid logos, simple graphics, and spot colors. It handles cotton canvas well, gives a durable result when ink is cured correctly, and scales efficiently when MOQ is large enough to absorb screen setup. For a one-color logo on natural 10 oz canvas, screen print is normally straightforward. For four-color artwork on dark dyed canvas, the supplier may need underbase printing, extra screens, and more drying control.
Digital print, DTF transfer, heat transfer, embroidery, woven labels, and patches can all be valid, but each changes the approval memo. Transfers require heat, pressure, peel conditions, and surface testing. Embroidery needs stitch count, backing, and fabric puckering control. Woven or sewn labels need seam position and label fold direction. If a supplier quote is much lower, check whether they changed the print method, reduced ink coverage, skipped underbase, or quoted a smaller artwork size.
- Screen print fits 1-4 spot colors, clear lines, and repeat bulk artwork.
- DTF or digital print fits gradients and small runs, but hand feel and wash testing need approval.
- Embroidery fits premium branding, but heavy stitch areas can pucker lighter canvas.
- Sewn labels are useful when artwork must avoid print cracking, but label MOQ may apply.
- Large solid ink areas need rub testing and curing confirmation before tight packing.
Set Practical Placement Tolerances
Canvas tote bags are sewn products, not rigid packaging. A realistic placement tolerance protects both buyer and factory. For common screen printed canvas totes, many buyers use plus or minus 5 mm for print position on standard sizes, with stricter approval only if the factory has confirmed it can hold that tolerance in production. Very large bags, soft fabric, heavy gussets, or printing after sewing may require a wider tolerance.
Do not write zero tolerance in the purchase order unless you are prepared to pay for the controls needed to approach it. Fabric relaxation, cutting stacks, sewing feed, pressing, and manual loading can all affect placement. Instead, define the acceptable range and the rejection rule. For example, a logo that is 5 mm low may be acceptable, but a logo touching the handle stitch box or entering the bottom gusset fold should be rejected because it changes the visible presentation.
- State vertical and horizontal tolerance separately if the design is sensitive.
- Define critical no-print zones around handle stitch boxes, side seams, top hem, and bottom gusset.
- Confirm whether tolerance is checked on flat-packed bags or opened bags.
- Use the approved sample as the visual standard, but keep numeric measurements in the memo.
Understand MOQ Logic Before Comparing Quotes
MOQ for printed canvas tote bags is not only about the number of bags. It can be affected by fabric color, fabric weight, artwork version, print color count, print method, handle color, label type, packing style, and carton mark. A factory may accept 500 pieces for a standard natural canvas tote with one-color screen print, but require a higher quantity for custom dyed canvas, multiple bag colors, or special ink. The approval memo helps reveal these hidden MOQ drivers.
When comparing quotes, ask suppliers to break out setup and variable costs. A low unit price may exclude screen charges, sampling, artwork adjustment, woven label MOQ, inner polybags, export cartons, or final inspection support. For distributors managing many logo versions, the key question is whether MOQ applies per artwork or as a combined order. If the factory needs separate screens and separate print setup for each logo, combined quantity may not reduce all costs.
- Ask for MOQ per bag color, per artwork, per print color, and per shipment.
- Separate sample fee, screen charge, bulk unit price, packing cost, and inland logistics if possible.
- Confirm whether the quoted GSM is stock fabric or needs weaving or dyeing.
- Check whether repeat orders can reuse screens and whether screen storage has a time limit.
Sample Approval: What to Check Before Bulk
A pre-production sample should prove more than logo appearance. It should confirm finished bag size, fabric weight, handle length, stitch quality, print color, print position, print size, and packing feasibility. Ask the factory to include measurement photos: ruler from top edge to artwork, ruler from side seam to artwork, ruler across artwork width, and a photo showing handle stitch-box clearance. These photos prevent later disagreement if the sample is shipped to one office and the bulk inspection happens elsewhere.
The buyer should also handle the sample like the end user will. Open the gusset, carry weight appropriate to the intended use, fold it as it will be packed, and rub the printed area with a clean white cloth after curing. If the fabric is dyed, check whether the print color shifts against the ground color. If the bag is natural canvas, check slubs and seed flecks are acceptable for the brand standard, because natural cotton texture can make large flat logos look less uniform.
- Weigh the sample or request a fabric GSM test record if GSM is critical.
- Measure the actual artwork, not only the digital file size.
- Check if print edges remain sharp on the canvas weave.
- Confirm the print is cured before approving rub or packing tests.
- Approve one golden sample and keep one factory duplicate for production reference.
Lead Time and Workflow Risks
Print placement approval affects lead time because it sits before several production steps. A typical workflow is artwork checking, material confirmation, sample making, buyer approval, bulk fabric cutting, printing, sewing, trimming, inspection, packing, and shipment booking. If approval is delayed after the factory has prepared screens or cut panels, any placement change may require rework or new material. This is why the memo should be approved with the sample, not after bulk production has started.
Lead time also changes according to fabric availability and print complexity. Stock natural canvas and one-color screen print are faster than custom dyed canvas, heavy canvas, multi-position printing, or special packing. Buyers should avoid accepting a shipment date until the factory confirms the approval deadline. A practical purchase order should show sample approval date, bulk start date, in-line inspection window, final inspection date, packing completion date, and cargo handover target.
- Freeze artwork placement before bulk cutting if the factory prints on panels.
- Add time for revised samples if the first sample fails placement, color, or fabric checks.
- Confirm curing time before packing, especially for large ink coverage or dark fabric.
- Align final inspection booking with real packing completion, not the first day of sewing.
Packing Details That Protect the Approved Print
Many print complaints are created after printing, not during printing. Fresh or poorly cured ink can offset onto another bag when stacked. Heat transfers can mark if folded sharply through the graphic. Natural canvas can absorb moisture if packed too tightly in humid conditions. The approval memo should therefore connect print placement with folding direction, stack quantity, polybag use, carton strength, and carton compression.
For retail buyers, packing also affects shelf presentation. If the logo is folded through the center, the front panel may show a crease across the artwork. If the carton is overfilled, handle stitch boxes and thick seams may emboss into the print surface. Ask the factory to show a packed sample or packing trial photo before mass packing. This is especially useful for large totes, heavy canvas, and bags with prints close to folds.
- Confirm whether each bag is flat packed, folded once, or folded into a retail polybag.
- Keep printed faces separated or protected if ink surface is sensitive.
- State carton quantity, carton size, gross weight limit, and carton marking content.
- Ask for moisture protection if shipping in humid season or long ocean transit.
- Do not approve tight vacuum-style packing for prints that may crease or block.
Quote Data Buyers Should Request
A supplier quote is only useful if it states what is included. For a canvas tote bag with print placement approval, the quote should include finished size, fabric composition, fabric weight, print method, artwork size, print colors, placement references, sample cost, bulk MOQ, packing method, lead time after approval, and payment terms. Without these details, a buyer may compare a complete factory quote against a simplified quote that will become more expensive later.
Ask each supplier to quote the same specification and return comments on manufacturability. An experienced factory will flag artwork too close to the top hem, fine lines that may fill on canvas texture, print size too large for the available platen, or a placement that conflicts with handle stitching. These comments are commercially valuable. They show whether the factory is reading the RFQ as a production file or only chasing the lowest unit price.
- Request fabric in both ounces and GSM where possible to avoid regional misunderstanding.
- Ask whether fabric shrinkage, pressing, and sewing tolerance are already considered.
- Require artwork file format, print size, and color reference in the quote sheet.
- Ask for the factory standard AQL or inspection method for print placement defects.
- Make exclusions visible, especially labeling, polybags, cartons, testing, and freight.
Specification comparison for buyers
| Spec decision | Recommended option | When it fits | Buyer risk to check |
|---|---|---|---|
| Front print position | Center artwork 70-90 mm below bag opening, measured from finished top edge | Standard retail, event, and promotional totes where logo visibility matters | If measured from fabric cut edge instead of finished top edge, bulk placement may shift after hemming |
| Fabric weight | 10-12 oz canvas or 280-340 GSM cotton canvas | Reusable shopping bags, gift-with-purchase bags, retail merchandise | Light fabric may show ink strike-through; heavy fabric may change bag shape and freight cost |
| Print method | Screen print for solid logos and spot colors | Bulk orders with 1-4 colors and stable repeat artwork | Artwork near side seams or handles can print unevenly if platen clearance is not confirmed |
| Digital print | DTF or digital pigment print after buyer approval | Short runs, gradients, multi-color graphics, seasonal artwork | Hand feel, wash resistance, and color matching may differ from screen print |
| Handle clearance | Keep artwork at least 25-35 mm away from handle stitch boxes | Totes with long handles, contrast handles, or reinforced X stitching | Print can overlap stitch lines if the memo ignores finished handle attachment position |
| Bottom gusset allowance | Keep main print above the folded bottom transition area | Box-bottom or side-gusset canvas totes | Artwork may distort when the bag is opened or packed flat |
| Approval sample | One physical pre-production sample with ruler photo and signed placement memo | Import orders, distributor programs, and retail launches | Photo-only approval can hide scale, ink thickness, and placement tolerance |
| Packing method | Flat pack with print face protected, carton not over-compressed | Screen printed or heat transfer canvas bags | Fresh ink or transfer surface may mark if bags are packed too soon or too tight |
Buyer checklist before sampling
- Confirm finished bag size, not cut panel size, before approving artwork placement.
- Mark the print placement from fixed references: finished top edge, side seam, bottom fold, and handle stitch box.
- State artwork size in millimeters and include print tolerance, usually plus or minus 5 mm for common tote production.
- Approve fabric weight in GSM or ounces, because thickness affects print absorption, bag shape, and seam allowance.
- Specify print method, color standard, ink type, and whether the artwork is printed before or after sewing.
- Request a pre-production sample with ruler photos showing top distance, side distance, and print size.
- Check whether MOQ changes when using multiple bag colors, multiple artwork positions, or separate print colors.
- Confirm packing direction, drying or curing time, inner polybag requirements, carton quantity, and carton markings.
- Ask the factory to show the print placement approval memo with the production worksheet before cutting or printing.
- Keep the signed memo attached to the purchase order, artwork file, and final inspection checklist.
Factory quote questions to send
- What finished tote size, fabric GSM, and shrinkage allowance are included in your quote?
- Will the artwork be printed on cut panels before sewing or printed on finished bags after sewing?
- What is your standard placement tolerance for canvas tote bag screen printing and heat transfer printing?
- How much clearance do you require from the top hem, side seam, bottom gusset, and handle stitching?
- Does your MOQ apply per artwork, per bag color, per print color, or per shipment?
- Can you provide one pre-production sample with measurement photos before bulk printing?
- Which print method is quoted, and what are the limitations for fine lines, gradients, metallic ink, or large solid areas?
- What curing, drying, or resting time is required before packing printed canvas bags?
- How are bags packed to prevent print offset, crease marks, moisture, and carton compression?
- What quote data is excluded, such as sampling cost, artwork setup, export carton, label, inspection, or freight?
Quality-control points to confirm
- Measure print placement from the finished top edge and side seams on the approved sample and bulk units.
- Check artwork size, logo proportion, print color, edge sharpness, ink coverage, and registration against the approved sample.
- Inspect print distortion around seams, gussets, handle stitch boxes, and folded bottom areas.
- Confirm fabric GSM, bag dimensions, handle length, seam strength, and shrinkage are consistent with the approved specification.
- Verify that ink is fully cured and does not transfer under reasonable rubbing, stacking, or carton pressure.
- Review packing quantity, folding method, carton strength, carton marks, polybag use, desiccant need, and pallet instructions.
- Keep the signed print placement approval memo available during in-line inspection and final random inspection.
- Record any accepted tolerance deviation in writing before shipment, not after the buyer receives goods.