Use the photo packet as a shipment hold point
A canvas tote bag preload photo set photo packet is a controlled set of production photos sent before goods are fully packed, sealed, or released. For procurement buyers, it should answer a practical question: are the bags being produced and packed according to the PO, approved sample, artwork file, and warehouse requirement? It is not a replacement for sampling or inspection, and it is not a lifestyle gallery for marketing use.
The timing matters. If photos arrive too early, they may show only a sample-room piece. If they arrive after cartons are sealed, wrong folding, label placement, barcode use, or carton marks become harder and more expensive to correct. The strongest workflow places the photo packet after real bulk output is available, after basic inline checks, and before mass carton sealing.
- Use the packet as a formal release checkpoint before final packing continues.
- Tie every packet to PO number, SKU, sample number, artwork version, and carton mark version.
- Request actual bulk pieces, not only the approved sample or a polished showroom unit.
- Require written approval with date, approver name, accepted deviations, and open corrective actions.
- State clearly that photo approval does not replace final inspection or agreed testing.
Start with the order risk, not with a generic photo list
Many suppliers will send three quick images if the buyer simply asks for photos: front of bag, folded bag, and carton. That may be enough for a reorder with a trusted factory and simple bulk packing, but it is weak for a new retail program, custom dyed fabric, multi-color logos, barcode-controlled packing, or a shipment going directly to a 3PL. The photo packet should be built around the risks that can still be corrected at preload stage.
A low-cost event tote usually needs proof of fabric weight, logo position, handle drop, folding, and carton quantity. A retail tote may need hangtag, barcode, seam finish, thread trimming, label alignment, and shelf presentation checks. A heavier grocery or utility tote should show handle reinforcement, bottom seam, gusset, and load-related construction details. A distributor order with several artwork versions needs clear SKU separation so the warehouse does not receive mixed or mislabeled cartons.
- For event giveaways, prioritize dimensions, logo placement, fabric weight, handle length, and carton count.
- For retail shelves, add barcode, hangtag, label placement, folding quality, trimming, and carton marks.
- For heavy-duty totes, show handle attachment, bottom corners, gusset seams, and reinforcement method.
- For multi-SKU programs, photograph each color, artwork version, size, label version, and carton mark.
- For direct-to-warehouse shipments, include barcode scan proof and receiving-label placement.
Confirm canvas fabric weight, shade, and finish
Canvas tote bag pricing is often compared by 8 oz, 10 oz, 12 oz, or 16 oz fabric. Some factories quote the same fabric in GSM, such as about 270 GSM, 340 GSM, 400 GSM, or heavier. These figures are useful only when the buyer understands what is being measured. Greige fabric, finished fabric, washed canvas, coated canvas, and dyed canvas can feel different even when the quoted number looks similar.
A photo cannot prove exact GSM, but it can reveal obvious problems: loose weave, unexpected stiffness, a thinner body, a grey or yellow natural tone, shade mismatch between panels and handles, or fabric that does not resemble the approved sample. Request fabric close-ups from bulk rolls and finished bags. If shade is important, ask the supplier to photograph bulk production next to the approved swatch or lab dip under consistent neutral light, not under dramatic showroom lighting.
- Quote fabric by both ounce weight and GSM where possible.
- Clarify whether the weight refers to greige fabric, finished fabric, dyed fabric, washed fabric, or coated fabric.
- Ask for a fabric cut-weight record or internal GSM check when weight affects price or compliance.
- Photograph bulk canvas beside the approved sample, swatch, or lab dip.
- Check whether handles and bag body use the same fabric lot or intentionally different materials.
- Define acceptable natural cotton specks, shade variation, slubs, and weave irregularity before production.
Make logo photos useful enough to prevent disputes
Logo problems rarely start with a missing logo. They usually involve size, position, color, opacity, edge quality, curing, distortion, or texture. A one-color screen print on natural canvas has different risk from a full-color heat transfer, pigment print, embroidery, woven label, or patch. The photo packet should show the decoration in a way that lets the buyer judge both layout and workmanship.
Ask for three levels of logo photos. The full front or back view confirms overall placement. A ruler photo confirms print size and distance from bag edges. A close-up confirms edge quality, ink coverage, transfer border, embroidery density, label alignment, or thread trimming. If the artwork has small text, QR codes, fine lines, or strict brand color, photos should support the decision but not replace a physical print sample or agreed color standard.
- For screen print, check opacity, registration, pinholes, curing marks, and edge softness on textured canvas.
- For heat transfer, check press shine, border marks, peeling risk, handfeel, and film alignment.
- For digital or pigment print, check banding, color build, sharpness, and surface absorption.
- For embroidery, check backing, thread density, puckering, loose thread, and logo distortion.
- For woven labels or patches, check content, fold, stitch line, placement, and contrast.
- For QR codes or small text, request a scan or readability check in addition to a close-up photo.
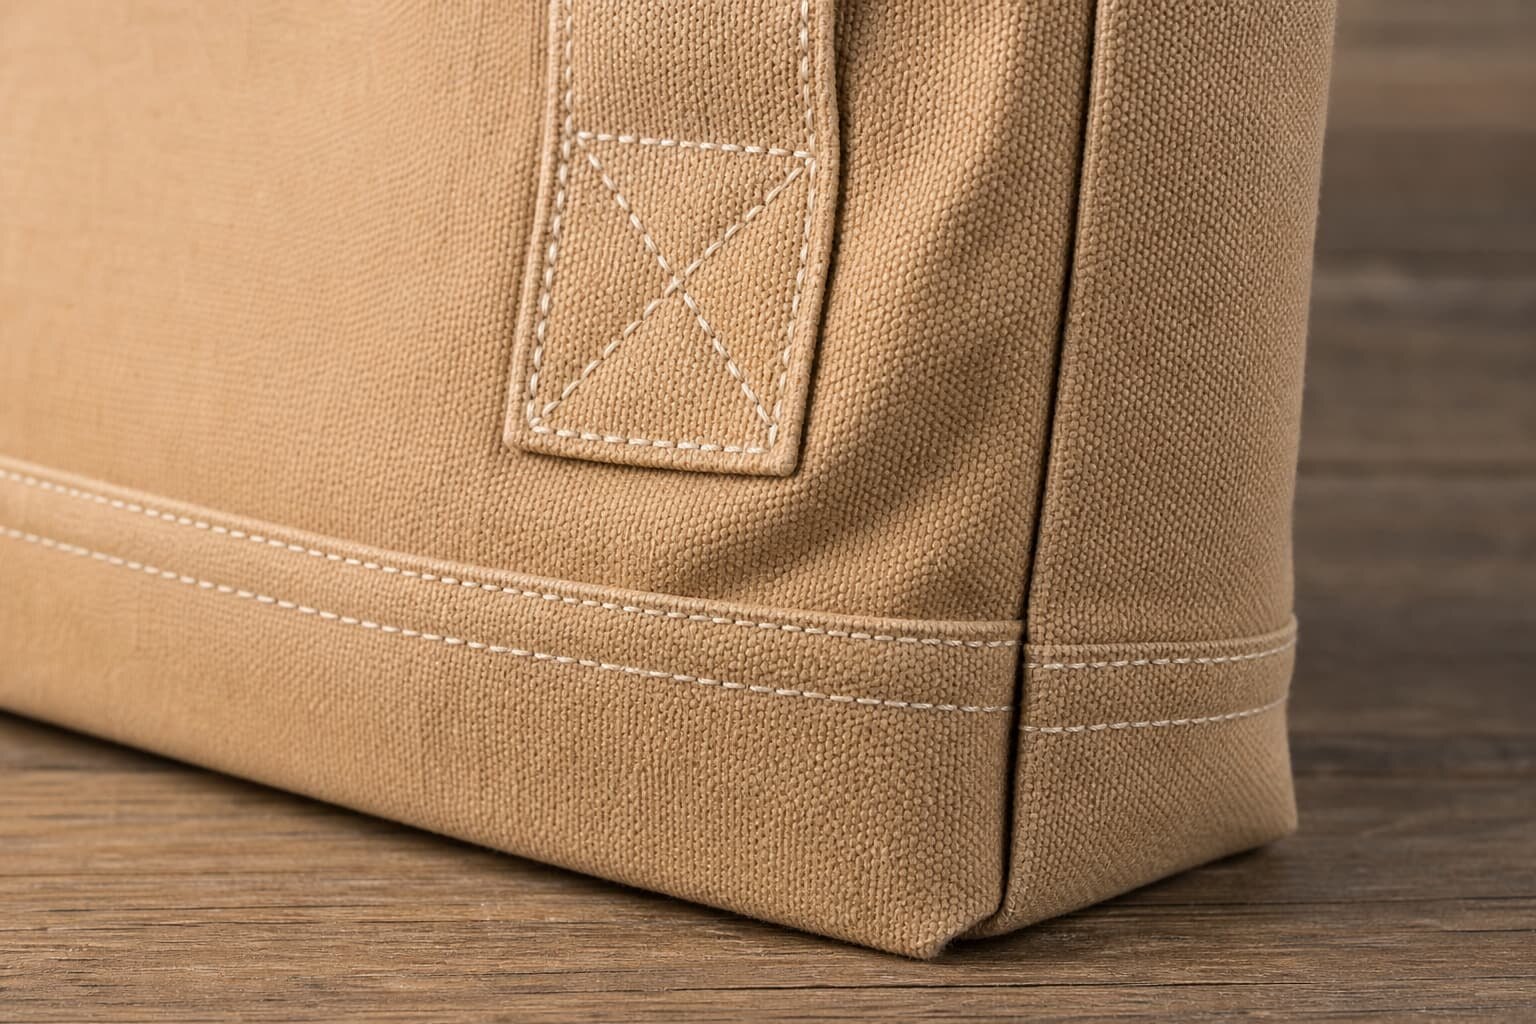
Photograph construction where failures usually happen
Canvas totes look simple, but construction differences are easy to hide in distant photos. Handle attachment is the most important area because it carries the load and receives repeated stress. A low quote may use narrower handles, fewer stitches, loose thread tension, shorter reinforcement, or a single row where the buyer expected a box stitch or cross stitch. The preload packet should make these details visible.
The packet should also show side seams, bottom corners, gusset seams, inside seam finish, and any pocket, zipper, snap, lining, or binding. Buyers should avoid vague instructions such as strong sewing or good stitching. Use clear construction language in the specification: handle width, handle drop, stitch type, stitch location, reinforcement size if critical, and seam finish. If the bag is intended to carry heavier items, photos should be paired with a load-test requirement or agreed internal test, not used as the only proof of strength.
- Show handle attachment from the outside and inside of the bag.
- Confirm box stitch, cross stitch, bartack, double row, or other specified reinforcement.
- Check stitch density, skipped stitches, broken thread, loose thread tails, and thread color.
- Show side seam, bottom seam, gusset corner, and inside overlock or binding.
- For lined or zippered totes, photograph zipper ends, lining attachment, pocket sewing, and snap alignment.
- Use construction photos together with measurement records and load-test references when strength matters.
Write acceptance criteria into the PO before production
A preload photo packet works best when the buyer has already defined what will be accepted. Comments such as same as sample, good quality, correct color, or normal packing leave too much room for disagreement. The PO, tech sheet, or approved specification should list measurable requirements: finished dimensions, fabric weight, handle drop, print size, print location, seam finish, packing method, carton quantity, barcode position, and carton mark content.
Tolerances should be practical for sewn cotton goods. Canvas can relax after sewing, and natural cotton can vary in shade and texture. That does not mean everything is acceptable. It means procurement should identify the critical items. A 5 mm logo shift may matter for a premium retail bag. A small natural cotton slub may be acceptable on an eco-style promotional tote. The photo packet then becomes a way to confirm known criteria, not a negotiation about expectations after production is already underway.
- State finished width, height, gusset depth, handle drop, and handle width with tolerances.
- State fabric weight, color reference, approved sample number, and acceptable shade variation.
- State print size, print position from top and side edges, decoration method, and color standard.
- State handle reinforcement, seam finish, thread color, pocket details, zipper or snap specification, and label placement.
- State folding method, insert card, hangtag, polybag, barcode, units per carton, carton mark, and destination label rules.
- State that approved photo deviations must be documented and shared with inspection and receiving teams.
Use a concise but complete preload photo set
A strong packet does not need dozens of duplicate photos. It needs the right photos in a clear order. Ask the factory to name the files or place them into sections so a remote buyer can review quickly: product overview, measurements, fabric, logo, construction, packing, carton, and QC support. If there are multiple SKUs, each set should identify the SKU, color, artwork version, and carton mark.
For simple one-color printed totes, 14 to 20 useful photos are often enough. Complex retail bags, lined bags, zippered totes, mixed colors, or multiple logo versions need more. The key is coverage, not volume. A packet with 60 unclear photos is weaker than 18 sharp images with rulers, close-ups, sample comparison, and packing proof.
- Full front and back views of the finished bag lying flat.
- Approved sample beside bulk production piece for shade, shape, logo, and construction comparison.
- Ruler photos for bag size, gusset, handle drop, handle width, print size, and label position.
- Close-ups of fabric weave, logo edge, handle stitching, side seam, bottom seam, and inside finish.
- Photos from at least two bundles or production points when order size or risk justifies it.
- Packing sequence from unfolded bag to folded bag, polybag or bundle, carton arrangement, carton mark, and sealed carton.
Check packing and carton details before they create receiving costs
Canvas tote problems often appear at the warehouse, not at the sewing table. The bag may be acceptable, but receiving can still fail if the carton mark is wrong, the carton quantity does not match the ASN, the barcode is unreadable, the bags are folded across the print, or mixed SKUs are not separated. These errors create relabeling cost, chargebacks, shipment delays, and avoidable arguments between buyer and supplier.
The preload packet should show the exact packing flow. One photo should show the bag before folding so the buyer can confirm print and trim. Another should show the fold direction. Then show the insert card or hangtag, barcode, polybag warning if used, bundle quantity, inner carton arrangement, master carton mark, and carton size. If the shipment goes to a retailer, 3PL, event warehouse, or marketplace fulfillment center, provide label rules early; the factory should not guess them at preload stage.
- Confirm printed areas are protected from rubbing, transfer marks, or fold creases during transit.
- Check insert card, hangtag, barcode, polybag size, warning text, suffocation holes if required, and seal method.
- Verify units per bundle, units per carton, carton dimensions, gross weight, net weight, and CBM estimate.
- Check carton mark spelling, PO, SKU, color, size, quantity, country of origin, destination, and carton numbering.
- Request a barcode scan photo when barcode accuracy affects receiving, retail checkout, or fulfillment.
- For mixed SKUs, require carton-level identification and a photo of separation method inside the carton.
Plan the approval workflow into lead time
Preload approval should be on the production calendar, not added after the goods are packed. A realistic schedule includes sample approval, material sourcing, bulk fabric check, cutting, printing, sewing, trimming, inline QC, preload photo packet, buyer review, correction if needed, final packing, final inspection, carton sealing, and shipment booking. If the buyer wants a photo packet but does not reserve review time, the order can still be delayed.
Assign one decision owner. Procurement, brand, quality, and warehouse teams may all care about different details, but the factory needs one consolidated response. Mark comments as critical hold items or minor corrections. Critical items include wrong fabric, wrong print position, barcode error, wrong carton quantity, or weak handle construction. Minor items may include loose threads that can be trimmed before packing. Written approval should state whether the factory can continue packing, must rework, or must hold shipment pending inspection.
- Set the photo packet due date after first bulk goods are complete and before mass carton sealing.
- Define the buyer response time, especially for urgent campaigns or vessel cut-off dates.
- Separate critical hold items from minor trimming or packing comments.
- Keep goods unsealed until approval when packing errors would be expensive to correct.
- Send the approved packet to the inspection company, forwarder contact, or receiving team when relevant.
- Record approved deviations so final inspection does not reject an item the buyer already accepted.
Compare supplier quotes with photo support included
A lower unit price is not always a better landed result. For canvas tote bags, price differences may come from fabric weight, handle construction, print method, label quality, packing material, carton strength, inspection support, or service level. A supplier who includes a structured preload photo packet, measurement records, and clear packing proof may prevent costs that do not appear in the first quote.
When comparing quotes, make the photo packet requirement part of the RFQ. Ask each supplier to confirm the same fabric target, same dimensions, same decoration, same packing, same carton data, and same preload approval process. This keeps the comparison focused on real value rather than the cheapest interpretation of a loose request.
- Compare quotes using identical GSM or ounce weight, bag size, handle drop, print method, and packing method.
- Ask whether sample cost, print setup, label cost, carton cost, testing, and preload photo support are included.
- Confirm MOQ separately for fabric color, artwork version, size, label version, and custom packing.
- Ask what rework is possible if preload photos reveal errors before final packing.
- Use the packet to validate service discipline, not just product appearance.
- Do not approve shipment from photos alone when supplier history, order value, or compliance risk calls for inspection.
Specification comparison for buyers
| Photo packet item | What buyer should see | Best use case | Risk if missing |
|---|---|---|---|
| Bulk fabric proof | Fabric close-up, approved swatch comparison, GSM or ounce reference tag, and shade photo under neutral light | Orders where canvas weight, natural shade, dyed color, or handfeel affects retail value | Supplier may substitute lighter fabric, different weave, or a shade that does not match the approved sample |
| Ruler measurement photos | Bag width, height, gusset, handle drop, handle width, print size, and label position measured flat without stretching | Any custom size, shoulder-carry tote, boxed gusset tote, or brand-controlled artwork layout | Dimensions can drift after sewing, and a bag that looks correct in a front photo may fail fit or brand placement requirements |
| Logo and decoration close-ups | Full front view, angled surface view, close-up of print edge, color reference, and any embroidery or label detail | Screen print, heat transfer, digital print, pigment print, embroidery, woven label, or multiple artwork versions | Logo disputes may appear after packing: wrong size, off-center placement, weak ink coverage, transfer shine, puckering, or unreadable small text |
| Handle and stress-point construction | Handle attachment, stitch box or cross stitch, bartack, stitch density, thread trimming, and inside seam finish | Retail totes, grocery totes, trade show bags with catalogs, and heavier 12 oz to 16 oz canvas styles | Weak reinforcement can pass a quick beauty photo but fail during use, causing complaints or returns |
| Packing sequence | Unfolded bag, folded bag, insert or hangtag, polybag, barcode, inner bundle, carton arrangement, and carton sealing method | Distributor, retail, fulfillment center, promotional kit, and multi-SKU shipments | A correct bag can still create receiving problems if folding, label placement, carton quantity, or barcode detail is wrong |
| Carton and logistics data | Carton mark, SKU, PO, destination, carton quantity, carton size, gross weight, net weight, and loading estimate | Orders shipping to 3PLs, retailers, event warehouses, or importers consolidating multiple suppliers | Receiving teams may reject, delay, or relabel cartons if outer marks and declared quantities do not match |
| Random production coverage | Photos from more than one bundle, sewing line, color, size, or artwork version, with each SKU clearly identified | Large orders, split production, repeat programs with many versions, and orders from new suppliers | Factory may photograph only the cleanest piece or easiest SKU, leaving variation hidden until final inspection |
| QC record support | Photo packet paired with measurement sheet, defect notes, rub-test or load-test reference, and final inspection plan | Higher-risk retail programs, first orders, heavier bags, or orders with strict brand standards | Photos alone cannot prove defect rate, fabric weight, print curing, seam strength, or AQL acceptance |
Buyer checklist before sampling
- Match the preload photo packet to the PO number, SKU, artwork version, approved sample number, fabric weight, packing method, and carton mark version.
- Require ruler photos for finished bag width, height, gusset depth, handle drop, handle width, print size, logo position, label position, and packed unit size.
- Check close-ups of fabric weave, canvas shade, print edge, ink coverage, handle reinforcement, side seam, bottom seam, inside seam finish, and any pocket, zipper, snap, lining, or label.
- Ask for photos from actual bulk pieces, not only the sealed sample; for larger orders, request random pieces from different bundles or sewing lines.
- Verify the packing flow: folded direction, insert card or hangtag, polybag warning, barcode placement, bundle count, carton quantity, carton mark, and carton condition.
- Compare the preload images with the approved pre-production sample and note any accepted deviation in writing before final packing continues.
- Keep photo approval separate from final QC approval; photos help release a hold point but do not replace measurement records, testing, or AQL inspection for high-risk orders.
Factory quote questions to send
- Can you include a canvas tote bag preload photo set photo packet before final carton sealing, and what production stage will trigger it?
- Will the packet show actual bulk goods from random production pieces, or only one approved production sample?
- Which fabric is quoted: ounce weight, GSM, yarn type if available, natural or dyed canvas, washed or unwashed finish, and stock or custom fabric?
- Can you provide a fabric cut-weight record or internal GSM check for the selected canvas before bulk cutting?
- What decoration method is included: screen print, pigment print, heat transfer, digital print, embroidery, woven label, patch, or another process?
- What are the MOQ breaks for fabric color, bag size, artwork version, label version, packing method, and mixed-SKU cartons?
- How many photos are included in your standard preload packet, and will they show ruler measurements, logo close-ups, construction details, packing, carton marks, and barcode scans?
- Can the quote separate fabric, cutting, sewing, print setup, decoration unit cost, label cost, packing materials, carton cost, testing, inspection support, and inland freight?
- What sample lead time, bulk lead time, photo approval window, packing time after approval, and shipment booking timing should we plan?
- If photos show a mismatch, what rework is possible before final packing, what cannot be corrected, and how will responsibility for cost and delay be handled?
Quality-control points to confirm
- Fabric GSM, weave, shade, coating or washing finish, and handfeel should match the approved bulk reference within agreed tolerance; photos should be supported by a fabric record when weight matters.
- Finished dimensions should be measured after normal sewing relaxation and without pulling the bag flat to force the target size.
- Print size, position, opacity, registration, curing, transfer adhesion, embroidery density, label placement, and color tolerance should be checked before folding or polybagging.
- Handle reinforcement should show consistent stitch density, correct box stitch, cross stitch or bartack placement, no skipped stitches, no broken thread, and clean trimming on visible areas.
- Inside construction should show the agreed seam finish, pocket construction, zipper tape, snap position, lining, binding, or overlock quality where applicable.
- Packing should match the buyer receiving rules for folding, insert card, hangtag, barcode, warning text, bundle count, carton quantity, carton mark, and pallet or loading instruction.
- Photo approval should be treated as a shipment hold point, but it should not waive defects found during inline inspection, final inspection, testing, or warehouse receiving.