Why the handle spec sheet decides whether a tote works
Most canvas tote problems do not start with the body fabric. They start with the handle. A tote can look clean on a sales sample and still fail in use if the handle is too narrow, too short, too stiff, or attached with weak reinforcement. That is why a canvas tote bag handle spec sheet should be treated like a working production document, not a one-line note in the RFQ. If the handle is not clearly defined, every factory will fill in the gaps with its own default construction, and those defaults will not always match your use case.
For procurement teams, the handle spec sheet is also a quote control tool. It lets you compare suppliers on the same basis instead of comparing one factory's short hand-carry strap against another factory's shoulder-length webbing. When the handle is written down in measurable terms, you can judge comfort, cost, lead time, and risk before the order is placed. That is the difference between a tote that looks acceptable on paper and a tote that holds up on the retail floor or at an event.
- Use the handle sheet to lock down dimensions, construction, and reinforcement before sampling starts.
- Treat handle comfort and load carry as part of the product spec, not as a styling choice.
- Make the handle spec visible in the RFQ so suppliers do not submit quote apples and oranges.
Start with use case, load target, and bag size before choosing a handle
Before you talk about stitch counts or bartacks, define how the tote will be used. A lightweight giveaway bag for brochures, a retail shopping tote, and a reusable market bag all need different handle behavior. As a practical rule, a tote meant for light promotional use may be fine with a simpler, shorter handle, while a retail tote that carries daily purchases needs a wider handle and stronger reinforcement. If you do not set the load target, the factory will guess based on its own standard and may overbuild or underbuild the handle.
Bag size also changes the handle equation. A compact tote does not need the same drop or width as a deep, boxy body. If the body is wide, a short handle may dig into the shoulder or make the bag sit awkwardly under load. If the bag is tall, a handle that is too long can swing, twist, or rest too low on the body. The best spec sheets start with the end use, then translate that into a handle that supports the actual carry experience.
- Light promo tote: focus on low cost, simple carry, and short-term use.
- Retail or resale tote: prioritize comfort, repeat use, and clean reinforcement.
- Heavier carry tote: set a load target first, then design width, layer count, and stitch pattern around it.
Define handle material, width, and fabric weight with numbers
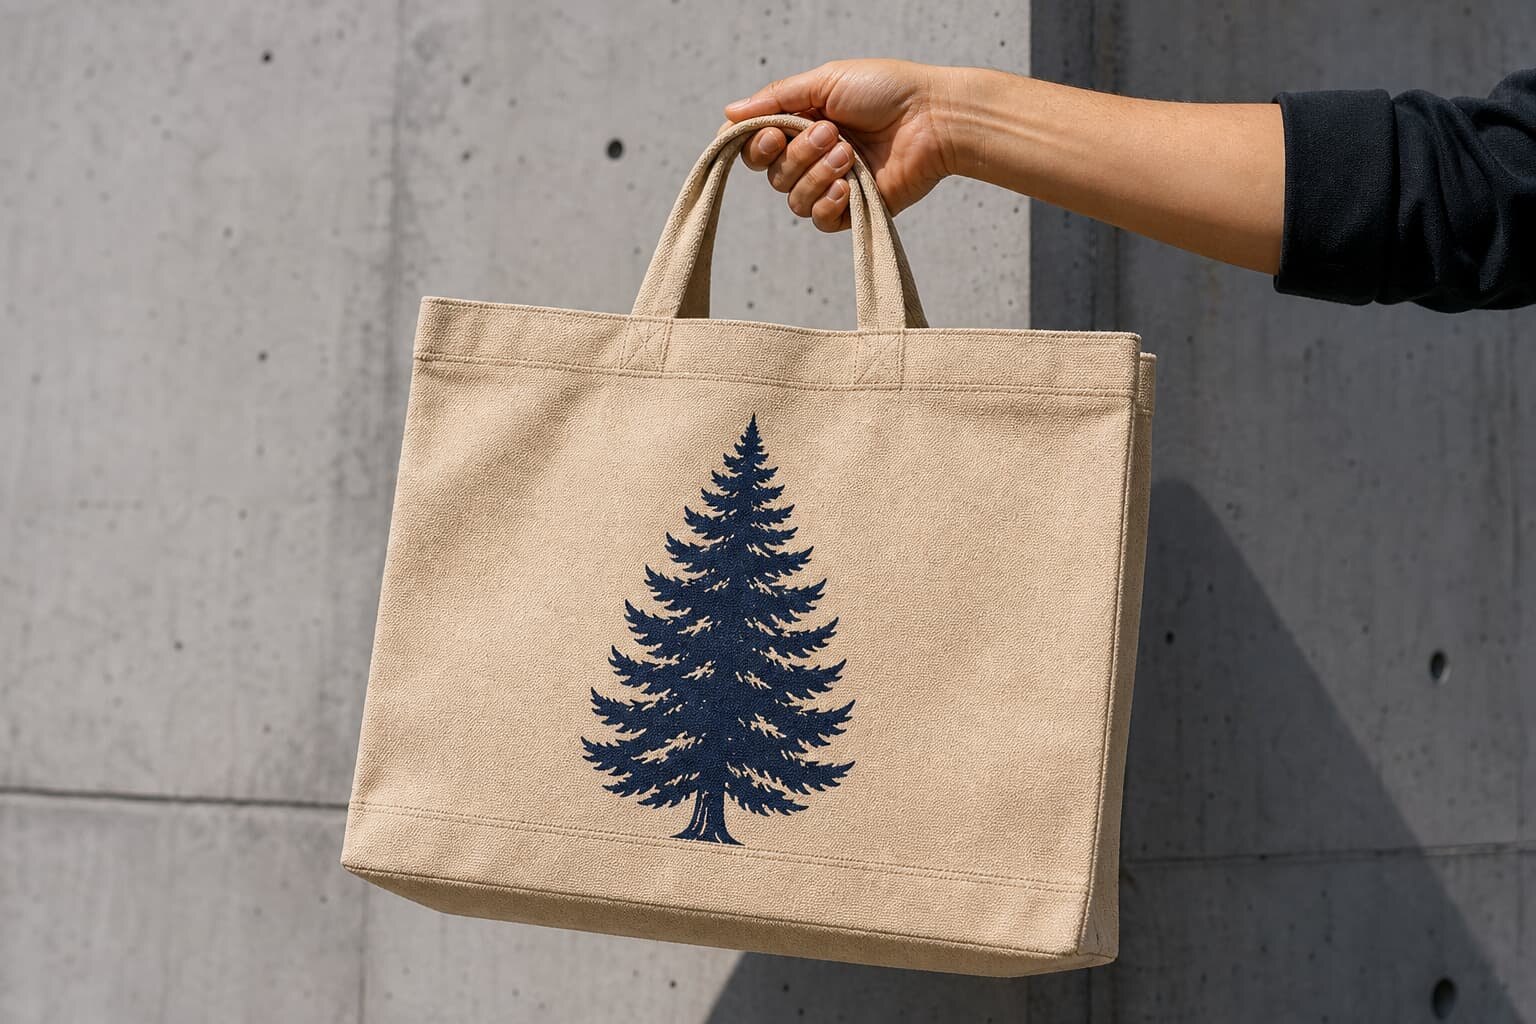
For canvas tote bags, the handle is usually either self-fabric cut from the same canvas as the body or a separate woven cotton tape. Self-fabric gives a cohesive look, but it can feel bulkier if the body fabric is heavy. Woven cotton tape often gives a cleaner, flatter grip and can be easier to sew consistently, especially when the handle is wider than the body seam allowance. If you want a more premium hand feel, you may need a heavier tape or a double-layer self-fabric handle so the strap does not collapse under load.
Fabric weight matters because a handle inherits stress from the bag body, not just the item inside. For example, a body at 200 to 240 GSM may still need a stronger handle build if the bag is intended for repeat retail use. A heavier body at 280 to 320 GSM can support a self-fabric handle better, but only if the fold, stitch line, and reinforcement are set correctly. In the RFQ, do not say 'strong handle'; say the finished width, cut width, fabric GSM, layer count, and whether the handle is folded, bound, or double-sewn.
- Self-fabric handles work well when you want a natural cotton look and body-matched appearance.
- Cotton tape handles work well when you want flatter grip, cleaner edges, and easier repetition in sewing.
- Always specify whether GSM refers to the body only or to both body and handle material.
Set handle length and drop for real-world comfort
Handle length should be written in a way that the factory can measure the same way every time. The most common mistake is mixing cut length with finished length and then finding that the first sample carries differently from the approved drawing. For buyer clarity, define the finished handle length and the drop, and state whether that measurement is taken from seam point to seam point or from loop apex to attachment point. If your supplier uses a different method, ask them to show it on a sample sketch before approval.
The handle drop should match the carrying style. Short drops work for hand carry and compact promotional bags. Medium drops are usually better for shopper totes that may sit on a shoulder briefly. Longer drops help when the bag needs to be carried over outerwear or when the user is moving between retail and transit settings. A handle that is too short causes the top edge to pinch; a handle that is too long can make the tote swing and hit the body. The spec sheet should include a loaded sample check, not just a flat measurement.
- Write the measurement method into the spec so the sample and bulk production are compared the same way.
- Test handle drop with a filled bag, not an empty shell.
- If the tote will be sold as a shoulder-carry item, say so directly and set the drop around that use.
Choose reinforcement and stitch patterns that prevent handle failure
The handle usually fails at the attachment point, not in the center of the strap. That means the spec must cover reinforcement, stitch pattern, and thread quality as clearly as it covers width and length. For canvas totes, box-X stitching with bartacks is a common choice because it spreads the load across the join. Dense top-stitching can work on lighter bags, but only if the placement is controlled and the load is modest. If the bag will be reused often or filled heavily, ask the factory what reinforcement pattern it recommends and require that it show the same pattern on both sides.
Thread selection also matters. A strong handle sewn with weak thread is still a weak handle. Ask for the thread type, thread color, and the number of passes or bars used at the reinforcement point. If the bag body is lightweight but the handle is wide, the sewing can pucker the upper hem unless the stitch density is balanced. This is where a good sample sheet helps: it prevents a factory from changing the construction to save time without warning you that the top edge will look bulky or uneven.
- Use box-X or box-X plus bartack when load spread and repeated use matter.
- Ask for thread specification if the bag is meant for heavier contents or retail resale.
- Check that both handles mirror each other, including reinforcement placement and stitch density.
Keep print, branding, and handle placement from fighting each other
Handle design affects print design more than many buyers expect. If artwork reaches close to the top of the tote, the handle anchor can block the print area, distort the image, or create a visible gap that makes the bag look unbalanced. That is why the spec should state a print-safe zone around the upper edge and around each handle attachment point. If the same bag will be offered in multiple print methods, your handle spec needs to stay stable so the print area does not shift from one run to the next.
The print method itself can change the handle decision. Screen print on canvas usually wants a clean, flat print area and enough distance from thick seams. Heat transfer, embroidery, or patch branding may be more tolerant of a nearby handle, but each method changes stiffness and production sequence. If the handle crosses or crowds the branding area, tell the factory whether the handle is sewn before or after printing. That simple line can save a costly rejection when the finished bag hides part of the artwork or the print cracks near a hard seam.
- Reserve a clear print zone around the handle anchor in the tech pack.
- State the production sequence if print placement depends on when the handle is sewn.
- If you use embroidery or patches, check stiffness near the top hem so the tote still folds neatly.
Use the handle spec to control MOQ, sample cycles, and lead time
Handle choices affect MOQ and lead time more than many buyers realize. A standard handle made from the factory's common tape or stock canvas is usually easier to quote and sample. A custom width, a special dyed tape, a double-layer folded construction, or a nonstandard reinforcement pattern may trigger new material sourcing and a higher MOQ. That is not a reason to avoid custom specs, but it is a reason to ask for the MOQ logic in writing before you approve the sample. If the supplier needs extra time or a larger fabric run, you should know that early enough to adjust your launch plan.
Sampling should be treated as a handle approval process, not only a bag approval process. Ask for a pre-production sample that shows the exact handle material, width, drop, reinforcement, and packing method. Then test it in the same way the end user will use it: fill it, carry it, fold it, and inspect the seams after carrying. If the handle changes after sampling, even slightly, you should expect the quote and lead time to change as well. The spec sheet should therefore lock the approval sample into the production record.
- Ask whether the factory is quoting stock handle material or a special order.
- Treat handle changes as a cost and lead time change, not a cosmetic detail.
- Approve a physically measured sample before bulk, and keep that sample as the reference.
Write an RFQ that lets factories quote the same handle spec
A clean RFQ is the fastest way to compare tote quotes. If one supplier quotes a 25 mm self-fabric handle and another quotes a 38 mm cotton tape handle with box-X reinforcement, the numbers cannot be compared fairly unless the spec sheet names every variable. Your RFQ should ask for quote data by line item: body fabric GSM, handle material, handle width, handle length, reinforcement type, stitch detail, print method, folding or packing method, sample lead time, production lead time, and MOQ. This is the level of detail a sourcing team needs if the bag will be reordered later.
You should also ask the factory to flag any assumed values. Some suppliers will silently substitute a default handle length, a narrower tape, or a cheaper stitch pattern if the specification is incomplete. Make it easy for them to answer clearly by including a sketch or annotated measurement sheet. Then ask them to confirm where the handle begins and ends, which sewing operation creates the reinforcement, and whether the quoted carton pack changes if the handle is bulkier than standard. Those answers tell you more about the supplier's discipline than the price line alone.
- Break the quote into fabric, handle, sewing, print, packing, and carton data.
- Ask suppliers to confirm all assumed dimensions in writing.
- Use one shared sketch for all bidders so no one interprets the handle differently.
Set acceptance criteria before bulk, then inspect the failure points
Acceptance criteria are the part of the spec sheet that saves the most money. A buyer who writes down a tolerance for handle length, width, stitch location, and twist angle can reject a bad run before it reaches distribution. A buyer who only says 'good quality' leaves room for a factory to defend almost any result. The criteria should include measurable items such as acceptable length variation, where the bartack must sit, how many loose threads are allowed, and whether the handle may twist after folding and packing.
The final inspection should test the tote as a product system. Look at the handle, the top hem, the print area, the side seams, and the folded carton pack together. A handle that looks neat on its own may still create bulk that causes the bag to pack poorly or arrive creased. Likewise, a handle that is strong but too stiff can make the tote sit awkwardly on shelf. The best buyer review checks function, appearance, and pack-out at the same time, because production mistakes often show up at the intersection of those three things.
- Write tolerance limits for length, width, and reinforcement placement.
- Inspect a stuffed sample and a packed sample, not just a flat sample.
- Record one approved golden sample with photos, measurements, and sewing notes.
Specification comparison for buyers
| Spec decision | Recommended option | When it fits | Buyer risk to check |
|---|---|---|---|
| Handle material | Self-fabric canvas or cotton webbing | When you want a natural look and a consistent cotton story | Check if the chosen material stretches, curls, or feels too thin in hand |
| Finished handle width | 25 mm for light carry, 38 mm for daily retail use, 50 mm for heavier carry | When bag load and shopper comfort matter more than lowest cost | Check if the width matches the body size and the sew allowance at the top edge |
| Handle length and drop | Set by end use: hand-carry, shoulder-carry, or extended shoulder drop | When the bag must work for a specific user behavior or retail channel | Check if the handle clears the body print and still feels balanced when loaded |
| Reinforcement method | Box-X with bartack or dense top-stitch reinforcement | When the bag will be reused often or carry heavier contents | Check stitch density, thread quality, and whether the reinforcement distorts the top hem |
| Handle attachment style | Inserted into side seam or wrapped into top hem with secure top-stitching | When you want cleaner construction or faster sewing depending on cost target | Check if the attachment method changes internal volume, seam bulk, or print area |
Buyer checklist before sampling
- State the bag use case, target load, and carry style before asking for quotes.
- Define handle material, finished width, cut width, and whether the handle is single-layer or double-layer.
- Specify handle drop, overall finished length, and whether the measurement is taken before or after sewing.
- Call out reinforcement type, stitch count, and thread color so factories do not guess.
- Reserve a print-safe area if artwork sits near the upper bag edge or handle anchor.
- Ask for separate pricing on handle options, reinforcement upgrades, and packaging changes.
- Request pre-production samples, size checks, and one wash or rub test if the bag will be reused.
- Confirm carton pack count, polybag method, insert style, and how handles are folded for packing.
- Write tolerances for handle length, handle width, and stitch position before approval.
- Compare quotes only after every supplier answers the same handle spec sheet line by line.
Factory quote questions to send
- What handle material are you quoting, and is it self-fabric, woven tape, or a mixed construction?
- What is the finished handle width, cut width, and layer count?
- What handle length and drop are included in the price, and how are those measured?
- Which reinforcement method is included: bartack, box-X, double top-stitch, or another pattern?
- How many stitches or bartacks are used per handle attachment point?
- Is the handle sewn before or after the body side seam is closed?
- Does the quote include a print clearance allowance near the handle area?
- What sample lead time do you need for handle approval, and what production lead time is tied to that approval?
- What MOQ applies to this exact handle spec, and does changing width or reinforcement alter it?
- How are handles packed for shipment so they stay flat, matched, and ready for carton packing?
Quality-control points to confirm
- Measure finished handle width on multiple samples, not just one approved piece.
- Check handle drop on a stuffed bag, because a flat sample can hide a comfort problem.
- Pull-test the seam area by hand to see whether the reinforcement spreads load evenly.
- Inspect bartack position so it lands cleanly on the intended reinforcement zone.
- Verify that left and right handles match in length, angle, and twist.
- Check thread tension, skipped stitches, and loose tails around the top edge.
- Confirm the handle does not cover critical print space or fold into the artwork area.
- Look for seam puckering, top-edge distortion, or hard corners where the handle meets the body.
- Review packing folds to make sure handles are not crushed, creased, or mismatch-packed.
- Keep one golden sample with signed measurements and stitch notes for bulk reference.