Why Handle Seams Deserve a Separate Audit
A canvas tote bag can look correct in a flat photo and still fail where the handle enters the body. The handle seam carries the actual load, absorbs pulling force when the user swings the bag, and is often sewn through multiple layers: top hem, handle end, reinforcement patch, and front or back panel. If the RFQ only says "strong handles" or "reinforced stitching," each supplier may quote a different construction while using similar product photos.
For procurement teams, the handle seam audit is not a cosmetic detail. It affects unit cost, sewing time, needle breakage, inspection criteria, carton packing, and claim risk after delivery. A tote used for a lightweight conference brochure does not need the same seam as a grocery tote carrying bottles. The buying problem is to specify enough construction detail to compare quotes fairly without overbuilding a bag that no one needs.
- Audit the seam before bulk cutting, not only during final inspection.
- Define the expected carry load and real use case in the RFQ.
- Ask for close-up photos of the handle attachment, not only full bag photos.
- Compare stitch method and fabric weight together; one does not replace the other.
- Keep the approved sample as the physical standard for future repeat orders.
Define the Tote Use Case Before Choosing Seam Strength
The correct handle seam depends on what the bag will carry and how long the buyer expects it to remain in use. A retail gift-with-purchase tote may carry folded apparel for one trip. A bookstore canvas tote may carry books every week. A grocery tote may carry dense, uneven loads that pull the handle seam at an angle. These are different risk profiles, even when the outside dimensions are similar.
In an RFQ, state the intended contents in plain commercial terms. For example, "used for cosmetics retail purchase, expected load 3-5 kg" gives the factory a clearer direction than "premium strong tote." If the bag will be sold at retail, used as distributor stock, or supplied to a brand with warranty expectations, choose a more conservative seam. If it is a short-term event bag, avoid paying for heavy reinforcement that does not improve the buyer's real outcome.
- Light event tote: 6-8 oz canvas, simple folded handle, straight stitch or small box stitch may be enough.
- Standard retail tote: 10-12 oz canvas, cotton webbing or self-fabric handle, box-X stitch is usually safer.
- Heavy reusable tote: 12-16 oz canvas, wider handle, larger attachment box, reinforcement patch or bar tack should be considered.
- Book or grocery tote: check load at the top hem because heavy contents pull upward and outward at the seam.
- Premium brand tote: seam appearance matters as much as strength; require neat stitch lines and consistent symmetry.
Fabric Weight and Handle Seam Performance
Canvas weight is often quoted in ounces, but factories and buyers do not always use the same conversion. A supplier may describe fabric as 12 oz while the actual measured gsm, finishing, or shrinkage result differs from another quote. For practical sourcing, ask for both oz and gsm. Common canvas tote ranges include 8 oz at roughly 270 gsm, 10 oz at roughly 340 gsm, 12 oz at roughly 407 gsm, and 16 oz at roughly 540 gsm, depending on weave and finishing.
Heavier fabric does not automatically solve a weak handle seam. Dense canvas can resist tearing, but if the stitch box is too small, thread tension is poor, or the needle damages yarns, the seam can still fail. Lighter canvas may perform acceptably if the handle load is modest and the seam is well balanced. The best RFQ pairs fabric weight with the exact handle attachment method and the expected load test.
- Ask whether the quoted gsm is before or after dyeing, washing, or finishing.
- For natural canvas, request the natural shade tolerance because fabric lots can vary.
- For dyed canvas, confirm whether colorfastness testing is required and whether dyeing changes lead time.
- For recycled or blended canvas, check whether hand feel and tear strength are consistent enough for handle stress.
- For heavy canvas, confirm the factory has machines suitable for sewing through multiple layers at the handle.
Handle Materials: Self-Fabric, Webbing, and Edge Finish
Self-fabric handles give a clean matching look because the handle is made from the same canvas as the bag body. They are often preferred for premium natural canvas totes or retail brand bags. The risk is bulk: folded self-fabric handles create several layers at the attachment point, especially when sewn into a top hem. If the sewing line is not set up correctly, the result can be skipped stitches, uneven stitch length, or wavy attachment boxes.
Cotton webbing handles are common for promotional, retail, and reusable canvas totes because they are stable, efficient to sew, and easier to control in bulk production. Webbing must still be specified by width, thickness, weave tightness, and color. A 25 mm webbing handle feels different from a 32 mm handle, and low-density webbing can stretch or curl. For heavier bags, ask the factory to send a handle material swatch or include the webbing in the pre-production sample.
- Self-fabric handle: best for matched appearance, but check bulk and sewing neatness.
- Cotton webbing handle: practical for volume orders, but check width and stretch under load.
- Dyed handle: confirm shade match against body fabric and labels.
- Contrast handle: approve stitch color and handle color under the same lighting used for artwork approval.
- Edge finish: folded edges should not expose loose yarns or twist after handling.
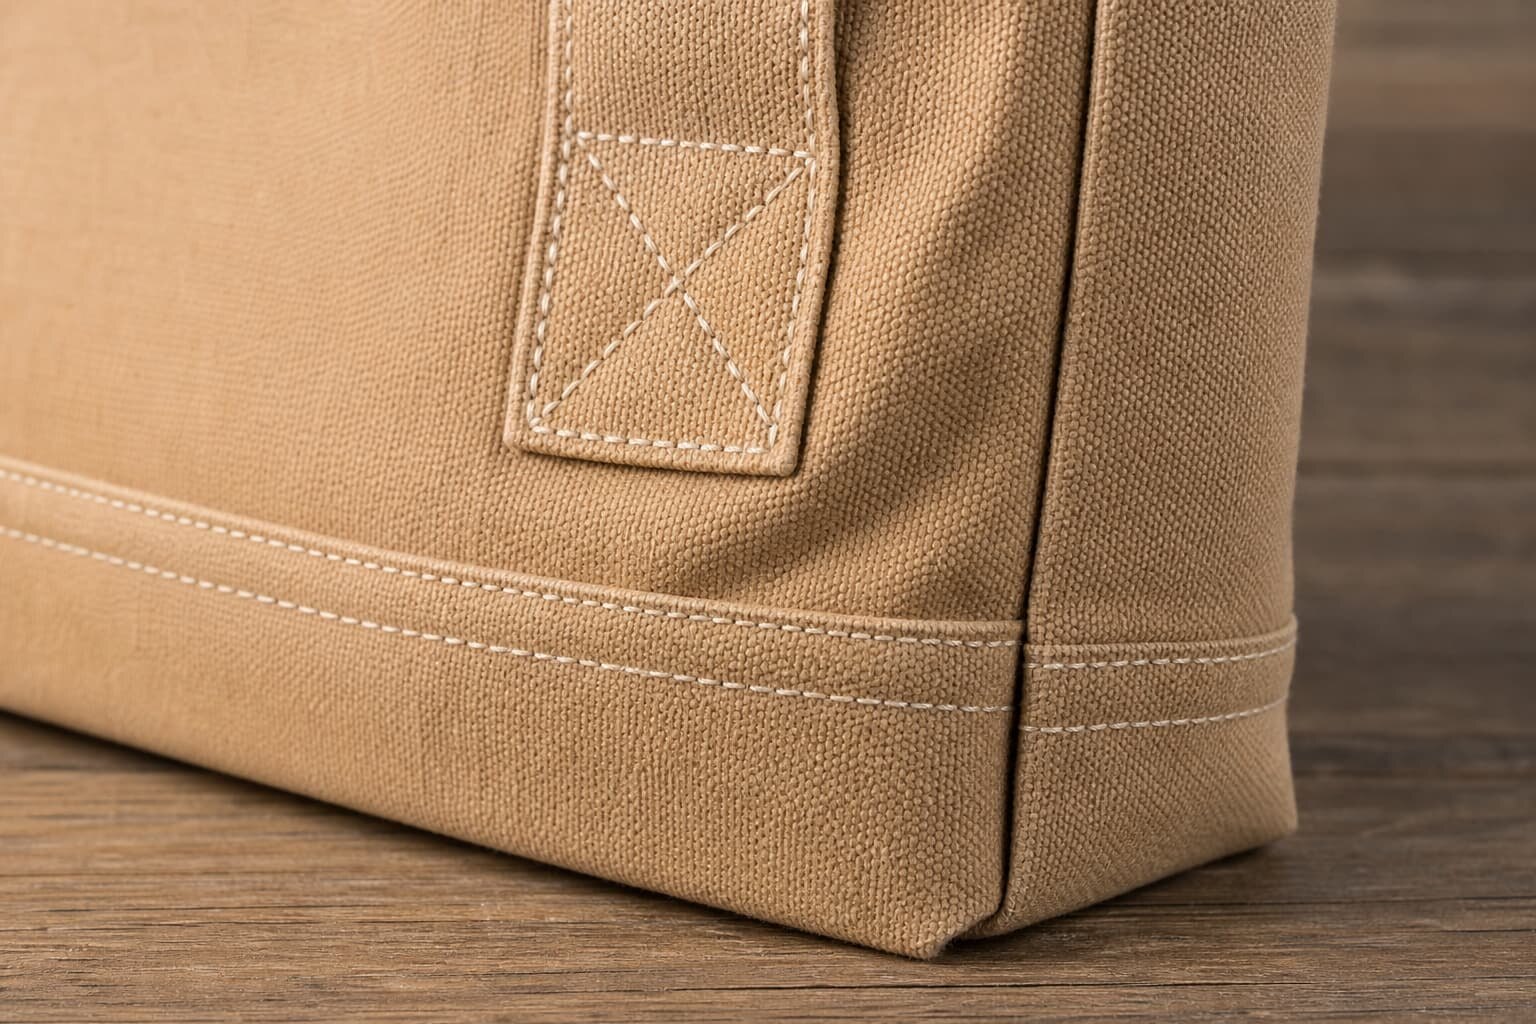
Stitch Construction and Acceptance Criteria
Most buyer disputes happen because the seam word is vague. "Reinforced" can mean a second straight stitch, a box stitch, a box-X, a bar tack, or a patch behind the handle. A straight stitch may be acceptable for a lightweight tote, but it gives less resistance to spreading force. A box-X distributes force across more stitch paths and is a practical standard for many retail canvas tote orders. Bar tacks can add strength but must be positioned correctly and not cut the fabric.
Your acceptance criteria should be visible and measurable. Define the approximate size of the box stitch, the distance from the top edge, the number of stitch lines if relevant, and whether back tack is required. Do not rely only on stitch density because a high stitch count can weaken fabric if the needle perforates too many yarns in a small area. For dense canvas, a balanced medium stitch density with correct thread tension is usually better than over-sewing.
- Box-X stitch: useful for standard and heavy retail totes when the stitch box is large enough.
- Bar tack: useful for concentrated reinforcement, but reject if it cuts or puckers the canvas.
- Double straight stitch: acceptable for lighter loads when approved on sample.
- Back tack: should secure start and end points without creating messy thread nests.
- Thread tension: stitches should sit flat, not pull the fabric into sharp puckers.
- Skipped stitches: treat skipped stitches near handle corners as a functional defect, not a minor cosmetic issue.
Print Method Conflicts Around the Handle Area
Handle seams and printing often compete for the same space on the upper front panel. Screen printing is common for canvas totes because it gives solid color coverage and efficient pricing at bulk quantities. Heat transfer may be chosen for detailed logos or smaller runs. DTG can support multicolor artwork but may vary by fabric color, pretreatment, and surface texture. Embroidery near the handle area adds even more bulk and can distort the panel if the placement is too high.
When the logo sits close to the top edge, the handle stitch box can run through the design or create a raised area that makes printing uneven. This is easy to prevent in the artwork proof stage. Add the handle stitch box to the technical drawing and keep the artwork at a safe distance, often 25-35 mm from the stitch area unless the sample proves otherwise. If a woven label is sewn at the side seam or top hem, confirm it does not interfere with handle folding or seam reinforcement.
- Screen print: check ink coverage over textured canvas and avoid printing over seam bulk.
- Heat transfer: check edge lifting around raised seams and after folding for packing.
- DTG: confirm fabric pretreatment and color result on actual canvas, not only a digital proof.
- Embroidery: avoid dense embroidery directly beside handle reinforcement unless tested.
- Woven label: confirm placement before handle seam approval so the sewing line does not improvise.
Sample Audit Workflow Before Bulk Approval
A good sample audit is not just checking whether the tote looks like the drawing. Measure the handle length from the top edge to the handle apex, measure handle width, check left-right placement, inspect stitch shape, and review the inside of the bag. Many weak seams look acceptable from the outside but show loose thread, poor trimming, or insufficient catch on the inside layers. Ask for sample photos before shipping if time is tight, but still inspect the physical sample before bulk approval on important orders.
For load checking, use a simple method that can be repeated. Hang the bag with the expected weight for a defined time, then check for seam opening, fabric tearing, stitch breakage, handle stretch, and distortion around the attachment. This is not a substitute for formal lab testing when a buyer requires it, but it is a practical factory and importer control point. Record the test weight and result in the approval notes so the bulk inspection team uses the same expectation.
- Measure handle drop after the bag is sewn, not only the cut length of the handle strip.
- Check whether both handles are equal in length and centered on the bag body.
- Inspect inside seam trimming and loose thread near the handle attachment.
- Photograph the seam before and after a load test.
- Confirm whether washing, dyeing, or ironing changes handle length or seam appearance.
- Approve the sample only with written comments on any tolerated deviation.
MOQ, Cost, and Lead Time Logic for Seam Choices
Handle seam construction affects MOQ and cost because it changes sewing time, material usage, and production line setup. A basic straight stitch is faster. A box-X takes longer and requires better operator control. Reinforcement patches add cutting, positioning, and extra sewing. Custom dyed webbing or special width webbing may require a higher MOQ than the bag body itself. If the buyer requests a low quantity with a heavy-duty custom handle, the supplier may raise the unit price or suggest a standard webbing option.
Lead time also changes with fabric and trim decisions. Natural canvas in stock may support faster sampling. Dyed canvas, custom webbing, special labels, and complex print placement can add days or weeks depending on the factory schedule. For bulk planning, separate sample lead time from production lead time after approved sample and artwork. If you split colors, print designs, or packing methods, ask whether the factory treats them as one order or several smaller production lots.
- Stock natural canvas plus standard webbing usually gives the simplest MOQ path.
- Custom dyed canvas often needs fabric dyeing time and shade approval before cutting.
- Custom webbing may create its own MOQ, separate from the tote bag MOQ.
- Reinforcement patches add labor and should be quoted as a defined construction, not assumed free.
- Split shipments or split packing can increase carton work and inspection complexity.
- Rush orders should avoid untested seam changes because sewing defects increase under schedule pressure.
Packing and Carton Risks That Affect Handle Seams
Packing can damage the result of a well-made handle seam if the folding method creates hard creases across the stitch box or printed artwork. Canvas is thicker than non-woven material, and reinforced handles create raised areas. If too many totes are compressed into one carton, the handle attachments can leave pressure marks on neighboring bags. This is especially visible on dark dyed canvas, heat transfer prints, or premium natural canvas with clean retail presentation requirements.
For retail buyers and distributors, request a packing method before mass production. Decide whether each bag is folded, flat packed, belly banded, polybagged, or packed by inner carton. A lower carton count may save freight volume but can increase crease risk and carton weight. Heavy cartons also increase handling damage and make warehouse receiving harder. Ask for carton dimensions and estimated gross weight in the quote, then verify during pre-shipment inspection.
- Check whether handles are folded inside the bag, outside the bag, or laid flat.
- Avoid folding directly through the printed logo if the ink or transfer is sensitive.
- Set a reasonable carton weight for manual handling and importer warehouse rules.
- Ask whether kraft paper, tissue, or divider sheets are needed for premium retail finish.
- Confirm barcode, carton mark, and color assortment requirements before packing starts.
- Inspect cartons from the top, middle, and bottom because compression defects may vary.
How to Compare Supplier Quotes Without Being Misled
A cheap canvas tote quote may be cheaper because the handle seam is lighter, the fabric gsm is lower, the thread is weaker, the print size is smaller, or the packing is less protective. Procurement teams should create a quote comparison sheet that includes construction details, not only unit price. If one supplier quotes 10 oz canvas with straight stitch and another quotes 12 oz canvas with box-X reinforcement, the prices are not directly comparable.
Ask each factory to quote against the same technical description and provide exceptions in writing. A professional supplier should be able to explain if a requested seam is unnecessary, difficult, or better replaced by another method. The best quote is not always the heaviest seam. It is the quote that matches the use case, can be repeated in bulk production, and gives you enough inspection data to defend acceptance or rejection.
- Compare fabric oz and gsm, not only the trade name of the canvas.
- Compare handle material, width, length, and attachment method.
- Compare print method, print size, number of colors, and position relative to the seam.
- Compare sample cost, sample lead time, and whether sample revisions are included.
- Compare carton quantity, carton size, carton weight, and packing protection.
- Compare whether load testing and seam close-up photos are included before shipment.
Specification comparison for buyers
| Spec decision | Recommended option | When it fits | Buyer risk to check |
|---|---|---|---|
| Handle attachment style | Box-X stitch with back tack at start and end | Retail totes, event bags, grocery bags, and reusable shopping bags expected to carry 5-10 kg | Box size too small, uneven X stitch, skipped stitches at corner turns, or weak thread tension |
| Fabric weight | 10-12 oz cotton canvas, approx. 340-407 gsm | Most branded canvas tote bags needing structure without becoming too heavy for retail packing | Supplier quoting lower gsm fabric while describing it as the same ounce weight |
| Handle webbing | Self-fabric folded handle or 25-32 mm cotton webbing | Self-fabric for premium matching look; webbing for faster production and stable strength | Handle width variation, twisting after washing, or loose weave webbing stretching under load |
| Reinforcement patch | Interior canvas patch or wider seam allowance on heavy-duty orders | Large totes, wine carriers, book bags, or promotional bags with expected heavy contents | Patch visible through light fabric, patch edge fraying, or added bulk affecting print position |
| Thread | Polyester core-spun thread matched to fabric or contrast approved by artwork | Bulk orders where seam strength and color consistency matter more than fully natural composition | Cotton thread shrinkage, thread color mismatch, or needle heat damage on dense canvas |
| Print position near handle | Keep artwork at least 25-35 mm away from handle stitch box unless approved on sample | Screen print, heat transfer, and DTG designs placed high on the tote front panel | Stitching crossing artwork, ink cracking around seam bulk, or print table distortion |
| Inspection test | Static load hang test plus seam visual audit after test | Pre-shipment inspection for reusable totes, retail totes, and distributor stock | Testing only one sample, testing empty bags only, or not recording handle seam deformation |
Buyer checklist before sampling
- State bag size, gusset size, fabric weight in oz and gsm, handle length, handle width, and handle material in the RFQ.
- Specify the handle seam construction: straight stitch, box stitch, box-X, bar tack, reinforcement patch, or other approved method.
- Ask the factory to confirm seam allowance, stitch density per inch or per centimeter, thread type, needle size range, and back tack method.
- Require pre-production sample photos showing the handle seam from front, inside, side angle, and close-up after trimming.
- Set an expected carry load, such as 5 kg, 8 kg, or 10 kg, and ask the supplier to confirm the sample test method used.
- Check whether the artwork, logo label, pocket, or top hem conflicts with the handle stitch box location.
- Approve packing only after confirming handle folding method, carton size, carton weight, and whether handle seams are compressed during packing.
- For repeat orders, keep a sealed approved sample or detailed seam photo standard so the next batch is not re-engineered by the sewing line.
- Include acceptable and rejectable seam defects in the purchase order or inspection checklist, not only in email discussion.
- Compare quotes by fabric gsm, handle method, stitch reinforcement, sample fee, packing method, lead time, and inspection support, not by unit price alone.
Factory quote questions to send
- What exact canvas weight are you quoting in oz and gsm, and is the fabric greige, dyed, washed, or pre-shrunk?
- Will the handle be self-fabric, cotton webbing, polyester-cotton webbing, or another construction, and what is the measured width after sewing?
- What handle attachment stitch will be used, and can you provide close-up sample photos before bulk cutting?
- What stitch density, thread specification, and seam allowance will your production line follow for the handle area?
- What load test can you perform on the sample and bulk production, and how many pieces will be tested per lot?
- Will any print method, label, pocket, top hem, or gusset construction affect the handle seam placement?
- What is the MOQ for this handle construction and fabric weight, and what changes if we reduce quantity or split colors?
- What is the normal sample lead time, bulk lead time after approval, and extra time needed for dyed canvas, custom webbing, or special labels?
- How will the bags be folded and packed, and what is the estimated carton quantity and carton weight?
- Which handle seam defects will your internal QC reject before final inspection?
Quality-control points to confirm
- Handle seam location must match the approved sample and be symmetrical left to right within the agreed tolerance.
- Stitching must not skip, unravel, pucker heavily, or cut the canvas yarns around the handle attachment.
- Box-X or bar tack reinforcement must be complete, with back tack or lock stitch visible where required.
- Handle length must be measured from top edge to apex, not estimated by flat webbing length before sewing.
- Thread color, stitch density, seam allowance, and reinforcement size must stay consistent across cartons.
- Load testing should check both immediate seam failure and post-test deformation around the attachment area.
- Printing must not be covered by handle stitching unless the buyer approved that overlap on the sample.
- Packed bags must not create hard crease marks across printed artwork or bulky handle seam areas.