1. Start with the buying objective, not a generic tote description
A strong canvas tote bag for brand owners factory order guide starts with the buyer's commercial objective. A bag for a trade show, bookstore, cosmetics gift set, grocery promotion, apparel retailer, and corporate merchandise program may all be called a canvas tote, but the factory requirements are different. Load expectation, retail presentation, print visibility, carton handling, and compliance requirements all change the specification and the price.
The biggest sourcing mistake is sending a factory a photo and asking for a 'similar canvas tote bag.' That invites the supplier to fill in blanks with the cheapest workable assumptions. One quote may use 8 oz stock canvas and bulk packing, while another uses 12 oz dyed canvas with reinforced handles and individual polybags. The cheaper quote may not be cheaper at all once the actual requirement is clarified.
Before requesting a factory quote, define what success looks like in the buyer's market. If the bag is a low-cost event giveaway, the priority may be budget, on-time delivery, and clean one-color printing. If it is sold as a retail accessory, the buyer should pay closer attention to fabric handfeel, shade consistency, stitch quality, label placement, and packaging. If it will carry books, bottles, or grocery items, the handle attachment and bottom seam become procurement-critical, not cosmetic.
- Define end use: retail merchandise, giveaway, gift-with-purchase, subscription kit, event bag, corporate merch, or daily shopping tote.
- State expected contents: paper goods, apparel, cosmetics, bottles, books, groceries, or mixed retail items.
- Set quality tier: budget promotional, standard retail, premium lifestyle, or heavy-duty utility.
- Name the selling or receiving channel: own store, marketplace, distributor, retailer DC, event venue, or corporate client.
- Identify must-not-fail points: logo appearance, handle strength, barcode accuracy, carton cube, compliance labeling, or launch date.
2. Build a factory-ready specification sheet
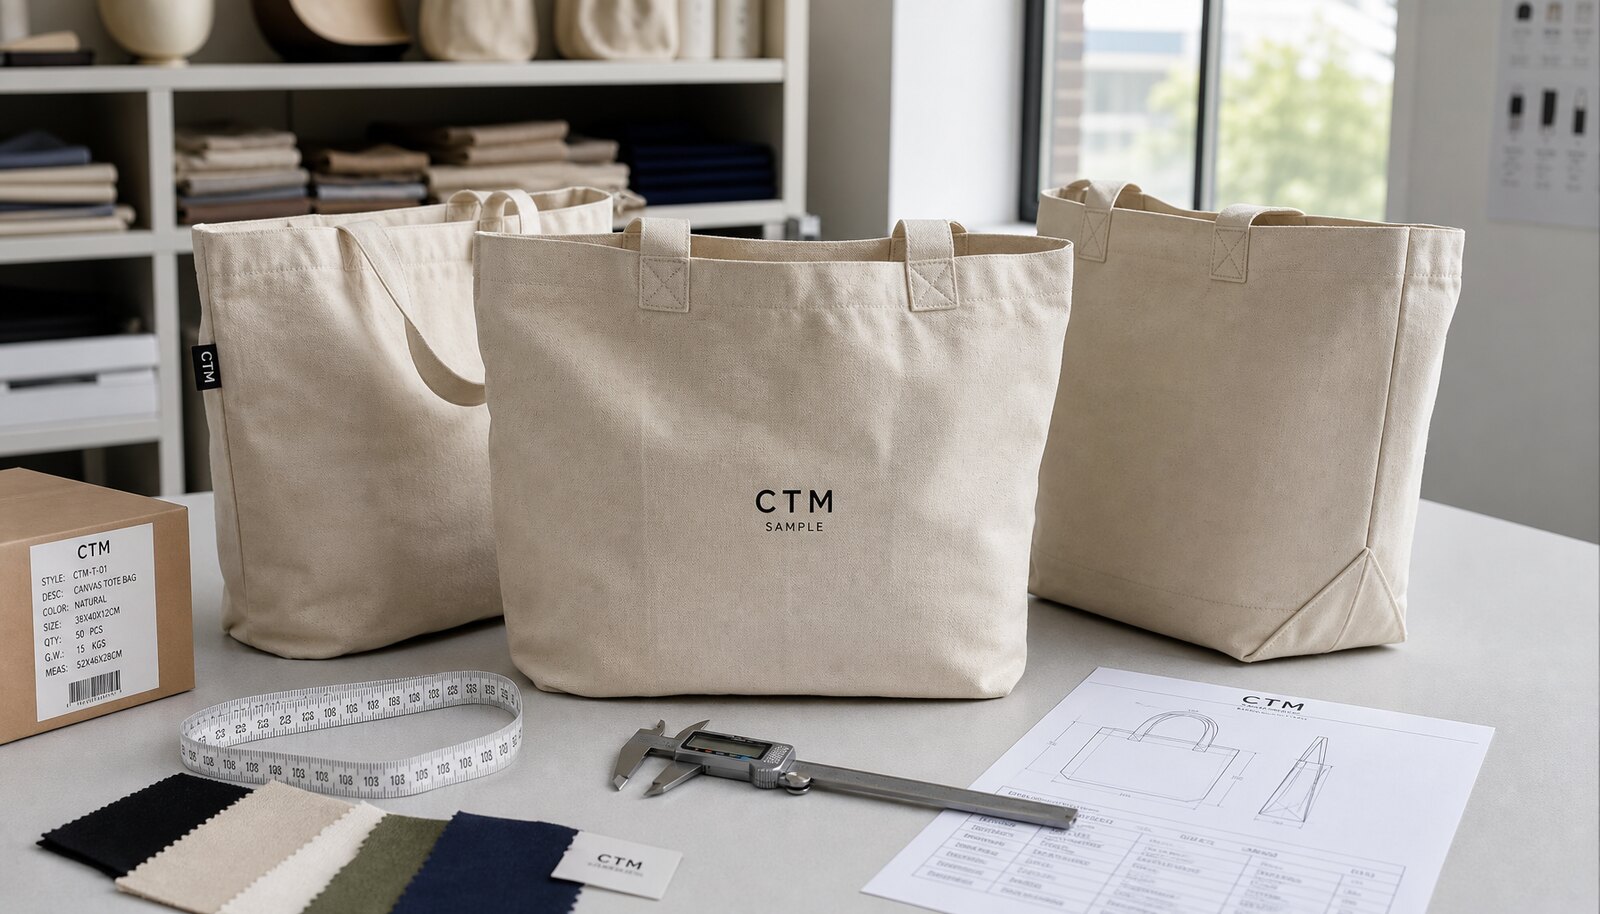
A factory-ready spec sheet should remove interpretation. Finished dimensions matter more than rough descriptions because canvas changes shape during cutting, sewing, pressing, folding, and packing. If the buyer writes only 'large tote,' the supplier must guess width, height, gusset depth, handle drop, and seam allowance. That guess becomes a cost assumption and later becomes a quality dispute.
Use finished measurements after sewing and pressing. For a flat tote, define body width and height. For a gusseted tote, define width, height, side or bottom gusset depth, and how the corners are constructed. For handles, define handle width, total handle length or handle drop, material, color, and attachment pattern. If the bag must fit a product box, binder, laptop sleeve, or retail kit, provide the product dimensions and allow clearance for practical loading.
Also specify tolerances. Textile bags are sewn products, so expecting zero variation is unrealistic, but leaving tolerance unstated is risky. Many buyers use practical measurement windows such as ±1 cm on body width and height for standard totes, with tighter limits for bags that must fit retail packaging or product inserts. Whatever tolerance you choose, put it in the PO, pre-production sample approval, and inspection checklist.
- Include a front, side, and bottom view drawing if the tote has a gusset or pocket.
- Mark finished width, finished height, gusset depth, handle drop, handle width, and pocket size if applicable.
- State seam allowance, top hem height, and whether seams are overlocked, folded, bound, or French-seamed.
- Specify reinforcement: box stitch, X stitch, bar tack, double row, or other construction.
- Add a tolerance table for dimensions, print placement, stitch density, and carton quantity.
- Attach reference photos only as support; do not rely on photos as the specification.
3. Choose fabric by performance, finish, and landed cost
Canvas weight is one of the main cost and quality drivers, but it should not be chosen by habit. An 8 oz canvas may work for a short-life event giveaway, but it may collapse, wrinkle heavily, or feel too light for a paid retail tote. A 10 oz to 12 oz range is often a practical starting point for general brand merchandise because it balances structure, printability, sewing efficiency, and freight weight. A 14 oz canvas can feel more premium and carry heavier contents, but it increases material cost, needle stress, carton weight, and shipping cost.
Ask whether the quoted fabric weight is before or after finishing. Washing, dyeing, bleaching, or coating can change weight, shrinkage, shade, and handfeel. Two suppliers may both say '12 oz canvas' while delivering noticeably different products because one fabric has a looser weave or softer finishing. For brand programs, approve a fabric swatch and a made-up sample, not only a digital color image.
Natural canvas also deserves attention. It can look authentic and cost-effective, but unbleached cotton is not a perfectly uniform color. Seed flecks, roll-to-roll shade variation, and small slubs may be acceptable for a natural look but unacceptable for a clean luxury program. If your brand needs a very controlled background color, bleached or dyed fabric may be better, with added lead time and shade-control work.
- Use 8 oz only when low cost and light-duty use are acceptable.
- Use 10-12 oz for many retail, event, and brand owner programs where structure matters.
- Consider 14 oz or tighter duck canvas for heavier loads, premium handfeel, or larger totes.
- Specify natural, bleached, dyed, washed, pre-shrunk, or treated finish clearly.
- Ask for shrinkage range if the tote may be washed or exposed to moisture.
- Request shade approval and roll control for dyed or brand-color fabric.
- Consider freight impact: heavier canvas may improve perceived quality but raise landed cost.
4. Engineer handles, gussets, and seams before you negotiate price
Handle construction is one of the most important differences between a cheap tote and a reliable tote. The buyer should define handle material, width, drop length, stitch pattern, reinforcement, and thread color. Self-fabric handles can look clean and coordinated, while cotton webbing often gives more consistent strength and width. Longer handles suit shoulder carry, but they use more material and can feel awkward if the tote is intended for hand carry.
Gussets also change the order more than many buyers expect. A flat tote is easier to cut, sew, print, fold, and pack. A side gusset or bottom gusset improves capacity and retail usefulness, but it affects print placement, seam stress, folded size, carton cube, and inspection complexity. If the tote needs to stand or hold boxed goods, a boxed bottom may be worth the additional sewing steps. If it must ship flat in high volume, a simpler gusset may be more efficient.
Seam choices should match the expected quality tier. Overlocked seams may be acceptable for many promotional bags, while bound or folded seams can look cleaner and reduce fraying. For premium programs, buyers should inspect the inside of the bag, not only the outside. Loose threads, uneven stitch density, skipped stitches, and seam puckering often reveal whether the factory is controlling sewing quality or only making the front face look acceptable.
- Specify handle drop based on use: hand carry, shoulder carry, or both.
- Define handle reinforcement pattern and minimum stitch density per inch or centimeter.
- Avoid large print areas that cross gusset folds unless the supplier confirms placement control.
- Ask for a seam sample if you are choosing between overlock, bound seam, French seam, or folded seam.
- Check bottom corner construction for gusseted bags because stress often concentrates there.
- Confirm whether thread color is matching, contrast, or brand-specific.
5. Match print method to artwork, fabric, and inspection standard
Brand owners often focus on artwork first, but factories need production details: print method, size, position, color count, ink type, curing process, and acceptable tolerance. Screen printing is usually the practical option for simple logos and repeat orders, especially one to three colors on a flat bag face. It can be durable and cost-efficient, but setup cost and color registration still matter.
Heat transfer can be useful for detailed artwork, gradients, or smaller test runs, but the buyer should approve handfeel, edge quality, adhesion, and rub resistance. Digital printing may suit complex graphics depending on the supplier's equipment and fabric pretreatment, but buyers should not assume photo-like clarity on coarse canvas. Embroidery gives a premium look on small logos or patches, yet it adds needle penetration, backing, thread color control, and extra inspection points.
Print placement must be defined from a measurable reference point. Do not say 'centered on front' without a print size, top-edge distance, and side-edge distance. For gusseted or folded totes, confirm whether the bag is printed before or after sewing. Printing before sewing can improve flatness but requires accurate cutting and sewing alignment; printing after sewing may be limited by seams, handles, and equipment clearance.
- Send vector artwork and specify Pantone, CMYK, or approved physical color target as relevant.
- State print size in centimeters or inches and define top, side, and center-line placement.
- Confirm whether price includes one-side or two-side printing and how many colors are included.
- Ask for a strike-off on actual canvas before bulk if logo accuracy is commercially important.
- Define print placement tolerance, such as acceptable movement from center or top edge.
- Add dry rub and wet rub checks if the bag will face daily handling, moisture, or dyed fabric contact.
- Review whether print setup fees, screens, films, or transfers are one-time charges or repeat charges.
6. Understand MOQ, price breaks, and hidden cost drivers
MOQ is not a single factory preference. It is usually a combination of fabric availability, dye lot size, print setup, label minimums, trim purchasing, carton production, and sewing-line efficiency. A supplier may offer a low MOQ for stock natural canvas with one-color screen print, but the same supplier may require a higher MOQ for dyed canvas, custom webbing, woven labels, zipper closures, or retail-ready packing.
Experienced importers should ask for step pricing rather than accepting one MOQ line. A quote at 500 pieces may carry high setup and labor burden, while 3,000 or 5,000 pieces may spread setup costs and improve cutting yield. However, ordering more only makes sense if demand is real and inventory carrying cost is acceptable. A procurement decision should compare unit cost, landed cost, inventory risk, and launch timing together.
Also watch SKU fragmentation. Five colors, three sizes, and two artwork versions may sound simple from a marketing point of view, but the factory sees thirty production combinations if every variable is separate. Each combination can require material allocation, printing setup, packing control, and carton labeling. Consolidating fabric colors, handle types, or packing formats can reduce MOQ pressure and inspection risk.
- Request price breaks at realistic quantities, such as 500, 1,000, 3,000, 5,000, and 10,000 units.
- Separate MOQ by fabric color, dyed lot, print artwork, print color count, label, trim, and packing format.
- Ask whether mixed colors or mixed artworks can share one fabric order or sewing line.
- Check whether setup fees are amortized, charged separately, or credited on reorder.
- Compare cost per sellable unit after expected inspection rejects, not only quoted unit price.
- Avoid unnecessary SKU complexity until demand is proven.
7. Qualify the supplier before placing the factory order
For a serious factory order, supplier qualification should go beyond a low price and a friendly sales contact. Ask whether the supplier is a direct manufacturer, trading company, print subcontractor, or a combination. None of those models is automatically wrong, but the buyer needs to know who controls fabric purchase, printing, sewing, QC, packing, and export documents. If printing or dyeing is subcontracted, clarify who is responsible when defects appear.
Review export experience for your market. A supplier shipping canvas tote bags to the United States, EU, UK, Canada, Australia, or other regulated markets should understand commercial invoices, packing lists, country-of-origin labeling, HS code discussion, carton marks, and buyer-specific documentation. If the bag includes claims such as organic cotton, recycled content, fair-trade cotton, or special chemical compliance, request valid certificates and transaction documents instead of accepting marketing language.
Payment and Incoterms also belong in qualification. EXW may look cheap but shifts local logistics and export handling to the buyer. FOB may be easier for importers working with a forwarder. FCA can be useful depending on the cargo handover point. Payment terms should protect both sides: many buyers use a deposit with balance after passed inspection and before shipment release, but the exact structure depends on relationship, order value, and risk tolerance.
- Ask for factory profile, business license, production photos, machine list, and monthly tote capacity.
- Confirm whether cutting, sewing, printing, dyeing, washing, and packing are in-house or subcontracted.
- Request audit status if required by your customer, such as social compliance, quality system, or retailer audit readiness.
- Ask for export history to your target market and examples of standard export documentation they can provide.
- Verify compliance support: fiber content, restricted substances, colorfastness, heavy metals in trims, and labeling requirements where relevant.
- Check whether they can support third-party inspection and lab testing before shipment.
- Discuss Incoterms clearly: EXW, FOB, FCA, CIF, or DDP if offered, including what charges are included or excluded.
- Control payment risk by linking balance payment to approved sample, passed inspection, and complete shipping documents where possible.
8. Make sampling and pre-production approval do real work
A sample should not be treated as a beauty photo. It is a production rehearsal. The buyer should use it to test fabric, dimensions, construction, print placement, logo color, handle comfort, packing method, and barcode or label position. If the production bag must be individually polybagged and folded a certain way, the approved sample should show that packing method. If the tote will carry weight, load the sample before approving bulk.
Separate sample types when needed. A proto sample confirms shape and construction. A print strike-off confirms artwork, ink, and placement. A lab dip confirms dyed fabric color. A pre-production sample should combine the final approved fabric, construction, print, trims, labels, and packing. For simple promotional orders, some stages may be combined. For retail or high-value programs, skipping stages can create expensive mistakes.
Approval should be documented. Photograph the approved sample from front, back, inside, handle attachment, gusset, print close-up, label, and packing. Record measured dimensions and any approved deviations. Then ask the supplier to keep a sealed counter sample in the factory. During inspection, the approved sample becomes the reference point, not a memory from an email thread.
- Measure the sample flat and, if relevant, loaded with intended contents.
- Check handle comfort and drop length on a real shoulder or with a mannequin if fit matters.
- Inspect inside seams, not only the front panel.
- Rub the print with a clean cloth and check for transfer, cracking, tackiness, or flaking.
- Confirm label content, barcode scan, country-of-origin mark, and hangtag position.
- Approve the folding method and carton packing with the same care as the bag itself.
- Keep one approved sample with the buyer, one with the factory, and one for third-party inspection if used.
9. Set QC standards with tolerances, tests, and rejection rules
Canvas tote bag QC should be specific enough that the factory, buyer, and inspector make the same decision on the same defect. General wording such as 'good quality' is not enforceable. Before production, define critical, major, and minor defects; measurement tolerances; AQL level; load test method; print rub test; carton packing requirements; and acceptance or rejection rules.
A practical final inspection usually checks workmanship, measurements, function, appearance, labeling, packing, and quantity. Many importers use AQL sampling for final random inspection, often with general inspection level II, but the exact plan should match order value and buyer risk. Critical defects should generally trigger immediate hold or rejection. Major defects are evaluated against the agreed AQL limit. Minor defects should be monitored so the shipment does not look poor even if each flaw is small.
For load testing, agree the intended test weight and duration before production. A light event tote and a heavy grocery tote should not have the same requirement. The test should load the bag evenly, lift or suspend it for the agreed time, and then inspect handle stitching, body fabric, seams, and gusset corners. For heavier-use bags, add repeated lift cycles or a gentle dynamic swing test. The goal is not to destroy every sample; it is to confirm the bag survives realistic use without visible structural failure.
Print and dye checks are equally important. Screen print should not smear, flake, crack, or transfer color under normal handling. Dyed canvas should be checked for shade consistency and crocking, especially if it may touch light clothing. If the bag is sold in retail, packing accuracy becomes a QC issue too: the wrong barcode, missing warning label, incorrect carton assortment, or unreadable carton mark can create receiving delays and chargebacks.
- Set body size tolerance, gusset tolerance, handle drop tolerance, and print placement tolerance in the inspection checklist.
- Use AQL sampling and define critical, major, and minor defects before the inspector arrives.
- Check stitch density, skipped stitches, loose threads, seam puckering, broken needles risk, and reinforcement consistency.
- Run load tests on selected samples using the agreed weight, duration, and pass/fail criteria.
- Perform dry rub and wet rub checks for print and dyed fabric where relevant.
- Reject or hold goods with wrong material, unsafe contamination, missing legal labels, failed load test, wrong artwork, or major barcode/carton errors.
- Require corrective action and reinspection if the major defect rate exceeds the agreed acceptance level.
- Inspect packed cartons, not only loose production pieces from the sewing line.
10. Plan packing, freight, and shipment documentation early
Packing decisions affect landed cost and delivery reliability. A tote packed flat in bulk may be efficient for freight, but it may not meet retail or marketplace receiving requirements. Individual polybags add labor and plastic cost, but they can protect the product, hold barcode labels, and simplify warehouse receiving. Belly bands, tissue, hangtags, and retail labels improve presentation but increase touch time and carton planning.
Ask for carton dimensions before production is complete. Carton cube and gross weight influence freight quotes, warehouse handling, pallet configuration, and container planning. A bag that folds slightly larger than expected can change units per carton and increase the number of cartons. If your forwarder or retailer has maximum carton weight limits, communicate them before the factory orders cartons.
Shipment planning should also include documents and timing. Confirm Incoterms, cargo-ready date, port or handover location, carton marks, commercial invoice format, packing list, material declarations if needed, and inspection booking window. If final payment is due before shipment release, connect it to passed inspection and complete pre-shipment photos or documents. For experienced buyers, the goal is not only to make the bag correctly but to make the shipment easy to receive.
- Specify bulk pack, individual polybag, retail fold, belly band, hangtag, barcode, or carton divider requirements.
- Confirm polybag warning language if required by the destination or retailer.
- Set units per inner pack and master carton, plus carton dimensions and gross weight limits.
- Require carton marks by PO, SKU, color, quantity, country of origin, and carton number if needed.
- Ask for packing photos from the first completed cartons before full packing continues.
- Coordinate inspection date with cargo-ready date and forwarder booking.
- Check commercial invoice, packing list, HS code discussion, origin marking, and any compliance documents before balance payment.
- Build time for rework if inspection finds packing, labeling, or assortment errors.
Specification comparison for buyers
| Spec decision | Common factory options | When it fits | Cost impact and buyer risk to check |
|---|---|---|---|
| Fabric weight and construction | 8 oz, 10 oz, 12 oz, 14 oz cotton canvas; plain weave or tighter duck canvas; natural, bleached, dyed, or washed finish | 8 oz for low-cost giveaways; 10-12 oz for retail and brand merchandise; 14 oz for premium or heavier carry programs | Higher weight increases material cost, carton weight, and freight. Verify whether weight is before or after finishing, and approve bulk shade because natural canvas can vary by roll. |
| Fabric finish | Unbleached natural, bleached white, piece dyed, pigment dyed, enzyme washed, pre-shrunk, water-repellent finish if required | Natural canvas for eco-style branding; white for bright print; dyed for brand color; washed for softer fashion handfeel | Dyed or washed fabric adds processing time and shade risk. Ask for colorfastness and shrinkage data if the bag may be washed or used in wet conditions. |
| Gusset style | No gusset flat tote, side gusset, bottom gusset, boxed bottom, T-gusset, or folded base | Flat tote for documents and events; side or bottom gusset for groceries, apparel, gift sets, or retail packaging | More gusset depth increases fabric consumption, cutting complexity, sewing time, and carton cube. Confirm finished depth tolerance and whether print crosses fold lines. |
| Handle type and reinforcement | Self-fabric handles, cotton webbing, contrast webbing, rope handle, box stitch, X stitch, bar tack, or double-row stitching | Self-fabric for clean retail look; webbing for strength and consistent handle width; bar tack or X stitch for higher load targets | Handle failures are a common claim. Specify handle drop, width, stitch pattern, stitch density, and load-test method instead of relying on a photo. |
| Print and branding method | Screen print, heat transfer, digital print, embroidery, woven label, printed neck label, hangtag, or patch | Screen print for simple repeat logos; heat transfer for detailed short runs; embroidery or woven labels for premium identity | Setup charges, color count, artwork size, curing, and defect allowance affect price. Test rub resistance, registration, placement tolerance, and ink handfeel on the actual canvas. |
| Closure and internal features | Open top, zipper top, snap button, magnetic snap, inner pocket, bottle loop, lining, or bottom board | Open top for lower-cost merchandise; zipper or snap for retail; pocket or lining for premium bags | Each feature adds material, sewing operations, inspection points, and failure modes. Ask whether the factory has made the same construction before at volume. |
| Packing format | Bulk stack in master carton, individual polybag, folded with belly band, tissue insert, retail hangtag, barcode label, or carton divider | Bulk pack for distributor programs; individual polybag and barcode for retail, marketplace, or warehouse-controlled SKUs | Packing changes labor cost, carton count, cube utilization, and compliance. Confirm bag count per carton, carton dimensions, gross weight, polybag warning requirements, and carton marks. |
| MOQ drivers | Stock fabric MOQ, custom dyed fabric MOQ, print screen MOQ, label MOQ, trim MOQ, carton MOQ, sewing-line efficiency | Low MOQ when using stock natural canvas and simple print; higher MOQ for dyed fabric, special trims, or multiple SKUs | A low headline MOQ may hide higher setup charges. Ask MOQ by fabric color, artwork, size, packing type, and shipment split, then request step pricing. |
| Inspection and compliance level | Inline inspection, final random inspection, buyer-nominated third-party inspection, lab testing for fiber content, colorfastness, restricted substances, and labeling review | Needed for importers, retail programs, children-adjacent promotions, marketplace sellers, and regulated markets | Testing and inspection add time and cost but reduce chargeback and recall risk. Confirm applicable standards, documents, and who pays for retesting if goods fail. |
Buyer checklist before sampling
- Define the bag's commercial job: giveaway, retail merchandise, gift-with-purchase, corporate program, subscription kit, or heavy-use carry item.
- Confirm finished size in width, height, gusset depth, handle drop, handle width, seam allowance, and size tolerance before requesting final pricing.
- State fabric in oz or GSM, weave type if known, finish, color, shrinkage expectation, and whether weight is before or after finishing.
- Send vector artwork with exact print size, print location, color references, number of print sides, and acceptable placement tolerance.
- Specify handle construction, reinforcement pattern, stitch density target, and expected load test weight instead of writing only 'strong handles'.
- Request a pre-production sample using actual fabric, actual print method, actual labels, and final packing method before authorizing bulk cutting.
- Ask for MOQ and price breaks by fabric color, bag size, artwork, print method, packing format, and shipment split.
- Verify supplier export experience, audit readiness, compliance documents, lab testing options, Incoterms, payment terms, and trade references where appropriate.
- Confirm carton quantity, carton dimensions, gross weight range, carton marks, barcode labels, polybag requirements, and pallet requirements before production starts.
- Set inspection plan, AQL level, measurement tolerance, defect classification, load test, print rub test, and rejection criteria in writing.
Factory quote questions to send
- What exact canvas are you quoting: fiber content, yarn count if available, weave, oz/GSM, finish, shrinkage range, and fabric width?
- Is the fabric stock-supported or made to order, and what is the MOQ by natural, bleached, dyed, or washed fabric option?
- Does the unit price include cutting, sewing, handle reinforcement, printing, label attachment, hangtag, individual packing, carton packing, and carton marks?
- What print method are you quoting, what setup charges apply, and how many colors, sides, and square centimeters of print area are included?
- What is the MOQ and price break at 500, 1,000, 3,000, 5,000, and 10,000 units, or at the volumes relevant to this program?
- Can you quote the same specification under EXW, FOB, and FCA terms, and state the port, local charges excluded, and cargo-ready date basis?
- What sample stages do you recommend: proto sample, artwork strike-off, pre-production sample, size set, or packing sample, and what is the fee and timeline for each?
- What production lead time applies separately to fabric, dyeing or washing, printing setup, bulk sewing, inspection, packing, and export document preparation?
- What equipment do you use for cutting, printing, curing, sewing, needle detection if required, and carton packing, and which steps are subcontracted?
- What QC plan do you follow for canvas tote bags, including inline inspection, final inspection, AQL level, measurement tolerance, load testing, and print rub testing?
Quality-control points to confirm
- Set measurement tolerances before production: for many standard totes, width and height may be controlled around ±1 cm, gusset depth around ±0.5 cm, and handle drop around ±1 cm, unless your program requires tighter limits.
- Use an AQL-based final random inspection instead of only checking factory photos. A common starting point is general inspection level II with separate critical, major, and minor defect limits agreed before production.
- Classify defects clearly: critical defects may include unsafe sharp objects, wrong material, missing required warning label, or mold; major defects may include weak handles, wrong size outside tolerance, print misplacement, broken seams, or incorrect barcode; minor defects may include small loose threads or light washable marks within agreed limits.
- Check fabric weight against the approved spec by cutting and weighing a known area when practical, or by requesting mill documentation plus random verification from bulk rolls.
- Inspect stitch density and seam security at handles, side seams, bottom corners, gusset intersections, pocket edges, zipper ends, and label attachment points.
- Perform a handle load test using the intended use as the target. For example, load the tote evenly with the agreed test weight, suspend or carry it for the agreed duration, then check for popped stitches, tearing, handle elongation, seam distortion, and body fabric damage.
- Add a dynamic use check for heavier programs: lift, set down, and lightly swing the loaded bag for a defined cycle count, then inspect handle attachment and bottom seams.
- Check print placement with a ruler or template. Agree tolerance in millimeters from top edge, side seam, or center line, and reject units with visibly tilted, off-center, smeared, cracked, or incomplete artwork.
- Conduct dry and, if relevant, wet rub/crocking checks on printed and dyed areas using a clean white cloth. Reject if visible color transfer exceeds the agreed limit or if print surface flakes, cracks, or becomes tacky.
- Verify screen print cure or transfer adhesion with a tape pull or scratch check when suitable for the ink system, and compare results against the approved strike-off.