Why Embroidery Backing Belongs in the RFQ
Canvas tote bag embroidery is not only a decoration decision. The backing behind the stitches controls how the logo holds shape, how the front panel looks after sewing, and how the inside of the bag feels to the end user. If the RFQ only says embroidered logo, the factory may quote the cheapest workable method, while another supplier may include a better stabilizer and slower stitching speed. The two quotes will not be technically equal.
For buyers comparing China, India, Vietnam, or Bangladesh tote suppliers, backing is one of the hidden reasons price gaps appear. A low quote may use thin canvas, no proper stabilizer, excessive stitch density, or embroidery after the bag is already sewn. The sample may look acceptable in one photo, but bulk cartons can show puckered logos, crooked placement, backing scraps, or thread breaks after folding.
- Ask for backing type by name: tear-away, cut-away, wash-away, no-show mesh, or adhesive stabilizer.
- Ask whether backing is included in the quoted embroidery cost or treated as an extra charge.
- Ask for front and reverse-side sample photos because the reverse side often reveals the real production quality.
- Do not approve embroidery only from a digital mockup; canvas tension and backing cannot be judged on screen.
Match Canvas GSM to Embroidery Density
Most promotional and retail canvas tote bags use cotton canvas from about 8 oz to 16 oz. In GSM terms, that usually ranges from roughly 230 GSM to 450 GSM depending on construction and finishing. Embroidery performs best when the fabric is stable enough to resist needle movement but not so heavy that hooping becomes difficult or the needle deflects. For many front-panel logo totes, 10-12 oz canvas, around 280-340 GSM, is a practical balance.
Light 6-8 oz cotton fabric can work for small outline embroidery, but dense filled logos often cause puckering. Heavy 14-16 oz canvas gives a premium hand feel, but it can slow embroidery speed, increase needle breakage, and create more visible hoop marks if the panel is handled poorly. If the tote will also be screen printed, washed, dyed, or enzyme finished, the final fabric stability must be checked after the same process used in production.
- For small text or icons under 50 mm wide, avoid very loose plain-weave canvas because letters may close up.
- For filled logos over 90 mm wide, request a stitch file review before confirming canvas weight.
- For recycled cotton canvas, check slub level and yarn irregularity because stitch lines may look less clean.
- For dyed canvas, confirm colorfastness and thread contrast before approving the final embroidery color.
Choose the Backing by Logo Structure, Not Habit
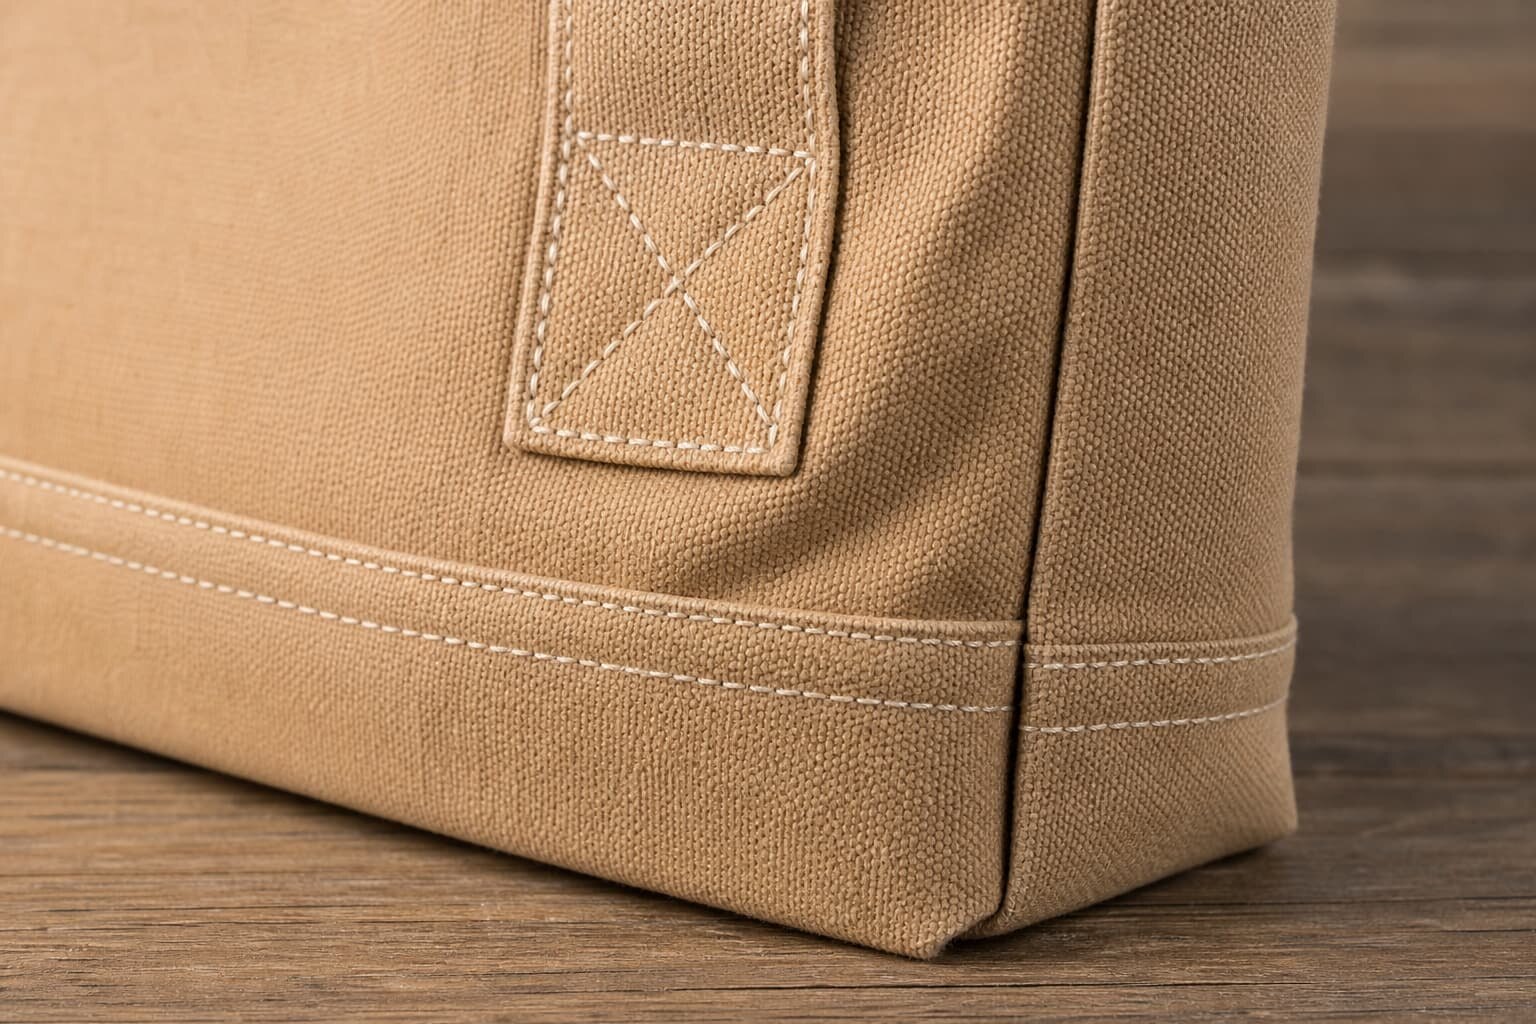
Many factories default to tear-away backing on canvas because it is fast, inexpensive, and easy to remove. Tear-away is suitable for stable canvas and moderate embroidery designs. It is usually the first option for simple brand marks, line art, badges, and medium-size lettering. The problem starts when the design has dense fill areas, small satin letters, or many direction changes. The backing may tear during stitching, leaving the fabric to move under the needle.
Cut-away backing gives better long-term support because it remains behind the embroidery. It is useful for high stitch counts, unstable fabric, or logos that must keep a sharp edge after handling. No-show polymesh can reduce stiffness compared with standard cut-away backing, which matters when the tote interior must feel clean. The tradeoff is trimming labor and possible visible backing edge if the logo is placed on a thin or light-colored canvas.
- Use tear-away for simple logos on 10-12 oz stable canvas with moderate stitch count.
- Use cut-away for dense filled logos, small lettering, or logos that must stay crisp after repeated use.
- Use no-show mesh when inside softness matters and the canvas is not too transparent.
- Avoid adhesive backing as the only stabilizer for larger orders unless residue, needle gumming, and storage temperature are tested.
Control Stitch Count Before It Controls Your Cost
Embroidery cost is often driven by stitch count, not just logo size. A 70 mm logo with dense fill may cost more than a 100 mm outline logo. Buyers should ask for the estimated stitch count after digitizing and before approving the quote. If the same artwork is quoted by multiple suppliers, one digitizing file may use unnecessary fill stitches, while another uses a cleaner structure that looks similar but runs faster and puckers less.
For canvas tote bags, a practical RFQ should state the maximum logo size and request digitizing advice. Tiny letters, gradients, thin outlines, and large solid filled areas are common causes of production problems. A factory can simplify the logo for embroidery by enlarging small text, changing fill direction, widening strokes, or converting some parts to screen print. If brand guidelines allow it, this decision can reduce cost and improve bulk consistency.
- Request stitch count per logo after digitizing, not only a flat embroidery charge.
- Ask if small text under 5 mm letter height can be embroidered clearly on the selected canvas.
- Avoid large solid embroidery blocks on lightweight canvas unless cut-away backing and sample testing are approved.
- For complex artwork, compare embroidery with screen print, woven label, or embroidered patch before finalizing.
Decide When the Logo Is Embroidered
Embroidery on flat cut panels is normally cleaner and more efficient than embroidery on finished tote bags. The operator can hoop the panel properly, keep the logo flat, and maintain placement before side seams and bottom gussets are sewn. This method is recommended for most bulk tote orders, especially when the logo is centered on the front panel and the order quantity justifies organized panel production.
Embroidery after sewing may be necessary for small reorder batches, special placement, or when blank bags are already in stock. However, finished bags are harder to hoop. Handles, side seams, gussets, and internal pockets can restrict machine movement. This increases the risk of crooked logos, hoop marks, uneven tension, and needle strikes near seams. If a supplier quotes a very low MOQ using stock blanks, confirm that the embroidery position is still practical.
- For custom production, specify embroidery before bag assembly whenever possible.
- For stock blank embroidery, request a photo showing the bag hooped on the machine.
- For gusseted totes, measure logo position from the finished top edge and side seam after sewing.
- For pocket totes, confirm embroidery does not stitch through an internal pocket unless that is intended.
Sample Checks That Catch Backing Problems Early
A pre-production sample should use the final canvas, final backing, final thread, final logo size, and final sewing sequence. A showroom sample made with available fabric is not enough for approval. The buyer should inspect the front face, the reverse side, and the surrounding fabric tension. If the sample has slight puckering before washing, pressing, or folding, bulk production usually makes the problem more visible.
Ask the factory not to over-press or hide the sample condition before photos are sent. A neat front photo can hide rough backing, untrimmed threads, or stabilizer residue inside the bag. If the bag will be folded for export packing, fold the sample the same way and leave it packed overnight. Embroidery that looks fine flat can become crushed or creased when 100 pieces are compressed in one export carton.
- Check logo width and height with a ruler against the approved artwork.
- Check placement from top edge, side seams, and handle centerline.
- Check for puckering by laying the front panel flat under side light.
- Check reverse-side backing for rough corners, loose stabilizer, and thread nests.
- Check whether embroidery distorts after folding, light steaming, or normal hand rubbing.
MOQ Logic for Embroidered Canvas Totes
Embroidery MOQ depends on more than the tote bag itself. The factory must consider fabric procurement, dyeing or washing if required, cutting layout, digitizing, machine setup, thread color change, backing inventory, and inspection time. A supplier with stock natural canvas may accept a lower MOQ than a supplier producing custom dyed canvas. A small order can still be possible, but unit cost will rise if setup time is spread over fewer pieces.
Buyers should be careful when comparing an MOQ for blank totes with an MOQ for embroidered custom totes. Blank bags may be available from inventory, while embroidery adds handling and positioning work. If you need multiple logo colors or several store versions, ask whether the MOQ applies per design, per color, per size, or per total order. This prevents a quote that looks acceptable but becomes expensive once variants are confirmed.
- Separate MOQ for bag production, embroidery setup, and each logo version.
- Ask if thread color changes create extra charges or minimum quantities.
- For distributor programs, consider one common bag body with different embroidered labels or patches.
- For first orders, use a practical logo size and standard canvas color to reduce MOQ pressure.
Packing Rules for Embroidered Tote Bags
Embroidery adds thickness to the front panel, so packing cannot be treated the same as plain printed totes. If bags are folded directly across the embroidered logo, the stitches can flatten and the backing can crease. If handles or seams press into the logo area, cartons may arrive with permanent pressure marks. This is especially important for retail orders where the first visual impression matters at store receiving.
A good packing instruction should define fold direction, piece quantity per polybag or paper band, carton quantity, and whether tissue or liner sheets are needed. For natural canvas, also consider dust protection because backing fibers and canvas lint can stick to dark embroidery thread. If the buyer wants plastic-free packing, confirm that paper wrapping still protects the embroidery from abrasion during export transport.
- Avoid folding through the embroidered logo when the design is dense or raised.
- Keep handles away from the logo face inside the carton stack.
- Use consistent bundle quantities so pressure is even across the carton.
- Request carton drop handling awareness for premium retail totes with raised embroidery.
- Ask for packed carton photos before shipment, not only individual bag photos.
Quote Data Buyers Should Require
A useful supplier quote should contain enough technical detail for comparison. Unit price alone does not show whether the supplier has allowed for the correct backing, stitch count, fabric weight, or packing method. For embroidered canvas totes, the quote should identify the fabric composition, canvas weight, bag size, handle size, embroidery size, thread type, backing type, estimated stitch count, MOQ, sample charge, production lead time, and export packing.
Lead time should be broken into stages where possible. Artwork review and digitizing may take a few days. Fabric procurement, dyeing, cutting, embroidery, sewing, trimming, inspection, and packing each add time. If the order has a fixed launch date, ask which materials must be approved first and what happens if the embroidery sample needs revision. A realistic quote protects both buyer and factory from rushing the most visible part of the bag.
- Quote fabric as cotton canvas 12 oz or 340 GSM, not only canvas material.
- Quote embroidery by size and stitch count, not only by logo.
- Quote backing type and trimming method as part of the decoration spec.
- Quote sample lead time separately from bulk production lead time.
- Quote packing method with carton size and estimated gross weight if freight planning is needed.
Acceptance Criteria for Bulk Inspection
Before production starts, define what is acceptable and what is not. Without acceptance criteria, the supplier may consider small puckers normal while the buyer considers them defects. For embroidered canvas tote bags, inspection should cover logo placement, stitch quality, thread color, backing condition, fabric damage, trimming, and packing. The approved pre-production sample should be the reference, but measurable tolerances are still needed.
Common acceptance rules include logo placement within plus or minus 5 mm for standard tote bags, no broken stitches on the visible logo area, no exposed backing on the front face, no fabric holes beyond needle penetration, and no loose thread tails longer than the agreed limit. For premium retail bags, standards may be tighter. For low-cost promotional bags, buyers may accept minor reverse-side appearance issues if the front face is clean and the inside is not scratchy.
- Classify front logo puckering, skipped stitches, and wrong logo position as major defects when visible at normal viewing distance.
- Classify rough backing edges as major defects if they can scratch contents or hands.
- Classify small reverse-side thread tails as minor defects if they do not affect use or appearance.
- Use the approved sample to judge normal embroidery relief and thread sheen.
- Inspect packed goods after carton opening because compression defects may not appear at the sewing line.
Specification comparison for buyers
| Spec decision | Recommended option | When it fits | Buyer risk to check |
|---|---|---|---|
| Canvas fabric weight | 10-12 oz cotton canvas, about 280-340 GSM | Most retail tote bags with front-panel logo embroidery under 90 mm wide | Lighter canvas can pucker; heavier canvas may need stronger needles and slower production speed |
| Backing type | Medium tear-away backing for stable woven canvas | Simple logos, text, badges, and moderate stitch counts | Poor tear removal can leave fuzzy edges or pull stitches loose |
| Backing type for dense logo | Cut-away or no-show polymesh backing | Dense filled logos, small lettering, or designs over 8,000 stitches | Visible backing edge or hand-feel complaints inside the bag |
| Embroidery position | Flat front panel before bag sewing | Most tote orders where logo is centered and panel access is easy | If embroidered after sewing, hoop marks and crooked placement risk increase |
| Logo size | 60-90 mm wide for standard front logo | Corporate giveaways, retail brand marks, and event totes | Oversized embroidery increases cost, puckering, needle breaks, and lead time |
| Thread choice | 120D/2 polyester embroidery thread | General export orders needing good colorfastness and abrasion resistance | Cotton thread may look natural but can fade faster and break more often in production |
| Inside comfort | Backing trimmed cleanly with no sharp fused edges | Totes used for apparel, books, gifts, or daily carry | Scratchy backing can create complaints even when the front logo looks acceptable |
Buyer checklist before sampling
- Confirm canvas weight in oz and GSM, not only fabric description such as natural canvas.
- State whether embroidery is done before bag sewing or after bag assembly.
- Provide logo size in millimeters, stitch file if available, and required thread color reference.
- Ask the factory to recommend backing type based on stitch count, not only on visual logo size.
- Approve one pre-production sample with the final canvas, backing, thread, and logo placement.
- Check front puckering, reverse-side backing comfort, loose threads, skipped stitches, and hoop marks.
- Define tolerance for logo placement, usually plus or minus 5 mm for standard tote embroidery.
- Require photos of the embroidery reverse side before bulk production starts.
- Confirm packing method prevents embroidered panels from being crushed by straps or folded seams.
- Include backing type, logo size, stitch count, and embroidery location in the purchase order.
Factory quote questions to send
- What canvas weight in oz and GSM are you quoting, and is it greige, bleached, dyed, or washed?
- Which embroidery backing will you use for this logo, and why is it suitable for the stitch count?
- Will embroidery be done on flat panels before sewing or on finished bags after assembly?
- What is the estimated stitch count per logo and how does it affect the embroidery charge?
- Can you provide a photo of the front and reverse side of the embroidery sample before bulk approval?
- What needle size, thread type, and thread color system will be used for the production run?
- What is the minimum order quantity for this embroidery setup, and does a lower MOQ change the unit price?
- How many production days are needed after artwork approval, material arrival, and sample confirmation?
- How will embroidered bags be folded and packed to avoid pressure marks on the logo area?
- What inspection standard will be used for puckering, skipped stitches, backing residue, and logo placement?
Quality-control points to confirm
- Measure fabric GSM and compare it with the approved sample because lighter fabric can change embroidery tension.
- Check embroidery alignment against the bag centerline, handle position, and bottom seam, not only against the cut panel.
- Inspect both front and reverse sides of the logo for puckering, backing residue, thread knots, and loose tails.
- Rub the reverse side by hand to confirm backing edges are not sharp, stiff, or likely to snag contents.
- Test fold one packed bag for 24 hours and check whether the embroidery becomes flattened or permanently creased.
- Compare thread color under daylight and indoor light, especially for dark logos on natural or dyed canvas.
- Open random cartons during final inspection to verify that the packing method matches the approved sample.
- Record stitch count, logo size, backing type, and thread code on the inspection report for repeat orders.