Why the double-handle seam is the first failure point
On a canvas tote bag, the handle seam is not just a sewing detail. It is the part that carries the weight, shows the first signs of fatigue, and creates most of the buyer complaints when the bag is used in the real world. A tote can look fine on a sample table and still fail after a few grocery runs or a trade show giveaway because the handle attachment was too narrow, the bartack was too light, or the seam allowance was inconsistent. For procurement teams, the problem is simple: the cost of a weak seam is far higher than the cost of one extra reinforcement step.
When you write an RFQ for a double-handle tote, treat the handle seam as a functional specification, not a cosmetic one. Ask the factory to define how the handle is attached, where the reinforcement lands, how much fabric is folded back, and what load the sample is expected to survive. If the supplier cannot explain that construction in plain terms, the quote is not ready to compare. Buyers who lock this down early usually avoid the most common disputes later: crooked handles, broken thread, seam puckering, and claims that the artwork forced a weaker stitch line.
- The seam carries the load, not the logo or the fabric hand feel.
- Weak reinforcement often shows up only after packing, transit, or customer use.
- A good quote should describe construction, not just bag size and color.
Lock the basic construction before you ask for price
A useful seam inspection checklist starts with basic construction data. For a standard branded tote, many buyers work from 10 oz to 14 oz canvas, or roughly 340 to 475 gsm, depending on whether the bag is meant for giveaways, retail, or grocery use. The handle itself should also be defined: width, folded width, length, and whether the handle is self-fabric, webbing, or a blended construction. If the supplier gives you only the phrase durable canvas tote, you do not yet have enough detail to compare suppliers on a like-for-like basis.
Ask for seam allowance in millimeters, stitch density in stitches per inch, and bartack length at the stress points. For example, a simple retail tote may use a 10 to 12 mm seam allowance and 6 to 8 SPI, while a heavier carry program may need denser reinforcement. The goal is not to force one universal construction. The goal is to make sure every factory is quoting the same target. Without that, one supplier may look cheaper only because it is quoting a lighter seam, less thread, or fewer reinforcement passes.
- Define canvas weight in gsm or oz and confirm whether that is finished fabric or greige fabric.
- Confirm handle material, folded width, and whether the handle is sewn into the side seam or top edge.
- Request seam allowance, stitch count, and bartack spec in the tech pack or sample sheet.
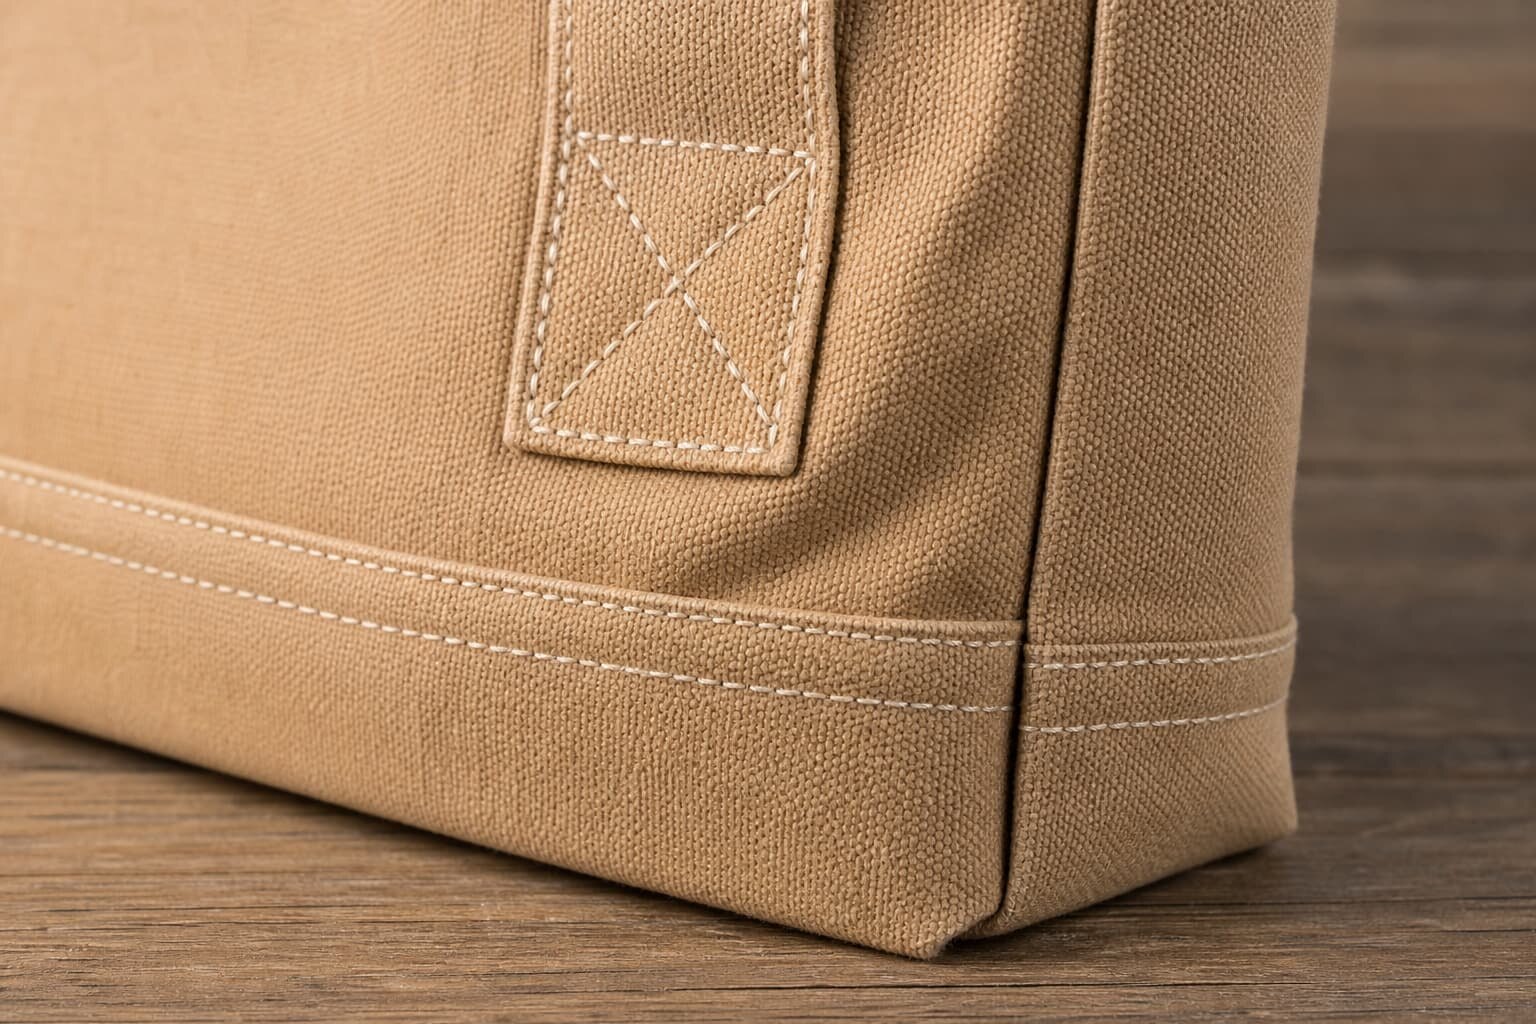
What to check on the first sample in the sample room
The first sample is where seam problems should be visible before they become production problems. Place the tote flat and inspect both handles for symmetry, placement height, and the way each handle enters the top seam. The handle ends should sit cleanly, with no twisting, uneven fold width, or exposed raw edges unless the design intentionally allows it. Check the front and back of the seam line, not only the visible side. Many bags look neat from the outside but hide loose thread, missed locking, or rough trimming on the inside.
For a buyer, the sample should also prove that the bag stands up when empty and remains balanced when filled. A simple practical test is to load the sample with the kind of items your customer would carry, then check whether one handle pulls harder than the other or whether the top edge warps. If the bag is sold as a premium retail item, the seam should still look clean after the first load test. If the bag is for light promotional use, you still need a clear pass-fail rule so the factory knows how much variation is acceptable.
- Check handle alignment from the top edge, not only from the side seam.
- Inspect both the outer and inner stitch lines for skipped stitches or loose thread ends.
- Confirm the bag remains balanced under a simple carry load, not just when empty.
Do not let print placement weaken the seam
Printing and seam integrity are linked more often than buyers expect. If the logo sits too close to the top edge or runs across the handle attachment area, the print method can change how the fabric behaves during sewing. Screen print may be fine for a simple flat logo on a stable canvas body, but heavy ink build near the seam can make the area stiffer and more likely to pucker. Embroidery can look premium, but dense stitching near a stress point adds bulk and can create a ridge that affects the way the handle folds or sits in carton pack.
This is why the quote must state the print method, artwork size, and print location relative to the seam. If the graphic crosses the handle zone, ask the factory whether they will sew first and print later, print first and sew later, or move the art slightly to protect construction quality. Buyers should also request a printed sample after sewing, not only a flat art proof. A logo that looks perfect on paper can still fail once the fabric is folded and the top seam is closed.
- Screen print works well for simple, low-color branding on stable canvas.
- Embroidery is premium but can add bulk near the seam line.
- Ask for the exact distance from logo edge to stitch line before approving artwork.
Use a comparison logic that exposes hidden cost differences
When suppliers quote a double-handle tote, the cheapest unit price is not always the best value. Some factories lower cost by using lighter canvas, fewer bartacks, narrower seam allowance, or a simpler handle fold. Others save on inspection, which means the defect rate moves from the factory floor to your receiving dock. A better comparison is to break the quote into fabric, handles, stitching, print, packing, and inspection. That way, a buyer can see whether the price difference comes from a real construction choice or from missing work.
MOQ logic matters too. A factory may quote a low price at a high minimum order quantity because the print setup and sewing line changeover are spread over more units. If your order is split by color, print version, or handle size, ask whether the MOQ applies per style or per artwork. For a small retail launch, the right answer may be a slightly higher unit price with lower risk and better seam control. For a repeat program, the buyer may accept a larger MOQ in exchange for a stronger construction and more stable lead time.
- Ask for a cost split so you can compare real construction decisions.
- Check whether MOQ changes by color, print version, or handle construction.
- Treat seam strength as part of unit cost, not as a free upgrade.
What a practical pull test should prove
A pull test should not be treated as a lab trophy. It is a practical check that tells you whether the handle seam, bartack, and top edge can survive the expected use case. The test should match the bag's market. A trade show tote may need only a moderate load test, while a grocery or book-carry bag needs a more demanding one. The exact target should come from the buyer's use scenario, not from a vague factory promise. Ask the supplier to state the load, duration, and failure condition before testing begins.
For example, a buyer might ask a sample to hold a stated weight for a fixed time without seam opening, thread breakage, or permanent distortion of the top edge. That is more useful than saying the bag is strong. Also check what happens after the test: does the handle recover, does the seam wave, or does the bartack tear the fabric around it? A seam can technically survive a short test and still be poor for retail because the fabric around the stitch holes looks damaged or the bag no longer folds flat for packing.
- Tie the test to your real use case, not a generic strength claim.
- Define the failure condition before the factory starts testing.
- Inspect appearance after load testing, not only survival during the load.
Packing can hide seam damage before shipment
A clean seam at inspection can still arrive crushed if packing is careless. Double-handle totes are often folded and stacked tightly, which can flatten bartacks, crease the top edge, or leave a permanent fold line near the handle base. If the bag has thick canvas or a reinforced handle, packing pressure can also make the seam look distorted when it is first unpacked by the buyer. That is why packing instructions should be part of the RFQ, not an afterthought after production starts.
Ask the factory how the bag will be folded, whether the handles are tucked inside or laid flat, and whether a polybag is used before carton packing. For retail programs, the packing method should protect the seam while also keeping the bag presentable on arrival. Carton count, carton size, and stacking height all matter because excessive pressure can affect the top edge and make a good seam appear irregular. If the product is being shipped with inserts or hangtags, those details also need to be checked so they do not press into the stitch line.
- Request a folding method that protects the top seam and handle base.
- Confirm carton count and stacking height so the bag is not crushed.
- Check whether insert cards or hangtags could deform the seam area in transit.
Use acceptance criteria that a factory can actually follow
A strong buyer checklist only works if the factory can execute it on the line. Set visible acceptance criteria for seam placement, stitch quality, handle alignment, and load behavior. If you want the handle attachment to stay within a certain distance from the top edge, write that number down. If the bartack must be centered over the seam with no skew, say that clearly. If loose thread ends are unacceptable, define the trimming standard. These are small details, but they are exactly the details that separate a sellable tote from a return risk.
It also helps to define what is a minor defect and what is a reject. A slight thread shade change may be acceptable on a low-cost promotional run, but a broken bartack, open seam, or handle twist should never pass. The cleaner your acceptance criteria, the less room there is for a supplier to argue that a defect is normal. Buyers who manage multiple factories should use the same pass-fail language across suppliers so the quote comparison stays honest and the inspection team does not have to guess what the brand wants.
- Write measurable acceptance criteria for placement, stitch quality, and balance.
- Separate cosmetic variation from structural defects.
- Use the same defect language across all factories for cleaner quote comparison.
A buyer workflow that prevents seam disputes
The best way to avoid a handle seam dispute is to force the right sequence. Start with the RFQ, then review a construction sample or detailed spec sheet, then approve a sewn preproduction sample, and only after that move to bulk. If a buyer skips straight to price, the factory may assume a lighter construction is acceptable. If the buyer skips the sewn sample, the first visible proof of a weak seam may be on the first production run. That is expensive to correct and even more expensive if the product is already booked into a retail calendar.
Build the workflow around evidence. Ask for the cut sample, the sewn sample, photos of the stress point, and at least one test result or internal check before bulk approval. Then compare the quote against the sample, not against the sales sheet. If the factory changes thread, handle width, or reinforcement style after approval, require a revised sample or written sign-off. That one control step protects buyers from the most common production mistake: assuming that a small construction change will not affect the seam.
- RFQ first, sewn sample second, bulk approval last.
- Compare the quote to the approved sample, not just to the sales description.
- Require sign-off for any change to thread, handle width, or reinforcement style.
Specification comparison for buyers
| Spec decision | Recommended option | When it fits | Buyer risk to check |
|---|---|---|---|
| Handle attachment | Box-X with reinforced bartacks | Retail totes, grocery carry, heavier sample loads | Check if stitch density is even and if both handles land at the same height |
| Fabric weight | 12 oz to 14 oz canvas, about 410 to 475 gsm | Most branded retail and promotional programs | Watch for a soft cloth that looks thick but collapses under load |
| Stitch construction | Lockstitch with 6 to 8 stitches per inch and dense bartacks | When the bag must stay neat after repeated use | Loose tension can pucker the seam or leave skipped stitches |
| Print method near seam | Screen print for simple logos, embroidery for premium marks, transfer only if tested | When branding sits close to the handle zone | Ink cracking or embroidery bulk can distort the seam line |
| Handle width and fold | 25 to 38 mm folded handles with balanced fold width | Standard shopping totes and trade show bags | Uneven fold width makes one handle carry more stress than the other |
| Inspection method | 100 percent visual check plus sample pull test | First orders, new factories, and new handle specs | A clean seam can still fail if thread, bartack, or handle patch is weak |
Buyer checklist before sampling
- Confirm canvas weight in gsm or oz, not just the word heavy duty.
- Approve handle width, folded thickness, and exact attachment point on the body.
- Ask for seam allowance, stitch count, and bartack length on the tech pack or sample sheet.
- Check that both handles are stitched symmetrically and sit flat when the bag is empty.
- Inspect the top edge for puckering, skipped stitches, loose threads, and needle holes.
- Verify that logo placement does not cross a stress point unless the method was tested there.
- Request a pull test on preproduction samples and define the target load and duration.
- Review carton pack count, folding method, and polybag thickness so seams are not crushed in transit.
Factory quote questions to send
- What canvas weight, weave, and shrinkage allowance are you quoting for the body and handles?
- What seam construction do you propose for the handle attachment, and can you show a sample photo?
- How many stitches per inch and what bartack length will you use at the stress points?
- What print method is included, and does the artwork sit close to the seam or handle fold?
- What is the minimum order quantity by color, by print version, and by handle style?
- What is the sample lead time, preproduction lead time, and bulk lead time by order size?
- Which inspection steps are included before packing, and what defects trigger rework?
- How will the bags be packed, folded, and cartonized to protect the top seam and handle shape?
- What is included in the unit price, and what are the separate charges for sampling, print setup, or special thread?
- Can you confirm the same construction will be used on the production line as on the approved sample?
Quality-control points to confirm
- Measure handle spacing, handle drop, and top edge symmetry against the approved sample.
- Check seam allowance at the handle attachment and confirm it does not vary from bag to bag.
- Inspect bartacks for density, width, and end locking so they do not open under tension.
- Look for puckering around printed or embroidered zones near the top seam.
- Run a short load test on samples and on first production cartons to catch weak thread or poor reinforcement.
- Verify that thread color, stitch line, and handle fold are consistent on both sides of the bag.
- Check inside seam cleanliness, loose thread trimming, and needle damage on the fabric surface.
- Confirm that packing does not flatten, crease, or deform the handle seam before shipment.