Why Cross Stitch Handles Deserve Separate Inspection
A canvas tote bag can look acceptable in a carton photo while the handle construction is already weak. The cross stitch area carries the load, receives the most pulling stress, and is often where sewing speed, thread tension, fabric thickness, and operator judgment meet. For procurement teams, this is not a cosmetic detail. A failed handle becomes a product complaint even if the fabric, print, and carton packing were all approved.
The buying problem is simple: many RFQs say only "canvas tote bag with reinforced handles." That wording is too loose. One factory may quote a real box-and-X stitch through strong webbing. Another may quote a shallow decorative X with thin thread and minimal back tack. Both quotes may look similar on paper, but the second one can fail during retail use, sampling, or distributor evaluation.
- Use a close-up handle specification in the RFQ, not only a full bag photo.
- Ask for stitch dimensions and thread type before comparing unit prices.
- Treat handle construction as a load-bearing component, not a style option.
- Approve a physical sample before bulk cutting when the handle is custom.
Define the Bag Before You Define the Stitch
Cross stitch performance depends on the full bag structure. A 6 oz promotional cotton tote and a 12 oz retail canvas tote should not use the same sewing assumption. For most reusable canvas tote bag programs, buyers commonly specify 10 oz to 12 oz cotton canvas, roughly 280 to 340 GSM. Lighter fabric can still work for events or mailers, but the stitch box may pucker and the load target should be lower.
The handle material also changes the inspection approach. Cotton webbing gives stable width and efficient production, but shade and texture may differ from the body fabric. Self-fabric handles give a clean matched look, especially on natural or dyed canvas, but they require careful folding and pressing. If the handle is folded canvas, the operator may sew through multiple layers at the attachment point, so needle size, thread tension, and machine setting become more important.
- Record body fabric as oz and GSM, for example 12 oz / about 340 GSM.
- State whether the canvas is natural, bleached, dyed, washed, or pigment dyed.
- Confirm handle width, finished drop, and total handle length in millimeters.
- Specify handle material separately from body fabric to avoid quote ambiguity.
- If the bag has a bottom gusset, confirm the expected load use with the supplier.
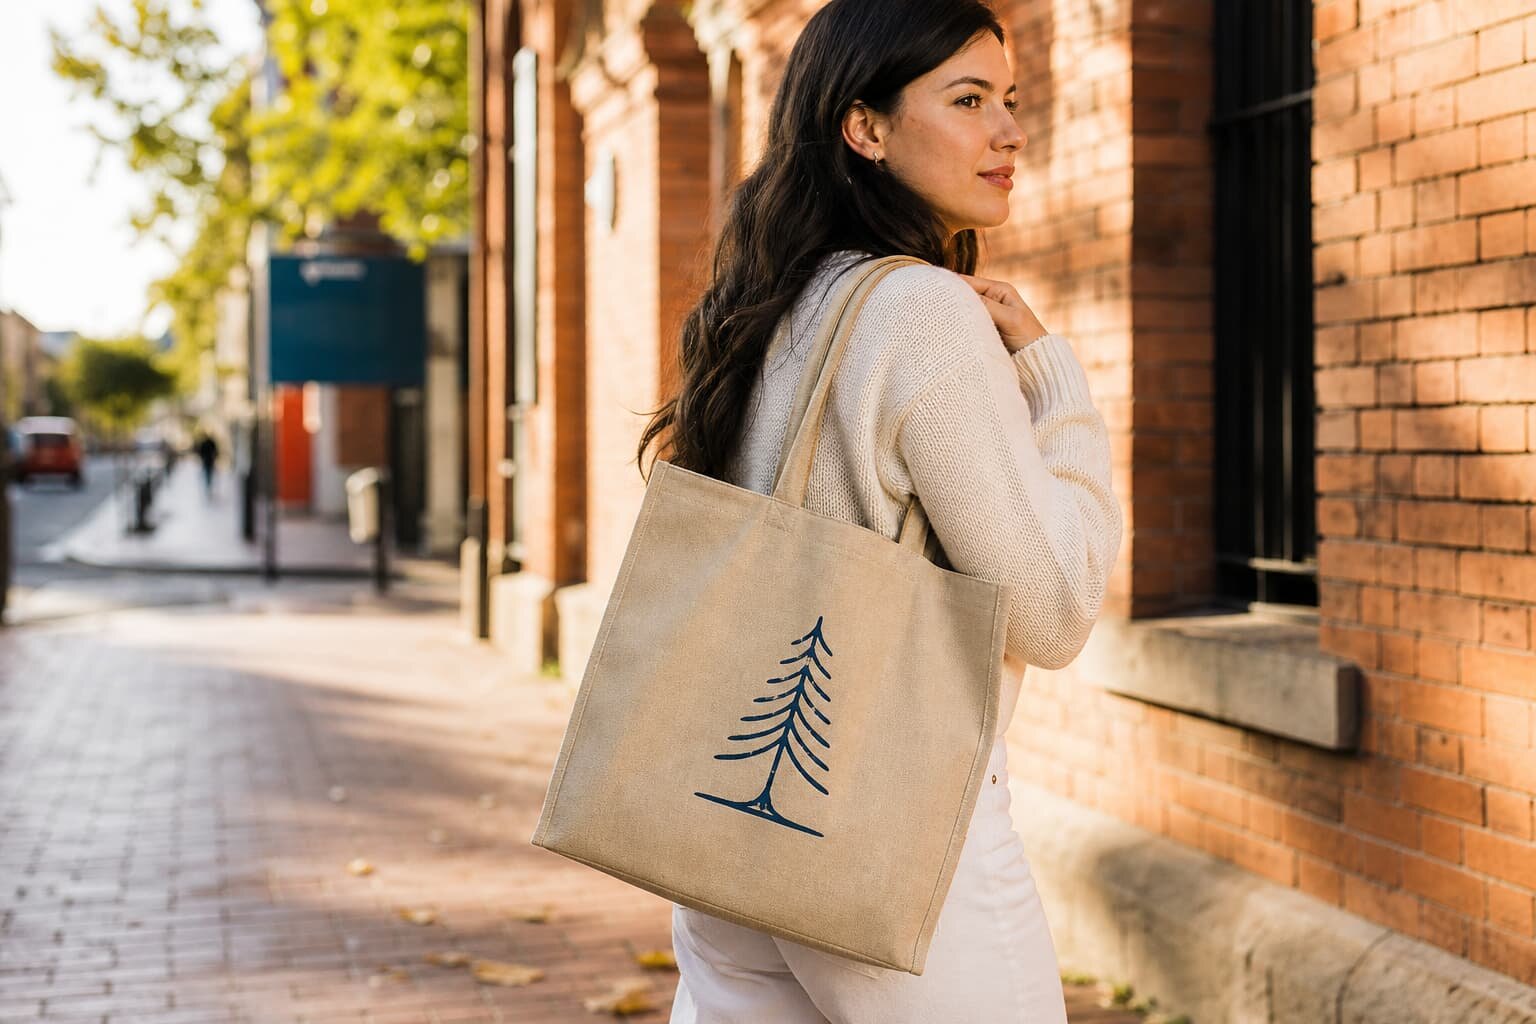
What a Proper Cross Stitch Specification Should Include
A useful specification does not need to be complicated, but it must be measurable. The factory should know the reinforcement box size, the X direction, the distance from the top hem, the handle insertion depth, and the stitch density. For a typical canvas tote, the reinforced box may sit below the top folded hem and cover the full handle width with enough surrounding fabric to distribute stress. The exact size should follow the bag size and handle width, not a random template.
Buyers should also define whether the stitch is functional or decorative. A real load-bearing box-and-X should include secure back tack or lock stitch control at the start and end. If the design uses visible contrast thread, the thread path becomes both a strength point and a brand-facing detail. In that case, the approved sample should show the exact thread shade, stitch density, and acceptable irregularity level.
- Box width should cover the handle end without leaving loose side edges.
- Box height should be deep enough to distribute pulling stress below the top hem.
- X stitch should reach near the corners without cutting outside the box.
- Back tack should be present and neat, not a bulky thread nest.
- Stitch density should be consistent on front and back sides of the bag.
Fabric Weight, Needle, and Thread: Where Failures Start
The most common handle failures are not dramatic at the sample stage. They start as skipped stitches, loose underside loops, needle cutting, or slight fabric tearing around the stitch holes. These defects may not be obvious in a front-view photo. They appear when the bag is loaded, pulled repeatedly, folded tightly, or washed. Heavier canvas needs a machine setup that can pass through stacked fabric without damaging the yarns.
For many canvas tote programs, polyester thread is safer than cotton thread because it handles abrasion and washing better. Thread size should match fabric thickness. If the thread is too fine, the cross stitch may look neat but lack strength. If the thread is too thick, it can create bulky knots and tension problems. The buyer does not need to dictate every machine setting, but the RFQ should force the factory to declare the thread and sewing standard being quoted.
- Ask whether the quoted thread is polyester, cotton, or blended thread.
- Check the underside of the stitch box, not only the visible front side.
- Look for needle holes that enlarge or tear after a simple pull check.
- Reject samples where the X stitch pulls the handle into a twisted shape.
- For washed canvas, approve stitching after wash treatment if washing occurs after sewing.
Print Method and Handle Stitching Must Be Planned Together
Many tote bag problems happen because print artwork and handle stitching are approved separately. Screen print, heat transfer, embroidery, woven labels, and sewn patches all interact with the handle area. If the logo sits too high, the presser foot can mark the print, or the stitch box can pierce part of the artwork. If the print is applied after sewing, raised handle areas may prevent even pressure during printing.
For screen printed cotton canvas totes, it is usually safer to leave a clear gap between the artwork and the handle reinforcement area. Heat transfer graphics need even pressure and should not overlap bulky seams. Embroidery adds another layer of thread stress and may need backing, especially on lighter canvas. If the bag has a front logo plus visible cross stitch, ask the factory to send a layout drawing with dimensions from top hem, side seam, and handle box.
- Keep artwork at least 20-25 mm away from handle stitch boxes unless tested.
- Confirm whether printing happens before or after sewing.
- For heat transfer, check whether the handle bulk affects press pressure.
- For embroidery, review backing, stitch count, and fabric puckering risk.
- For woven labels, confirm whether the label seam competes with handle stitching.
Sample Approval: What to Cut Open, Pull, and Measure
A buyer-approved sample should be more than a nice-looking reference. It should be a production sample made with actual fabric weight, actual handle material, actual thread, and the intended print method. If the sample uses substitute fabric or a hand-made stitch that bulk production will not follow, it is not enough for handle approval. Procurement teams should label the approved sample and keep close-up photos of the handle inside the technical file.
For first orders or changed handle specifications, ask for at least two or three samples: one for visual approval, one for internal load testing, and one to keep sealed as a reference. A simple hanging load test is often useful. The buyer and factory can agree on an example test, such as loading the bag with a defined weight for a defined time, then checking for stitch breakage, fabric tearing, handle slippage, or major distortion. The test does not need to replace lab testing, but it prevents weak construction from entering mass production unnoticed.
- Measure handle drop from the top edge to the inside top of the handle curve.
- Measure the distance from handle edge to side seam on left and right sides.
- Check whether both handles sit at the same height and angle.
- Inspect the inside face for loose thread, knots, or missed layers.
- Photograph the sample with a ruler beside the stitch box for future comparison.
Inline Inspection Is Better Than Finding Defects in Cartons
Cross stitch handle defects are easier to correct while the sewing line is still running. Once bags are printed, folded, packed, and export-cartoned, repair becomes slow and sometimes impossible without leaving needle holes. An inline check should be done after a small quantity is sewn, before the operator repeats the same error across thousands of pieces. This is especially important when the tote has custom-dyed fabric, expensive print, or retail packaging.
The inspection team should not only count defects. They should identify drift. Handle boxes can slowly move lower, become angled, or shrink in size as operators speed up. Thread tension can change after bobbin replacement. A good inline inspection photo set includes front view, back view, inside view, and close-up views of both handle attachments. If the factory sends only stacked finished goods photos, the buyer still has no evidence that the handles were sewn to the approved standard.
- Check the first 20-30 sewn pieces before bulk sewing continues.
- Compare inline pieces against the signed pre-production sample.
- Separate defects into strength defects, appearance defects, and dimension defects.
- Require correction records if handle alignment or stitch density drifts.
- Ask for close-up photos after any machine setting or operator change.
Acceptance Criteria Buyers Can Put in the PO
Acceptance criteria should be clear enough for the factory, third-party inspector, and buyer to judge the same way. Avoid wording like "good stitching" or "strong handle." Instead, define the visible and functional conditions that are acceptable. For example, no skipped stitch in the handle box, no broken thread, no loose handle edge outside the stitch box, no major misalignment, and no fabric tear around needle holes.
Tolerances should match the product and sales channel. A premium retail canvas tote needs tighter visual tolerance than a low-cost event giveaway. However, handle strength defects should be treated seriously in both cases. One broken handle can create returns, retailer chargebacks, or brand complaints. If a buyer uses AQL inspection, handle attachment defects should usually be classified more severely than minor thread trimming issues.
- Critical: handle detaches, fabric tears at stitch box, or stitch box misses handle layers.
- Major: skipped stitches, loose bobbin loops, broken thread, severe handle height mismatch.
- Major: print damaged by sewing or cross stitch placed through approved artwork.
- Minor: small thread tail if it can be trimmed without affecting stitch security.
- Measurement: handle drop and position tolerance should be agreed before production.
MOQ, Lead Time, and Quote Data That Affect Handle Quality
A low unit price may hide quality risk if the quote does not show what is included. Handle construction affects labor time, thread consumption, machine setup, and inspection workload. A self-fabric handle with folded edges and box-X stitching takes more handling than a stock cotton webbing handle. Contrast thread also increases visibility of every sewing variation, which may slow production if the buyer expects a clean premium look.
MOQ is usually driven by fabric availability, dye lot, webbing roll quantity, print setup, and cutting efficiency. Natural canvas with stock webbing can often be easier to source at lower volume than a custom PMS dyed body with matching handle tape. Lead time should also separate sample approval from bulk production. A realistic timeline includes artwork proofing, material booking, pre-production sample, buyer approval, cutting, printing, sewing, inline inspection, final inspection, and packing.
- Ask the supplier to quote fabric, handle, print, packing, and tooling or setup separately when possible.
- Confirm if the quoted MOQ changes for custom webbing color or heavier canvas.
- Request the sample lead time and bulk lead time as separate line items.
- Ask whether printing or sewing is the production bottleneck for the order.
- Require the quote to state export carton quantity and packed carton dimensions.
Packing and Shipment Checks for Reinforced Handle Totes
Packing can damage a well-made canvas tote if the fold line is wrong. A hard fold across the cross stitch handle box can flatten the thread, mark the canvas, or create a crease that does not relax before retail display. Printed totes have another concern: if the handle reinforcement presses into the printed face during tight packing, it may leave indentation or abrasion marks. This is more visible on dark prints, rubberized transfers, and pigment-dyed canvas.
Buyers should specify whether bags are packed flat, half-folded, individually polybagged, paper-banded, or bulk packed. The best option depends on the sales channel and shipping cost target. Flat packing protects the product better but increases carton volume. Folding reduces freight volume but needs a controlled fold location. Before shipment, inspectors should open cartons from top, middle, and bottom layers to check whether pressure marks or handle creases appear across the lot.
- Define fold direction and avoid folding directly through the handle stitch box.
- Use tissue or protective sheet if prints face reinforced handle areas.
- Check carton weight so lower layers are not crushed during stacking.
- Confirm carton count, inner pack quantity, and barcode or label requirements.
- Take unpacking photos during final inspection, not only repacked carton photos.
Specification comparison for buyers
| Spec decision | Recommended option | When it fits | Buyer risk to check |
|---|---|---|---|
| Canvas weight for reinforced handle tote | 10 oz to 12 oz cotton canvas, about 280-340 GSM | Retail gift bags, bookstore totes, event merchandise, light grocery use | Thin fabric may pucker around the cross stitch; heavy fabric may need slower sewing and larger needle |
| Handle material | Same canvas self-fabric handle or 1.25 in cotton webbing | Self-fabric for brand consistency; webbing for higher pull strength and cleaner mass sewing | Self-fabric handles can twist if not folded evenly; webbing can shade differently from body fabric |
| Cross stitch pattern | Box with X stitch, bar-tacked top and bottom if load target is high | Standard reusable tote bags where handles carry 5-8 kg in normal use | Decorative X only is not enough if stitch density, thread, and back tack are weak |
| Thread selection | Polyester 20s/3 or 30s/3 depending on fabric thickness | Most dyed, printed, and washed canvas tote production | Cotton thread can shrink or break after wash; thread shade must be approved under daylight |
| Print placement near handle | Keep logo at least 20-25 mm away from handle stitch box | Screen print, heat transfer, and embroidery orders with front-panel branding | Needle holes or presser-foot marks can damage print edges if artwork sits too close |
| Inspection sample quantity | Check at least 20 bags per color per shipment, more for first order | New supplier, new handle style, heavy fabric, or rush production | AQL sampling may miss handle alignment drift if only finished cartons are checked |
| Packing method | Flat pack with tissue or controlled fold line away from handle box | Retail-ready totes, printed front panels, natural canvas bags | Folding across cross stitch can create pressure marks, thread abrasion, or print cracking |
| MOQ logic | Align MOQ with fabric dye lot, webbing roll MOQ, and print setup | Custom color body, custom webbing, or PMS logo printing | A low unit MOQ can still carry high setup cost if handle tape or fabric must be dyed |
Buyer checklist before sampling
- Confirm bag body fabric weight in oz and GSM, not only the word canvas.
- Specify handle material, width, finished length, drop height, and whether it is self-fabric or webbing.
- Define the cross stitch pattern with dimensions: box height, box width, X stitch, back tack, and stitch density.
- Require a pre-production sample made with actual fabric, thread, print method, and handle construction.
- Measure handle symmetry from top hem and side seams on both front and back panels.
- Check whether the cross stitch penetrates all fabric layers cleanly without skipped stitches or loose bobbin thread.
- Run a basic pull test or hanging load test on sample bags before approving bulk production.
- Inspect print distance from the stitch box to avoid needle holes, rubbing, or distorted artwork.
- Review packing fold line so it does not crush the reinforced handle area or mark the print.
- Ask the factory to include photos of handle stitching during inline inspection, not only finished carton photos.
Factory quote questions to send
- What fabric weight are you quoting in both oz and GSM, and is it greige, dyed, washed, or bleached canvas?
- Is the handle quoted as cotton webbing, polyester-cotton webbing, or self-fabric folded canvas?
- What are the finished handle width, handle drop, and handle insertion depth below the top hem?
- What cross stitch box size, stitch density, thread type, and needle size will be used for the quoted sample?
- Can the quote include a simple load test standard for the handle, such as hanging weight and test duration?
- Will the logo be screen printed, heat transferred, embroidered, or woven label applied, and how close is it to the stitch box?
- What MOQ changes if we choose custom-dyed canvas or custom-dyed webbing instead of stock natural canvas?
- How many days are needed for artwork proof, sample making, bulk cutting, sewing, printing, inspection, and packing?
- Are cartons packed flat or folded, and how many bags per export carton for the quoted size?
- Can you send close-up photos of approved handle stitching before starting mass production?
Quality-control points to confirm
- Cross stitch box is centered on handle end and parallel to bag side seam.
- No skipped stitches, broken thread, loose bobbin loops, needle cutting, or visible thread nests.
- Both handles match in drop height within the buyer-approved tolerance.
- Handle ends are inserted evenly and secured through enough fabric layers.
- Top hem does not twist, wave, or collapse around the handle attachment point.
- Print artwork is not pierced, rubbed, or distorted by sewing operations.
- Thread color matches approved sample or intentional contrast specification.
- Reinforcement area passes agreed pull or hanging load check before packing.
- Carton folding method does not leave heavy creases across handle boxes.
- Inspection report includes front, back, inside, and close-up handle photos.