Why contrast trim changes the quote
A canvas tote bag with contrast trim is not just a plain tote with a different color on the edge. The trim changes material consumption, sewing steps, dye risk, colorfastness risk, and packing method. If the RFQ only says natural canvas tote with navy trim, suppliers may quote different constructions while all appearing to answer the same request. One factory may use dyed cotton webbing as edge binding, another may cut separate canvas strips, and another may use polyester tape because it is cheaper and cleaner to sew.
For procurement teams, the main buying problem is quote comparability. A low offer may be based on thinner body canvas, stock trim color, narrow binding, simple handles, or no colorfastness testing. A higher offer may include custom-dyed trim, heavier canvas, reinforcement stitching, and retail packing. Before negotiating unit price, make the trim construction visible in the specification.
- Ask whether contrast trim is functional reinforcement, decorative color blocking, or both.
- Define every trim location: top opening, side seam, bottom edge, handles, gusset, pocket edge, or label area.
- Quote the same finished trim width across suppliers so consumption and labor are comparable.
- Separate main fabric color approval from trim color approval because the materials may come from different lots.
Start with the bag structure, not the photo
Many buyer RFQs begin with a product image and a target size. That is not enough for a contrast trim tote. The factory needs to know whether the trim is sewn as folded binding over an edge, attached as a flat decorative strip, inserted into a seam, or used as separate handle webbing. These choices affect cutting, folding, sewing speed, seam thickness, and the final shape of the tote.
A practical RFQ should describe the finished bag as a production item. For example: finished size 380 W x 420 H x 100 mm bottom gusset, 10 oz natural cotton canvas body, navy contrast folded binding at top opening and side edges, 25 mm visible trim width, 30 mm wide navy cotton webbing handles with 260 mm drop, one-color screen print on front panel. This gives the factory enough information to cost material, labor, and print setup without guessing.
- Give finished size in width x height x gusset, and state whether measurements are taken flat.
- State handle drop and handle width separately; do not only provide total handle length.
- Show front, back, side, bottom, and inside views if trim placement is not symmetrical.
- Mark any seam where trim must align, especially at the top corner and bottom gusset.
Fabric weight and trim material choices
For most retail and promotional canvas tote bags with contrast trim, the body fabric often sits between 10 oz and 12 oz cotton canvas, roughly 280 to 340 GSM depending on yarn and weave. Lighter canvas can work for budget events, but the bag may collapse and the trim may look too heavy. Heavier canvas, such as 14 oz, gives a premium feel but increases sewing difficulty at folded corners and handle joints.
The trim material must be chosen with the body fabric. Same-fabric canvas trim gives a cohesive cotton look and accepts similar washing or steaming behavior, but it requires cutting and folding. Cotton webbing is neat and strong for handles or top borders, but the texture may differ from the body. Polyester webbing can reduce cost and improve color consistency, but it may feel less natural and can create a mismatch if the buyer expects an all-cotton product.
- 10 oz canvas: good for mid-range promotional and bookstore totes with moderate structure.
- 12 oz canvas: stronger retail feel, better for contrast trim that needs a crisp shape.
- 14 oz canvas: premium but may need stronger needles, slower sewing, and wider seam allowance.
- Cotton webbing trim: natural hand feel, but color variation and shrinkage must be controlled.
- Polyester webbing trim: stable color and clean edge, but disclose material if the claim is cotton canvas bag.
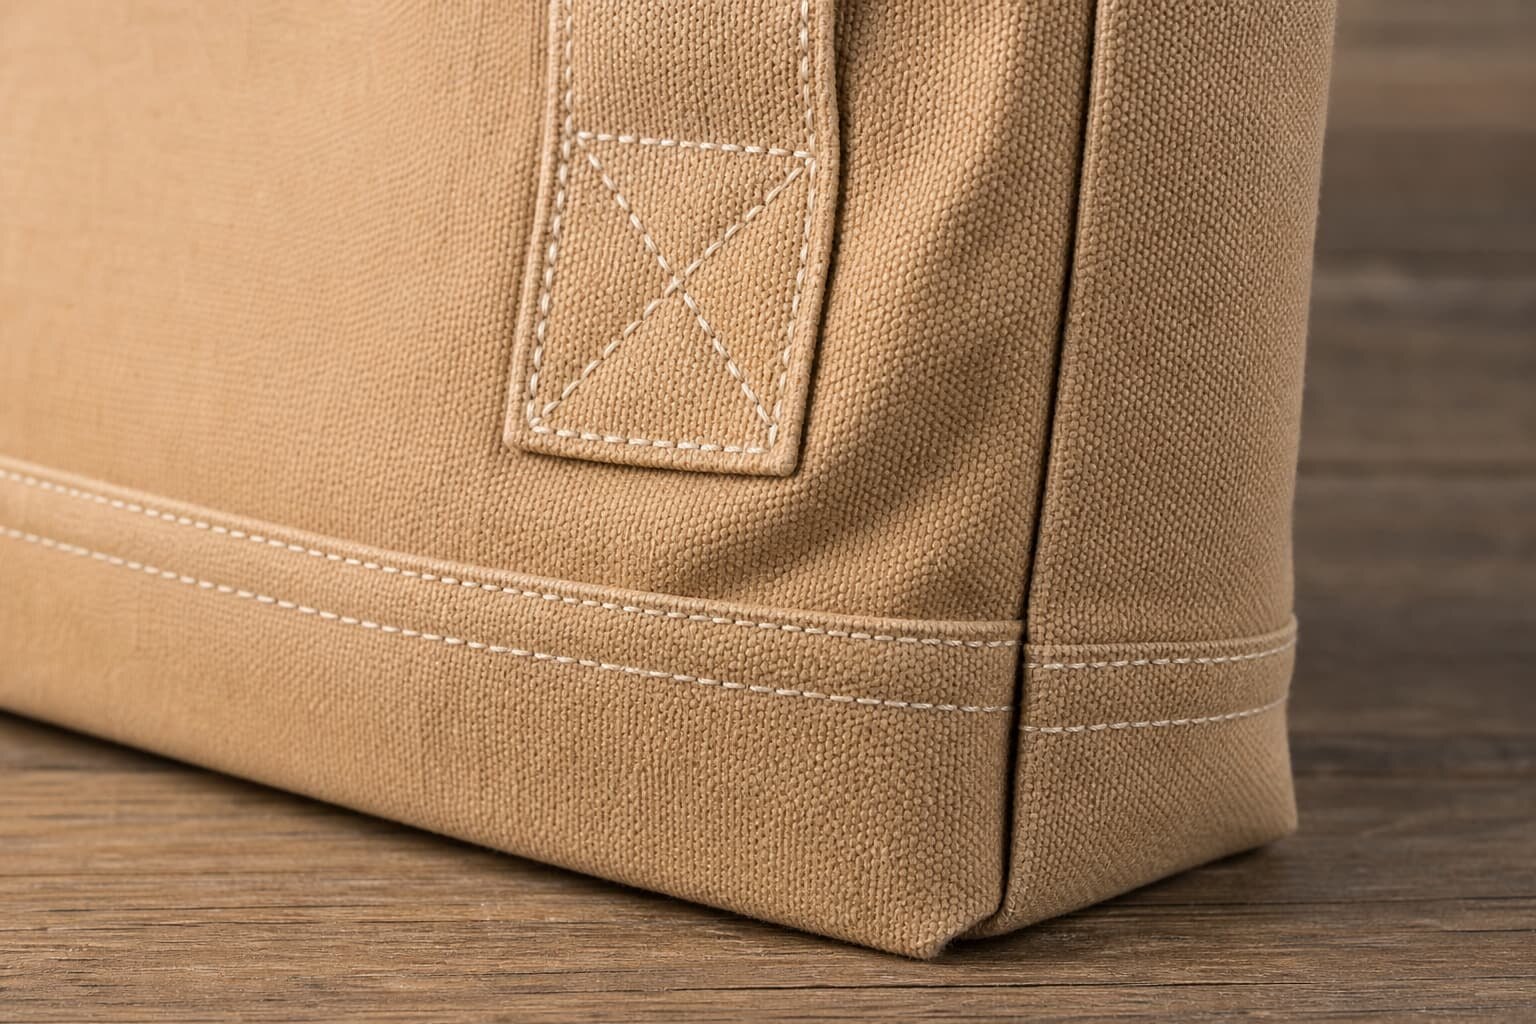
How trim width affects cost and appearance
Trim width is one of the most common hidden quote differences. A 15 mm visible trim gives a fine border; 25 mm looks balanced on many standard totes; 40 mm or more becomes a strong design feature. The wider the trim, the more material is consumed and the more visible any waviness becomes. If trim wraps around a top opening or bottom gusset, cut width is greater than finished visible width because fabric must fold into the seam.
Buyers should avoid sending only a reference photo and asking the factory to match. Camera angle and bag size can make trim appear wider or narrower than it is. Instead, state the target finished width and tolerance. For example, 25 mm visible trim width, tolerance plus or minus 2 mm, measured at three positions per side. This makes inspection easier and prevents a supplier from reducing trim width to save material.
- Use 20-30 mm finished width for most top-edge or side-edge contrast binding.
- Use 35-50 mm only when the trim is intended as a visible design panel.
- Specify whether the measurement includes stitching line or only visible color area.
- Ask the factory to show cut width and finished width on the technical sheet.
- For striped or patterned trim, confirm pattern direction and matching at joins.
Print method and artwork placement near trim
Screen printing remains the most common method for canvas tote bags with simple brand logos, solid colors, and good opacity. It is usually suitable for natural canvas, dyed canvas, and many contrast trim designs. Heat transfer can handle gradients or small detail, but buyers should check hand feel, edge film, and heat effect on dyed trim. Embroidery can look premium, but it is better for smaller marks because dense stitching can pull the canvas and distort the panel.
Artwork placement becomes more sensitive when contrast trim frames the bag. If the logo is visually centered between two navy side trims, a 5 mm print shift may look worse than it would on a plain tote. Do not place artwork over folded trim unless the construction is tested; seams and thickness changes can cause ink gaps, pressure marks, or transfer edges. The RFQ should include print size, print colors, Pantone targets, placement from top edge or side seam, and acceptable tolerance.
- Screen print: best for one to three solid logo colors on flat canvas panels.
- Heat transfer: useful for fine artwork, but confirm wash and rub resistance on canvas texture.
- Embroidery: good for small premium logos, not ideal for large filled graphics on soft canvas.
- Woven label: clean for side seam branding, but include label size, fold type, and placement.
- Keep print at least 20-30 mm away from raised trim unless the sample proves otherwise.
MOQ logic for contrast trim orders
MOQ for a contrast trim tote is driven by more than the number of bags. The factory may need minimum quantities for canvas rolls, dyed trim fabric, webbing color, print setup, labels, and packing materials. If the trim color is a stock navy or black, MOQ can be lower. If the buyer needs a custom Pantone orange trim across only 300 bags, the factory may quote a surcharge or propose a nearest stock color.
For distributors and retail buyers managing multiple SKUs, color split is the key point. An order for 3,000 bags split into five trim colors is not the same as 3,000 bags in one trim color. Each color may need separate material preparation and line control. In the RFQ, show total quantity, quantity per color, print version per color, and whether mixed-color packing is required.
- Ask for MOQ per trim color, not only MOQ per bag style.
- Confirm whether stock trim colors are available before requesting custom dye.
- Separate MOQ for printed logo versions if artwork changes by distributor or region.
- Expect higher unit cost for small color splits because setup and material waste increase.
- For test orders, consider one body fabric and one trim color to protect price and lead time.
Sample approval points before bulk
A contrast trim tote should not move to bulk production based only on a digital proof or photo sample made with substitute trim. The buyer needs to approve actual material thickness, color relationship, handle comfort, stitching quality, and print position. A sample made with thinner available trim may sew neatly, while the real bulk trim may pucker at corners or create a bulky top seam.
The best sample path is material swatch approval first, then a fit and construction sample, then a pre-production sample using actual bulk materials. For urgent orders, the factory may combine steps, but the buyer should clearly mark what is approved and what is still pending. If the approved sample uses substitute trim color, record that the construction is approved only and color remains subject to final swatch.
- Check body canvas hand feel, weight, weave density, and shade under consistent lighting.
- Measure trim width, handle drop, bag size, gusset, and print position on the sample.
- Inspect top corners where trim folds over multiple layers; this is where puckering often appears.
- Confirm thread color: matching trim, matching body, or contrast stitching as a design feature.
- Keep one sealed approved sample at the factory and one with the buyer for bulk comparison.
Packing decisions that protect the trim
Packing matters more when the tote has dark contrast trim against a natural canvas body. During ocean freight or warehouse storage, pressure, humidity, and rubbing can make dark edges mark lighter panels if colorfastness is weak. Even when there is no dye transfer, bulky trim can create deep fold marks that make the front panel look uneven when unpacked.
Buyers should define folding method, inner packing, carton quantity, and whether bags are individually polybagged or bulk packed. Individual polybags add cost and plastic, but they protect retail-ready bags and reduce abrasion. Bulk packing may be acceptable for events or distributor repacking, but carton pressure should be controlled. If the bag has a front logo, avoid folding directly across the print unless the print method and ink curing can handle it.
- State whether bags are packed flat, half-folded, or handle-tucked.
- Keep dark trim from pressing directly onto light print areas where possible.
- Ask for carton dimensions, gross weight, and pieces per carton in the quote.
- Use interleaving paper only when necessary; otherwise it adds handling cost and waste.
- Check a packed sample or pilot carton before approving high-volume retail packing.
Lead time items buyers often miss
Lead time for a contrast trim tote depends on material readiness. Stock natural canvas and stock navy webbing can move quickly, while custom dyed canvas body and custom dyed trim require lab dip, approval, dyeing, drying, finishing, and possible rework. Print screens, woven labels, hangtags, barcodes, and retail cartons also add steps that are easy to forget when comparing supplier promises.
A serious quote should break lead time into approval stages. Ask for estimated timing after artwork file receipt, after lab dip approval, after sample approval, and after deposit or purchase order confirmation. This protects the buyer from a common problem: the supplier quotes a production lead time but excludes the days needed for artwork correction, color approval, sample shipping, and buyer review.
- Lab dip approval can be required for custom trim colors and dyed body fabric.
- Pre-production sample approval should happen before cutting all fabric when possible.
- Printing lead time depends on artwork quality, screen setup, ink matching, and drying time.
- Retail packing components may have separate supplier lead times.
- Color split orders need careful scheduling to avoid mixed trim lots on the sewing line.
Quote comparison workflow for procurement
When supplier quotes arrive, do not compare only unit price. Create a comparison sheet with body fabric, GSM, trim material, trim width, handle construction, print method, included packing, sample basis, MOQ, lead time, and payment term. Many apparent price gaps come from different assumptions. One quote may include 12 oz canvas and individual polybags; another may use 8 oz canvas and bulk packing.
Ask suppliers to revise against one locked specification before final negotiation. If a factory suggests a cost reduction, require them to state exactly what changes: lower GSM, narrower trim, stock trim color, simplified handle stitching, fewer print colors, or different packing. This helps brand owners and importers decide whether the saving is acceptable or whether it will damage the retail appearance.
- Reject quotes that do not identify fabric weight or trim material.
- Normalize packing before comparing unit prices because polybagging and carton count affect cost.
- Check whether sample fee, mold or screen charge, label charge, and artwork setup are included.
- Ask for quote validity because cotton and dyeing costs can move between RFQ and purchase order.
- Keep the final approved quote attached to the production specification and purchase order.
Specification comparison for buyers
| Spec decision | Recommended option | When it fits | Buyer risk to check |
|---|---|---|---|
| Main body fabric | 10-12 oz cotton canvas, about 280-340 GSM | Retail promotions, bookstore totes, brand merchandise, and reusable shopping bags needing better structure than plain cotton sheeting | Confirm finished bag weight is not confused with fabric GSM; request fabric swatch and finished sample before bulk |
| Contrast trim fabric | Same canvas dyed to contrast color, or heavier twill tape for edging | Best when buyer wants clear color blocking on top opening, side panels, bottom, or handle reinforcement | Different shrinkage between body and trim can twist the bag after washing or steaming |
| Trim width | 20-30 mm visible finished width for edge binding; 35-50 mm for decorative side or bottom trim | Balanced look without adding too much sewing time or making the tote look bulky | Unclear finished width causes quote gaps because factories may calculate different tape consumption |
| Handle construction | Self-fabric canvas handles with contrast trim or contrast color webbing | Retail tote bags where the handle must match the edge color and carry moderate weight | Ask whether handle length is measured flat from top edge to top edge or total cut length |
| Print method | Screen print for solid CTM-style logos; heat transfer for fine gradients; embroidery only for small premium marks | Works for most brand logos on natural, dyed, or contrast canvas panels | Print over seam or trim edge may crack, distort, or misregister; keep artwork clear of stitching lines |
| MOQ logic | MOQ based on dyed trim color, fabric roll use, and print setup, not only bag quantity | Custom contrast colors, Pantone matching, and multi-SKU assortments | A low unit MOQ may still carry surcharge if contrast trim fabric must be dyed separately |
| Sample type | Pre-production sample using actual fabric weight, actual trim color, and actual print method | Needed before bulk when contrast trim color accuracy and seam appearance are important | Photo sample using substitute trim is not enough for color, thickness, or sewing approval |
| Packing method | Individual polybag or grouped master polybag with flat folding and trim protected from abrasion | Retail-ready shipments, distributor cartons, and ecommerce repacking | Dark trim can rub on natural canvas during compression if colorfastness and packing pressure are not checked |
Buyer checklist before sampling
- State finished bag size, gusset size, handle drop, seam allowance, and measurement tolerance instead of only giving a reference photo.
- Specify main body fabric by oz and approximate GSM, such as 10 oz cotton canvas around 280 GSM or 12 oz around 340 GSM.
- Define contrast trim placement, finished visible width, trim fabric type, and Pantone or standard color reference.
- Confirm whether trim is dyed canvas, cotton webbing, polyester webbing, twill tape, or PU trim because each quotes differently.
- Keep artwork away from trim seams unless the supplier confirms print registration tolerance on finished panels.
- Request actual material swatches for body canvas, trim, handle, thread, and print color before approving the sample.
- Ask for a pre-production sample using the same cutting method, sewing construction, and packing fold planned for bulk.
- Require colorfastness checks for dark trim against natural canvas, especially for navy, black, red, and forest green.
- Include carton packing method, pieces per carton, folding direction, inner bag requirement, carton marks, and barcode needs.
- Compare supplier quotes using the same fabric weight, trim width, print size, MOQ, sample cost, lead time, and packing basis.
Factory quote questions to send
- What exact fabric will be used for the main body: composition, oz, GSM, weave, shrinkage, and whether it is greige, bleached, dyed, or washed?
- Is the contrast trim made from the same canvas, separate dyed canvas, cotton webbing, polyester webbing, twill tape, or another material?
- What is the finished visible trim width, and what cut width will be required after folding and sewing?
- Does the quoted price include custom dyed trim, or is it based on an available stock color?
- What MOQ applies to the bag, the contrast trim color, the printed logo, and any SKU color split?
- Which print method is quoted, what is the maximum print size, and how many print colors are included?
- Will the sample use actual bulk fabric and actual trim color, or a substitute material for construction checking only?
- What seam reinforcement is included at handle joints, bottom gusset, side seams, and trim joins?
- What are the measurement tolerances for body size, handle drop, trim width, and print position?
- How will bags be folded and packed to prevent dark trim transfer, deep creasing, or print abrasion during transit?
Quality-control points to confirm
- Check finished trim width at top opening, side edges, and bottom panels against approved sample tolerance.
- Inspect trim color under consistent lighting and compare with approved swatch or Pantone target.
- Pull-test handle seams and inspect reinforcement boxes or bar tacks for skipped stitches and loose threads.
- Check whether contrast trim sits flat without puckering, twisting, waviness, or visible raw edge exposure.
- Verify print position relative to trim and seams, especially if the artwork is centered between contrast borders.
- Rub dark trim against natural canvas with dry and slightly damp cloth to screen for obvious color transfer.
- Measure bag width, height, gusset, handle drop, and carton quantity from randomly selected bulk cartons.
- Review folding marks after 24 hours packed because trim bulk can create uneven creasing on the front panel.
- Confirm needle holes, thread color, and stitch density match the approved pre-production sample.
- Check master carton strength, carton marks, polybag warning text if required, and barcode placement if retail packing is included.