What retail chain buyers are actually purchasing
A canvas merchandise bag for a retail chain is not just a reusable carrier. It is a repeatable branded item that has to pass through merchandising, operations, warehouse intake, and store-level handling without creating exceptions. That is why a retail launch bag needs tighter control than a one-off promo tote. The spec must define fabric, construction, print, and pack format well enough that another supplier could quote the same item without guessing.
The biggest mistake in chain sourcing is treating the bag as a soft accessory. In practice, it behaves like a controlled SKU. The chain needs stable appearance across stores, predictable pack-out for distribution, and a price that still works after freight, inspection, and rework risk are included. If the order is loose at the spec stage, the supplier will fill in the blanks with assumptions, and those assumptions usually become the buyer's problem during sample approval.
- Treat the bag as a retail SKU, not a promotional afterthought.
- Write the spec for repeatability, not for a single hand sample.
- Align merchandising, operations, and sourcing before you request quotes.
Start with the fabric decision, because it affects everything else
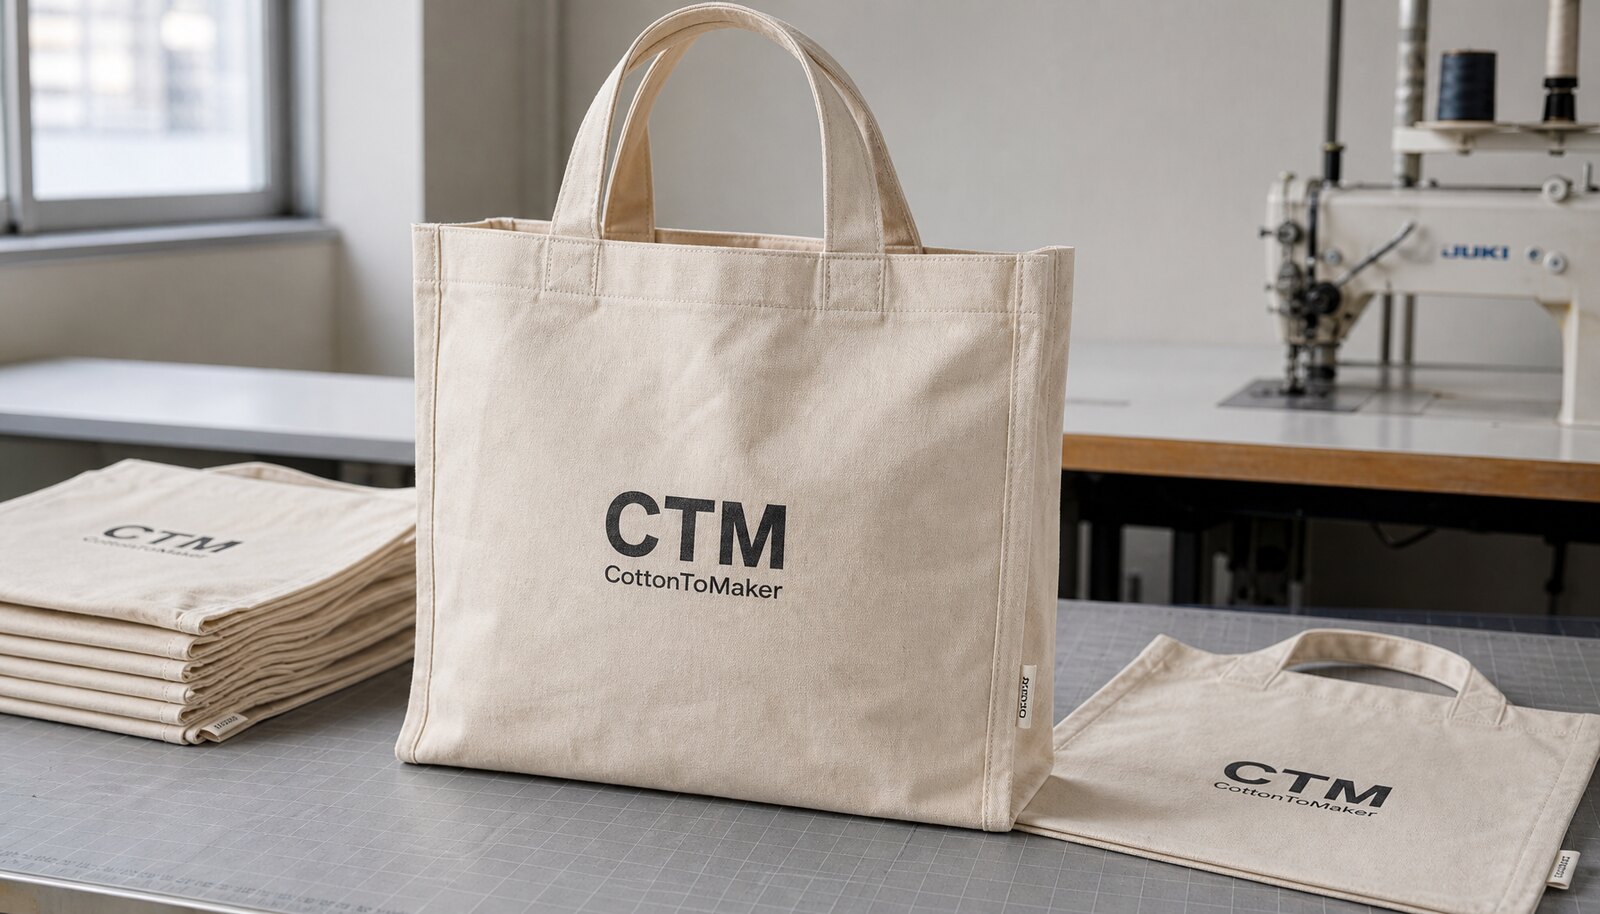
For most retail chain programs, 10 oz to 12 oz cotton canvas is the practical center of gravity. That range gives enough body for a bag to hold shape, carry branding well, and survive regular customer use without becoming unnecessarily expensive or bulky. Lighter canvas can be acceptable for lower-load merchandise carry, but it tends to collapse, wrinkle, and feel less stable in the hand. Heavier canvas adds structure, yet it also increases unit cost, shipping weight, and fold volume, which matters when bags are packed in quantity.
Do not evaluate canvas by weight alone. Ask whether the fabric is natural, bleached, washed, or calendered. Those finishes affect print sharpness, shade consistency, and the perceived quality of the final product. A 10 oz bag with a smoother finish can outperform a rougher 12 oz bag in logo clarity. If the bag is meant to stand on shelf or hold boxed merchandise, also ask whether the base is plain, gusseted, or reinforced with an insert. The build choice changes both appearance and usable capacity.
- Use 10 oz to 12 oz for most national retail launches.
- Request the real GSM or oz value, not only the fabric trade name.
- Clarify whether the bottom needs a gusset or support panel.
- Ask for a fabric swatch before comparing supplier quotes.
Choose the print method based on volume, artwork, and store expectations
Screen print is still the default option for most retail chain tote programs because it balances cost, clarity, and repeatability. It works well for one- or two-color artwork, holds up on canvas, and is easier to standardize across a multi-store rollout. For launch bags that will be ordered again, screen print usually gives the cleanest procurement story: setup is visible, output is stable, and the factory can prove the result with a sample.
Heat transfer has a place, but it should be used for the right reason. It fits short runs, fast artwork changes, or designs with fine detail that would be expensive to separate into multiple screens. The tradeoff is that transfer methods can feel less integrated into the cloth and may age differently over time. Embroidery or sewn patches can elevate the look for premium programs, but buyers should treat those as a different product class because they change cost, lead time, and handle feel. For chain launches, the safest approach is to match the print method to forecast certainty rather than taste alone.
- Use screen print for stable chain programs and repeat orders.
- Use transfer only when artwork complexity or timing justifies it.
- Do not approve a print method until you have seen it on the actual fabric weight.
- If color matching matters, ask whether Pantone matching is direct or approximate on canvas.
How to compare supplier quotes without getting fooled by the unit price
A low unit price only means something if the spec is the same. Suppliers can make a quote look attractive by changing fabric weight, reducing handle reinforcement, shrinking carton counts, or excluding labels and pack labor. That is why a retail buyer should normalize every quote to the same fabric, same print area, same packing format, and same inspection scope before doing any comparison. If those variables are not aligned, the lowest quote is usually the least useful one.
The procurement question is not just who is cheapest. It is who can produce the bag at the right quality level with the least amount of hidden friction. A quote that includes better stitching, accurate carton marking, and a documented QC process may be more economical than a quote with a lower sticker price and higher rework risk. Buyers should ask for a line-by-line explanation of what is included, what is excluded, and what would trigger a price change after sample approval. That makes the comparison usable for both sourcing and finance.
- Normalize all quotes to the same GSM, dimensions, print sides, and packing method.
- Separate product cost, packaging cost, inspection cost, and freight.
- Watch for quotes that exclude sample fees, carton labels, or handle reinforcement.
- Ask the supplier to show where the price changes when one input changes, such as one more print color or a wider handle.
Supplier route: direct factory, trading company, or converter
There is no universal best supplier type. The better question is where the project risk sits. If the bag is core to the chain launch and the buyer expects reorders, a direct factory usually offers the best control over sewing, print, and packing. The factory can answer questions about material control and show production photos from the actual line. That visibility matters when a buyer needs evidence, not just promises.
Trading companies can be useful when the project is larger than a single bag SKU or when the buyer needs one contact point for several categories. They can also be helpful if the internal procurement team needs support managing multiple suppliers or destinations. The tradeoff is that buyers should not confuse convenience with control. A trading company may be excellent at coordination while still depending on a factory the buyer never sees. Domestic converters can move quickly on samples and communication, but the buyer should still verify where sewing and printing actually happen and whether the converter can enforce the same standards across repeat orders.
- Direct factory: best when control, repeatability, and lower margin stacking matter.
- Trading company: useful for mixed-category buys, but verify the true production site.
- Domestic converter: useful for speed, but ask who owns the sewing line and QC.
Write an RFQ that removes guesswork before the first quote arrives
Good RFQs save money because they reduce re-quoting. A supplier can only price what the buyer defines. For a canvas retail merchandise bag, the RFQ should state finished size, fabric weight, finish, handle dimensions, gusset depth if any, print method, print size, artwork file format, packing instructions, carton labeling, and launch date. If any of those items are unclear, the factory will assume its usual standard, which may not match the chain's requirements.
The RFQ should also reflect retail reality. If the bag needs to ship to a distribution center, say that. If the warehouse wants a particular carton dimension or barcode label, include it. If artwork is not final, say whether the quote should use a placeholder design or if the supplier must wait. That may sound basic, but vague RFQs are a common reason why a procurement team ends up comparing different products that only look similar on paper.
- State dimensions in a finished, post-sewing size, not an estimated cut size.
- Define whether logo placement is one side or both sides.
- Include the artwork file format and Pantone references if color matters.
- Tell the factory what the bag must look like after folding and packing.
MOQ planning: keep the launch simple enough to buy well
MOQ is where retail programs often get fragmented. Suppliers may quote MOQ by fabric color, print version, or pack configuration, and the buyer may only see one number on the page. The correct response is to convert those rules into an actual SKU plan. For a launch, the lowest-risk structure is usually one core size, one core color, and one artwork version. That keeps cutting efficient, reduces fabric leftovers, and gives the chain a cleaner read on sell-through.
If the business case requires multiple sizes or colors, add them only where the data supports the split. In many programs, a second size is justified only if the chain already knows that customer use cases differ sharply. Otherwise, the extra size turns into a forecast tax. The same is true for seasonal variants. A small design change may look minor in merchandising, but on the factory side it can mean a separate screen, a different bundle count, and another inventory bucket. The better sourcing move is to delay complexity until the first launch has real sales data.
- Launch with one hero SKU unless there is clear demand for a split.
- Ask whether the factory can combine sizes in one fabric lot or one print run.
- Convert supplier MOQ rules into a store-by-store forecast before placing the order.
- Avoid adding variants that exist only to make the assortment look fuller.
Samples and golden samples: the control point that prevents arguments later
A retail buyer should always approve a physical pre-production sample made from the actual fabric, actual print method, and intended construction. Photos are useful for early review, but they cannot show handle twist, seam tension, surface feel, or the way a print sits on real canvas. If the launch has a fixed date, the sample should also be reviewed in the intended packing format so the warehouse does not discover pack issues after production is complete.
Once the sample is approved, retain a sealed golden sample on both sides. That sample is not ceremonial. It is the reference for color, size, print placement, stitching, and finish during bulk production and any later repeat order. Buyers should circulate the sample internally before approval so merchandising, operations, and brand teams all sign off once, not in separate rounds that reopen decisions later.
- Approve a physical sample, not just a photo set.
- Measure finished size, handle drop, and logo position on the sample.
- Inspect the sample under neutral lighting.
- Keep one sealed reference sample with the factory and one with the buyer.
QC should be measurable, not just a visual opinion
For bulk retail programs, quality control needs specific acceptance rules. A useful QC plan starts with measurable checkpoints: fabric weight tolerance, finished size tolerance, handle length tolerance, print location tolerance, and carton count. The factory should know what passes and what fails before production starts. If the standard is vague, the inspection team will improvise, and that usually produces inconsistent decisions across cartons or inspectors.
Inspection should follow the product flow. Check incoming fabric if the order uses new cloth, then verify cutting accuracy, seam quality, print registration, and packing accuracy before final shipment. Critical defects should be defined upfront. Wrong artwork, obvious size error, major shade mismatch, broken stitches at load points, or damaged cartons should not be treated as minor issues. For a chain launch, one bad carton can create multiple store problems, so the inspection standard should be strict enough to catch defects before the shipment leaves the factory.
- Define a tolerance band for size, handle length, and fabric weight.
- Record critical defects separately from minor defects.
- Inspect handle bar-tacks, side seams, bottom corners, and print edges.
- Use an AQL-based final inspection if your program needs a formal pass/fail structure.
- Require pre-shipment photos of cartons, labels, and packed bundles.
Packing, labels, and warehouse intake: where orders often break down
Many canvas bag programs fail not because the bag is poor, but because the packing is wrong for the chain's receiving process. If the warehouse expects flat-packed cartons with a clear bundle count and barcode label, a loose or mixed carton creates manual work and slows down intake. That becomes a real cost if the bags are being distributed to many stores from one central warehouse. Buyers should specify the inner bundle count, master carton count, carton mark format, and any barcode or SKU label required on the outside of the carton.
If the bag includes a structured base or thicker canvas, carton size and weight need extra attention. Too heavy and the carton becomes awkward for warehouse handling; too large and the pallet plan becomes inefficient. For retail launches, the safest packing format is usually the simplest one that still supports store allocation. Flat bulk packing is often the best default, while individual polybags should be used only when the presentation or channel requires them. Plastic adds cost and volume, so it should be a deliberate decision, not a factory habit.
- Match carton spec to the warehouse intake process before production starts.
- Confirm bundle counts and master carton quantity in writing.
- Ask for a pre-shipment packing photo with labels visible.
- Do not let mixed SKUs enter the same carton unless the allocation plan explicitly allows it.
Specification comparison for buyers
| Decision area | Option A | Option B | Option C | Buyer implication |
|---|---|---|---|---|
| Fabric weight | 8 oz to 9 oz cotton canvas | 10 oz to 12 oz cotton canvas | 13 oz+ heavy canvas | Use 10 oz to 12 oz for most retail chain launches; lighter cloth saves cost but can look flimsy, while heavy cloth improves structure but raises price and pack size. |
| Fabric finish | Natural unprocessed canvas | Washed or pre-shrunk canvas | Calendered / smoother finish | Choose the finish based on print clarity and the look you want at shelf level; smoother finishes usually improve logo sharpness, while washed cloth can feel more premium but may vary slightly in shade. |
| Print method | 1 to 2 color screen print | Heat transfer / digital transfer | Embroidery / woven patch | Screen print is usually the best default for chain rollouts; use transfer only for short runs or complex art, and reserve embroidery for premium assortments because it changes cost and handfeel. |
| Supplier route | Direct factory | Trading company / sourcing agent | Domestic converter with offshore production | Direct factories usually give better control over fabric, sewing, and print checkpoints; trading companies help when the project is broad, but buyers should verify the real production site and not just the sales office. |
| MOQ strategy | One core SKU | Two to three colorways | Multiple sizes and seasonal variants | A single core SKU is the lowest-risk launch structure; splitting early across sizes or colors increases MOQ pressure, complicates forecasting, and often creates dead stock. |
| Packing format | Flat bulk pack in master carton | Inner bundle + master carton | Polybagged individual units | Flat bulk packing works best for warehouse intake and store replenishment; individual polybags may be needed for e-commerce or premium presentation, but they add plastic, labor, and carton volume. |
| Sample route | Photo approval only | Pre-production sample | Pre-production sample plus sealed golden sample | Retail buyers should not approve from photos alone; require a physical sample in the actual fabric, print method, and packing format, then keep a sealed reference sample for production control. |
| Lead time control | Quoted production days only | Full calendar plan with approvals and freight | Compressed launch with no buffer | Use the full calendar, not just factory days; artwork changes, sample revisions, carton labels, and shipping delays are where retail launch schedules usually slip. |
| Inspection approach | Visual check at final packing | In-line checks during sewing plus pre-shipment inspection | AQL-based final inspection with documented defects | For chain programs, the most reliable approach is in-line plus pre-shipment verification; it reduces the chance that a large batch of the same defect reaches multiple stores. |
Buyer checklist before sampling
- Lock the finished size, handle drop, gusset depth, and target loading weight before asking for pricing.
- Specify fabric weight in GSM or oz, fabric finish, and acceptable shade tolerance for natural canvas.
- Send vector artwork, define exact print size and placement, and note whether the artwork must match a brand color standard.
- Require one physical pre-production sample and one retained golden sample before bulk release.
- Confirm carton count, inner bundle count, barcode format, and any store-ready label requirements.
- Write down acceptance criteria for seam strength, print alignment, stain limits, and packing accuracy before production starts.
- Build a calendar that includes sample approval, bulk production, inspection, freight booking, and warehouse receiving.
- Ask suppliers to show recent production photos, not just a catalog, so you can verify they actually run the build you want.
Factory quote questions to send
- What exact fabric weight, weave, and finish are you quoting, and can you send a swatch or fabric cut labeled with GSM or oz?
- Is your price based on one-side print or two-side print, and how many colors are included before extra charges begin?
- What is the MOQ by fabric color, by print version, and by size, and can any of those be combined in one production run?
- Which sewing details are included: handle reinforcement, seam allowance, bar-tacks, edge binding, or bottom gusset construction?
- What packing format is included in the quote: flat pack, inner bundle count, master carton quantity, carton marks, barcode label, and polybag if required?
- What is the realistic production timeline after sample approval, and what approvals or purchased materials can delay it?
- Can you share recent photos of a completed order from your own factory showing print clarity, handle stitching, and carton packing?
- Who actually makes the bag, where is the factory located, and can you provide the business license, audit report, or factory profile if requested?
- What is your defect handling process if the bulk shipment fails inspection, and how do you handle rework, replacement, or credit?
Quality-control points to confirm
- Set measurable tolerances for fabric weight, finished size, handle length, and print placement before mass production starts.
- Inspect the sample in neutral light and under the same conditions used for approval, because warm warehouse lighting can hide shade differences.
- Check seam construction at the handle joins, side seams, and bottom corners, where stress is highest when the bag is loaded.
- Measure logo placement from fixed reference points such as top edge and side seam instead of relying on visual judgment.
- Record acceptable and rejectable defects in writing, including loose threads, skipped stitches, stains, misprints, color smudge, and crooked handles.
- Use an inspection sequence that follows the actual product flow: incoming fabric, cutting, sewing, print, packing, carton labeling, then final count.
- Agree on a simple defect threshold for critical issues such as wrong artwork, wrong size, major shade mismatch, or damaged cartons; those should trigger hold or rejection rather than selective acceptance.
- Verify carton counts against the warehouse allocation plan, because a correct product in the wrong pack count still causes store receiving problems.
- Keep the sealed golden sample with the approved spec sheet so factory and buyer are working from the same reference during bulk production.