Start with the actual gift, not the catalog name
A canvas messenger bag for corporate gifting has to do several jobs at once. It carries items, represents the brand, arrives on a deadline, and lands in the hands of people who may judge the whole program from the first touch. The recipient may not know whether the fabric is 12oz or 16oz. They will notice a flimsy body, a crooked flap, a rough zipper, a logo that sits too high, or a strap that feels like an afterthought.
That is why a canvas messenger bags quality inspection checklist for corporate gifting should begin before the purchase order. The first sourcing question is simple: what must this bag carry? A conference bag for brochures and a pen can be lighter than an onboarding kit holding a notebook, water bottle, apparel piece, HR envelope, and laptop sleeve. Once the contents are known, decisions on fabric weight, gusset depth, strap width, reinforcement, closure, and packing become much less subjective.
A strong RFQ gives the supplier the use case, not just a product label. Include the target loaded weight, event or delivery date, destination plan, brand rules, preferred presentation level, and any must-fit items. This helps suppliers quote the same project rather than three different interpretations of 'canvas messenger bag with logo.' It also gives procurement a fair inspection basis later, because the quote, sample, purchase order, and final shipment all point back to the same written requirement.
- Describe the intended contents: documents, laptop sleeve, apparel, sample kits, notebooks, bottles, or event materials.
- Set a target loaded weight so strap reinforcement and body structure can be judged properly.
- State whether the bag is a one-day event giveaway, a daily-use employee gift, or a premium client gift.
- Use the final written specification as the reference for quote comparison, sample approval, production, and inspection.
Specify canvas with numbers buyers can enforce
Words like 'heavy canvas,' 'premium cotton,' and 'eco canvas' sound reassuring, but they do not give procurement enough control. Ask for fabric weight in oz/yd2 and GSM where possible, fiber composition, finish, color reference, and an agreed tolerance. For many corporate messenger bags, 12oz to 16oz canvas is a practical working range. A 12oz canvas can be suitable for lighter event kits. A 14oz to 16oz canvas often gives a more substantial handfeel for employee, university, or client gifting. Other weights can be right, but they should be chosen for a reason.
Fabric tolerance deserves a line in the quote. Cotton textiles vary by lot, and finishing can change handfeel. If the target is 14oz canvas, ask whether the supplier can support a tolerance such as +/-5% and how that will be verified. Also ask whether the stated weight applies before or after washing, dyeing, coating, or other finishing. Two fabrics with similar weights can still feel different if the weave density, yarn, or finish changes.
Natural unbleached canvas brings visible character. Seed flecks, small slubs, and slight shade variation may support an eco-positioned gift, but the same features can look messy in a more formal executive program. Dyed canvas needs shade approval and rubbing checks, especially if the bag may touch light clothing or paper inserts. Washed canvas can look softer and more casual, but it may introduce more dimensional variation. The goal is not to eliminate all textile character; it is to define what is acceptable before bulk production starts.
- Require fabric weight in oz/yd2 and GSM where available, plus fiber content and finish.
- Name the finish clearly: natural, bleached, dyed, washed, coated, waxed-look, or treated.
- Approve acceptable seed flecks, slubs, shade variation, and surface marks using swatches or photos.
- Ask whether fabric weight and color are controlled by mill report, internal measurement, or visual approval only.
Build a measurement chart before sample approval
Messenger bag dimensions are easy to misread. A catalog may list approximate size, outside size, cutting size, or a previous production size. The buyer usually cares about finished usable space. The measurement chart should cover body width, body height, gusset, flap depth, front pocket size, inside sleeve size, zipper opening, handle drop, strap width, and adjustable strap length. If the bag must fit A4 documents, a 13-inch laptop sleeve, a notebook, a gift box, or a bundled kit, share those item dimensions and ask the factory to confirm fit on the sample.
Tolerances should be agreed before the sample is approved. For many sewn canvas bags, a common starting point is around +/-1.0 cm on larger body dimensions and around +/-0.5 cm on smaller details. The final number should reflect the design, fabric, sewing process, and factory capability. A tolerance that is too tight can create avoidable disputes on a soft sewn product. A tolerance that is too loose can make the bags look inconsistent in a corporate rollout.
Dimensions also affect decoration. A logo that appears centered on a flat artwork proof may look off once the flap folds, the gusset expands, or the seam allowance pulls the panel. Logo placement should be measured from stable reference points such as the top seam, side seam, pocket edge, flap edge, or zipper line. For brand teams, this detail matters. Written placement tolerances reduce subjective arguments when final inspection photos arrive.
- Measure finished product dimensions, not only pattern or cutting dimensions.
- State tolerances for the body, gusset, flap, pocket, strap, handle, and logo position.
- Confirm internal usable space with the actual gift contents or realistic dummy contents.
- Use a marked placement drawing for logos, labels, pockets, closures, and special trims.
Treat straps and stress points as functional parts
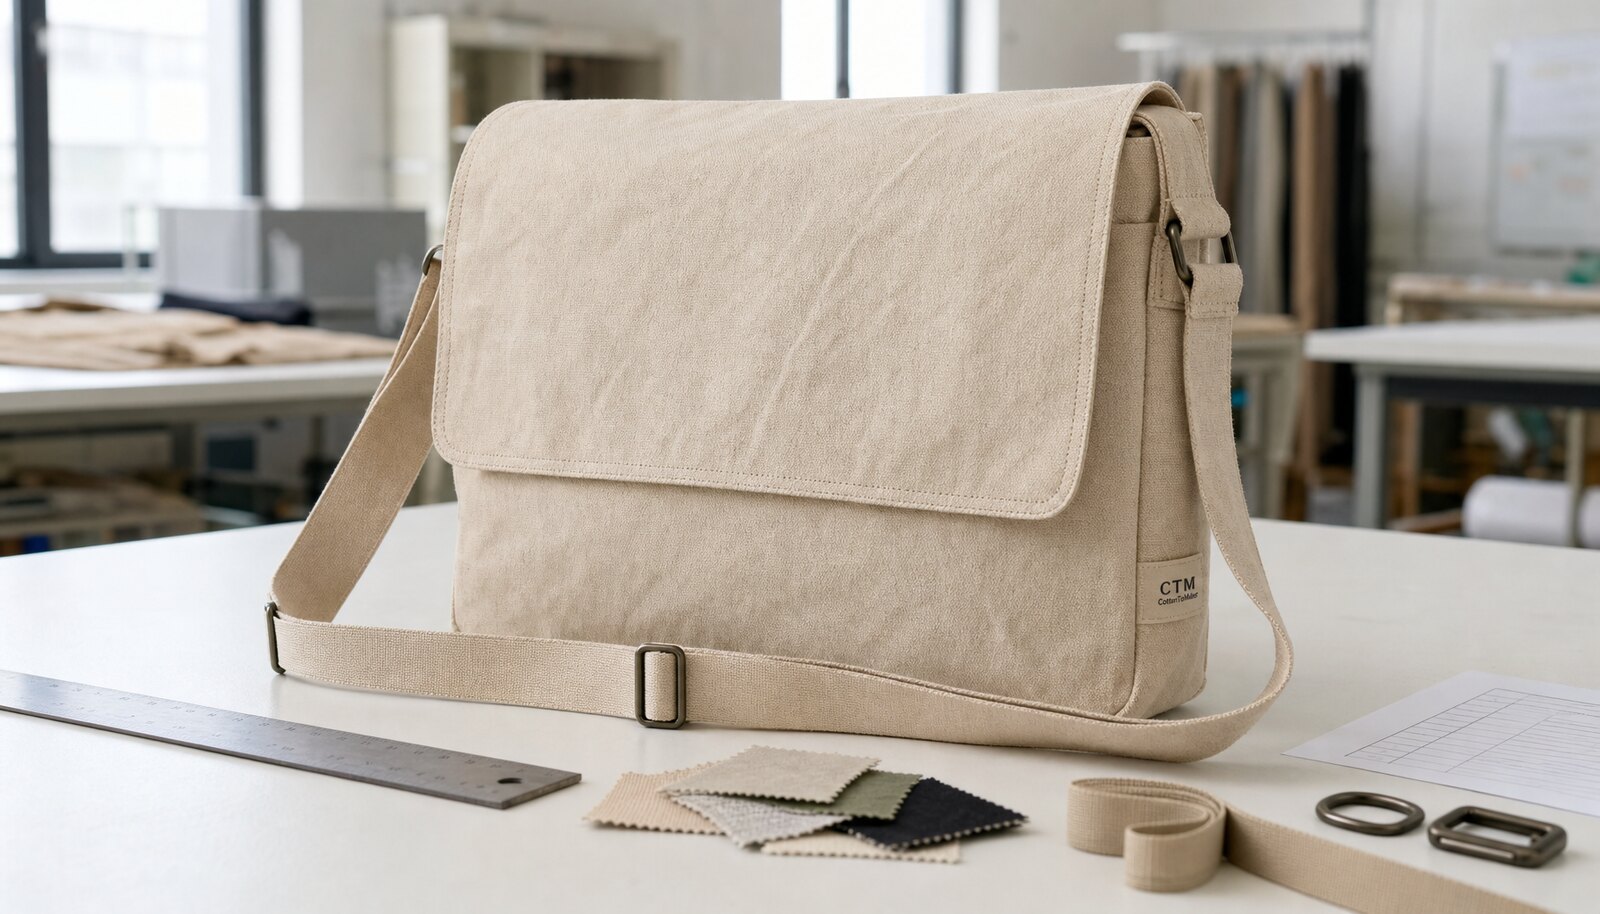
The shoulder strap is one of the highest-risk parts of a canvas messenger bag. It carries weight, affects comfort, and remains visible whenever the bag is worn. For many adult messenger bags, 38 mm to 50 mm webbing is more appropriate than narrow promotional strap, especially when the bag may hold a notebook, tablet, bottle, or product samples. The quote should identify webbing width, material, color, thickness or quality grade where available, adjuster type, buckle or D-ring material, and whether the strap is fixed or detachable.
Stress-point construction should be easy to inspect. Common reinforcement methods include bar-tacks, box-X stitching, folded webbing ends, backing patches, and reinforced seam allowances. Procurement does not always need to dictate every sewing operation, but the approved sample should show exactly how strap ends, handle ends, pocket corners, flap corners, zipper ends, and bottom gussets are secured. Close-up sample photos are useful because they give the factory, buyer, and inspector the same visual reference.
Do a practical load check before approving the sample. If the finished gift kit is expected to weigh 2 kg, test the sample with that load. Carry it by the handle and shoulder strap. Adjust the strap. Open and close the flap. Watch for body twisting, bottom sagging, stitch strain, webbing slippage, and uncomfortable edges. This is not a replacement for formal lab testing when a project requires it, but it catches many everyday failures that a clean product photo will never show.
- Specify strap width, adjustable length range, webbing type, hardware type, and anchoring method.
- Inspect bar-tacks, box-X stitches, reinforcement patches, folded webbing ends, and seam allowances.
- Check the bottom gusset, pocket corners, flap corners, zipper ends, and handle bases as stress points.
- Load the sample with the intended contents before approving bulk production.
Choose logo decoration with failure modes in mind
Logo decoration is often the first defect stakeholders notice. Screen printing works well for many simple logos, solid shapes, and larger orders, but it depends on correct mesh, ink, curing, and fabric preparation. Heat transfer can reproduce complex artwork or gradients, yet poor film or incorrect press settings can cause peeling, cracking, gloss mismatch, or adhesive residue. Embroidery can look premium on compact marks, but dense stitching may pucker canvas and fine text may lose clarity. Woven labels are useful when the buyer wants subtle branding and lower risk on textured fabric.
The artwork file should be paired with production instructions. State logo size, color reference such as Pantone or another approved brand value, decoration method, placement from fixed seams, print-area limits, and tolerance for position and skew. A small woven label may be controlled within a few millimeters, while a larger screen print on a sewn canvas panel may need a wider tolerance depending on the process. The tolerance should be realistic and written into the approval record.
Decoration should be approved on production-intent fabric. A strike-off on smooth test fabric does not always predict the result on natural canvas. Texture can change ink coverage, edge sharpness, and the readability of small type. Ask whether panels are decorated before sewing or finished bags are decorated after sewing. Panel printing may improve print access but can shift visually after assembly. Finished-bag printing may improve placement judgment but can be harder near seams, pockets, and hardware.
- Match the logo method to artwork detail, fabric texture, budget, order size, and expected use life.
- Approve logo color, handfeel, and placement on production-intent fabric, not only on a digital proof.
- Define unacceptable defects: wrong logo, wrong color, skew, bleeding, cracking, ghosting, adhesive marks, poor registration, and rough embroidery.
- Confirm whether decoration happens before sewing or after sewing because the inspection risks are different.
Make every supplier quote comparable
A low unit price is only useful when the specification behind it is visible. Ask every supplier to quote against the same RFQ sheet. The quote should list fabric weight and finish, lining, thread, webbing, zipper, snap, buckle, adjuster, label, logo method, packing, carton, setup fees, sample fees, lead time assumptions, payment terms, and incoterms. Otherwise, one supplier may price a fully lined bag with individual packing while another assumes unlined construction and bulk cartons.
MOQ should be separated by variable. A factory may accept 1,000 pieces total in one natural canvas color with one logo, but require higher minimums for dyed fabric, custom zipper tape, multiple bag colors, special strap colors, several logo versions, or individual gift packaging. Corporate gifting programs often split quantity across regions, departments, job levels, languages, or co-branded events. Those splits affect cost, production efficiency, and inspection planning.
Quote review should also cover change control. If the approved zipper, webbing, lining, or fabric color is not available, the supplier should request written approval before substituting. If the bulk fabric shade is noticeably different from the approved sample, the buyer should see a cutting or fabric swatch before production continues. This is a small administrative step that can prevent a large final-inspection problem.
- Use one RFQ sheet so all suppliers quote the same bag, logo, packing, and delivery assumptions.
- Separate unit price from setup fees, sample fees, packing charges, tooling, and freight assumptions.
- Ask for MOQ by bag color, fabric finish, logo version, trim color, print colorway, lining color, and packaging version.
- Require written approval for any material, trim, decoration, construction, or packing substitution.
Approve the pre-production sample like a control document
The pre-production sample should represent the order as closely as possible. It should use production-intent canvas, lining, thread, webbing, hardware, labels, decoration, and packing. A showroom sample can help with early design discussion, but it should not become the production standard unless it matches the ordered materials and construction. If the supplier says the final material will be 'similar,' ask for swatches, trim cards, or an updated sample before sign-off.
Sample review should be methodical. Start with the measurement chart: body width, height, gusset, flap depth, pocket size, zipper opening, handle drop, strap width, and strap length. Then review workmanship: seam straightness, stitch density, thread tension, pocket symmetry, flap alignment, binding, lining attachment, strap anchoring, zipper function, snap alignment, and thread trimming. Review the logo separately under stable lighting against the artwork proof and brand reference.
Finally, judge the sample as a gift. Load it with the intended contents. Fold it the way the factory plans to pack it. Place it in the proposed polybag, tissue, paper wrap, or belly band. Then unpack it and look again. Canvas creases, hardware dents, print transfer, flap distortion, and strap marks may appear only after a packing simulation. Keep one sealed golden sample where possible, or keep a signed photo set with close-ups of fabric, stitching, logo, trims, and packing.
- Reject generic samples as final approval references unless materials, construction, decoration, and packing match the order.
- Measure the sample with tools and record actual results against the tolerance chart.
- Simulate loading, carrying, folding, packing, and unpacking before sign-off.
- Keep a golden sample or signed photo record for factory, buyer, and inspector alignment.
Use in-line checks before mistakes reach cartons
Final inspection matters, but many messenger bag defects become expensive long before final inspection. If logo placement is wrong on cut panels, it is better to catch that before assembly. If strap bar-tacks are weak, catching the issue during sewing prevents a full batch from needing rework. If dyed fabric shade varies across rolls, checking before cutting helps avoid mixed-panel bags.
A first-article check is useful once production begins. The buyer, factory QC team, or inspector reviews the first complete production unit against the approved sample and specification. This check should focus on fabric lot, measurements, logo placement, strap reinforcement, closure function, flap alignment, trim color, and packing method. Approval of the first piece does not replace final inspection, but it reduces the chance that a preventable mistake repeats all day on the line.
For larger orders or deadline-sensitive corporate gifting programs, ask for progress photos or QC records at key stages: fabric arrival, cutting, decoration, sewing, trimming, and packing. This is not about slowing the factory down. It is about confirming that production is following the approved path while there is still time to correct course. Gift programs often have fixed event dates, so early visibility is worth the extra coordination.
- Check fabric lot, shade, and surface condition before cutting begins.
- Review first production pieces before the full run continues.
- Inspect logo decoration before panels are fully assembled when the process allows it.
- Ask for in-line photos of strap reinforcement, flap alignment, hardware attachment, and packing setup.
Define final inspection with defects, sampling, and evidence
An inspection instruction that says 'check quality' leaves too much room for interpretation. Buyers should define the sampling plan, AQL or acceptance rule if used, and defect classifications before production is complete. For promotional textile bags, third-party inspectors often use random sampling based on recognized sampling standards, but the exact inspection level and AQL values should be agreed by the buyer, supplier, and inspector. The acronym is less important than the shared decision on what passes and what fails.
Critical defects usually include safety or brand-blocking issues: wrong product, wrong logo, mold, severe contamination, broken needle or sharp-object risk, sharp hardware, strong chemical odor, or construction that makes the bag unsafe to use. Major defects affect function, appearance, or customer acceptance: weak strap stitching, open seams, broken zipper, badly crooked logo, severe stains, wrong color, missing pocket, or incorrect packing version. Minor defects are smaller workmanship issues that do not materially affect use or presentation, such as a short untrimmed thread within the agreed standard.
The inspection scope should cover measurement, workmanship, decoration, function, packing, and carton labeling. Inspectors should measure sampled units, compare logo placement against the approved drawing, cycle hardware, check straps and handles, review fabric appearance, verify carton count, and photograph defects. For corporate gifting, carton labels are part of quality. A perfect bag in the wrong version carton can still disrupt a regional rollout or event handout.
- Define critical, major, and minor defects before inspection day.
- Use a written sampling plan or AQL agreement instead of subjective shipment approval.
- Include product, logo, function, measurement, workmanship, packing, and carton-label checks.
- Require clear defect photos, quantity findings, and a shipment-release decision before goods leave the factory.
Protect the gift through packing and logistics
Packing can damage an otherwise acceptable canvas messenger bag. Heavy creases, crushed flaps, dented hardware, print transfer, dust, and damp cartons all reduce perceived value. The packing plan should state fold direction, strap placement, hardware protection, unit protection method, carton quantity, carton dimensions, and gross weight limits. If the logo is screen printed or heat transferred, confirm that decoration is fully cured before stacking and packing.
Individual polybags protect against dirt and moisture, but some corporate buyers prefer reduced plastic. Paper wrap, tissue, belly bands, or controlled bulk packing can work if the factory manages abrasion, humidity, carton dust, and handling. Decide this early because packing method affects labor, carton size, freight volume, sustainability requirements, and the presentation at the destination.
For multi-location programs, carton marking is a quality-control issue. Cartons may need destination, department, logo version, color, quantity, purchase order number, and sequence marks. Mixed cartons should be allowed only when the pack-out plan says so. At final inspection, verify carton marks, version separation, seal quality, dryness, carton strength, count, and gross weight. A well-made bag that arrives crushed, mislabeled, or in the wrong office still creates a procurement problem.
- Approve fold method, strap placement, and hardware protection before mass packing.
- Confirm curing time before printed or transferred bags are stacked.
- Choose polybag, paper wrap, tissue, belly band, or bulk packing based on protection and sustainability needs.
- Check carton marks, carton count, version separation, gross weight, seal quality, dryness, and carton condition before shipment.
Specification comparison for buyers
| Spec decision | Recommended option | When it fits | Buyer risk to check |
|---|---|---|---|
| Fabric weight | State canvas in oz/yd2 and GSM where available, with a written tolerance such as +/-5% when the mill can support it | Corporate gifting programs that need the same handfeel across departments, countries, or repeat campaigns | A quote that says only 'canvas' can hide big differences in yarn count, weave density, finishing, stiffness, and cost |
| Common weight range | Use 12oz to 16oz canvas for many structured corporate messenger bags; use lighter fabric only for simple event kits after sample approval | Employee welcome kits, sales kits, conference bags, laptop-adjacent gifts, university programs, and retail-style giveaways | 'Heavy canvas' may still feel thin if the weave is loose, the finishing is soft, or the actual GSM is below the approved sample |
| Fabric finish | Name the finish in the quote: natural unbleached, bleached, dyed, washed, waxed-look, coated, or treated | Natural canvas suits eco-positioned gifts; dyed canvas supports brand colors; washed canvas gives a softer casual look | Natural canvas can show seed flecks and shade variation; dyed canvas needs shade and crocking checks; coated finishes need odor, tackiness, and cracking checks |
| Finished size tolerance | Use a measurement chart with tolerances, often around +/-1.0 cm for main body dimensions and +/-0.5 cm for smaller details, adjusted to the bag design | Orders where the bag must fit documents, notebooks, tablets, apparel, samples, or a planned gift kit | Catalog dimensions may be approximate or taken before sewing; finished internal usable space can be smaller than expected |
| Body structure | Choose unlined for budget/event use; bound seams or lining for a cleaner gift; add a padded sleeve only when device protection is part of the brief | Executive gifts, onboarding kits, distributor programs, university bags, employee bags, and resale-style projects | Unlined bags may show raw seams and collapse; lined bags add checks for puckering, loose threads, stains, trapped debris, and uneven attachment |
| Strap and handle build | Specify 38 mm to 50 mm shoulder webbing for many adult messenger bags, with adjustable length and reinforced anchoring | Bags expected to carry notebooks, laptops, sample kits, bottles, or multi-piece welcome packs | Narrow webbing, weak bar-tacks, thin backing patches, and poor hardware are common causes of user complaints |
| Logo method | Use screen print for simple flat logos, embroidery for compact premium marks, woven label for subtle branding, and heat transfer for complex color artwork | Corporate logos, event marks, campaign names, department versions, and co-branded gifts on the flap or front panel | Small text can fill in, embroidery can pucker, transfers can peel, and screen print can crack if curing or fabric preparation is weak |
| Closure type | Match the use case: zipper, flap with magnetic snap, flap with buckle, hook-and-loop, or open top | Travel gifts need more secure closure; event handouts may use a simple flap; premium gifts need smoother hardware and cleaner alignment | Cheap snaps can pull out, hook-and-loop can collect lint, zippers can snag, and flaps can sit unevenly after folding |
| MOQ structure | Quote MOQ separately by bag color, fabric finish, logo version, print color count, trim color, lining color, and packaging version | Programs with several departments, office locations, language versions, sponsor logos, or co-branded campaigns | A total MOQ can become a per-version MOQ after artwork approval, which changes cost, schedule, and inventory planning |
Buyer checklist before sampling
- State the fabric precisely: canvas weight in oz/yd2 and GSM where possible, fiber content, finish, color reference, and acceptable weight or shade tolerance.
- Define finished bag measurements: width, height, gusset, flap depth, pocket size, zipper length, handle drop, strap width, and adjustable strap length range.
- List the intended contents and target loaded weight so the supplier can confirm strap strength, body structure, gusset depth, and closure suitability.
- Specify construction: unlined, bound seams, half-lined, fully lined, padded sleeve, bottom reinforcement, corner reinforcement, pocket reinforcement, and stress-point stitching.
- Require the quote to identify webbing, thread, zipper, slider, snap, buckle, adjuster, lining, label, hangtag, insert card, inner bag, and export carton materials.
- Approve logo method, artwork file, Pantone or brand color reference, decoration size, placement from fixed seams, allowed skew, and allowed position tolerance.
- Request a true pre-production sample made with production-intent fabric, trims, logo decoration, stitching, labels, and packing, not only a showroom reference sample.
- Set measurement tolerances before sampling, such as +/-1.0 cm on main body dimensions and tighter tolerances on logo placement if the design requires it.
- Define fabric defects: holes, stains, oil marks, mildew odor, shade bands, excessive slubs, loose yarns, contamination, heavy creasing, and unacceptable color variation.
- Define sewing defects: open seams, skipped stitches, needle cuts, loose thread, crooked flap, uneven pocket, weak bar-tacks, puckering, and exposed raw edges where not specified.
Factory quote questions to send
- What exact canvas will you use, stated in oz/yd2 and GSM, and what production tolerance can you commit to in writing?
- Is the fabric 100% cotton, cotton-poly blend, recycled cotton blend, or another composition, and can you provide the composition on the quote?
- Is the canvas natural, bleached, dyed, washed, coated, or treated, and what shade variation should we expect between sample and bulk lot?
- Can you quote the finished measurements and tolerances for body width, height, gusset, flap, pocket, zipper opening, handle drop, strap width, and strap length?
- What is the estimated safe carrying load for the proposed construction, and how are strap ends, handles, pocket openings, and bottom corners reinforced?
- Is the bag unlined, bound at seams, half-lined, fully lined, or padded, and what lining fabric weight and color are included?
- Which logo method do you recommend for this artwork, and what are the color limits, setup charges, curing needs, artwork restrictions, and durability risks?
- What logo placement tolerance can you control in bulk production, measured from which seam, edge, flap line, or pocket reference point?
- What materials are included in the unit price: fabric, thread, webbing, zipper, slider, puller, snap, buckle, adjuster, lining, label, hangtag, polybag, insert, and carton?
- What is the MOQ by total quantity, bag color, logo version, print color count, trim color, lining color, and packaging version?
Quality-control points to confirm
- Verify fabric weight against the approved specification or mill report where available; a quoted 14oz canvas should not be replaced by visibly lighter fabric without written buyer approval.
- Check fabric surface under consistent lighting for stains, oil marks, holes, weaving defects, mildew odor, color bands, contamination, heavy slubs outside the approved standard, and sharp shade differences between panels.
- Measure finished dimensions against the approved measurement chart, including body width, height, gusset, flap depth, pocket opening, zipper length, handle drop, strap width, and maximum/minimum strap length.
- Use agreed measurement tolerances, commonly around +/-1.0 cm for main body dimensions and +/-0.5 cm for smaller details, unless the design or factory capability requires a different written tolerance.
- Inspect cutting symmetry and panel alignment so the flap, pocket, gusset, bottom corners, and logo panel sit squarely when the bag is empty and when lightly loaded.
- Check stitch density and consistency against the approved sample; watch for skipped stitches, loose tension, needle cuts, seam grin, open seams, puckering, and poor thread trimming.
- Inspect stress points carefully: strap anchors, handle ends, pocket corners, flap corners, zipper ends, bottom gusset, and any D-ring, buckle, or adjuster attachment.
- Perform a practical strap and handle pull check on sampled units using a load appropriate to the intended contents, and look for tearing, stitch opening, webbing slippage, or hardware deformation.
- Cycle zippers, snaps, buckles, magnetic closures, and adjusters several times to confirm smooth movement, secure attachment, no sharp edges, and no uneven closure force.
- Compare logo color, size, placement, registration, edge sharpness, and handfeel against the approved sample and artwork proof under stable lighting.