Start with the retail promise before choosing canvas
At a craft fair, a canvas messenger bag has to work harder than it does in a catalog photo. It hangs on a booth wall. Shoppers handle it, try it on, open the flap, test the strap, and decide within seconds whether it feels worth the price. After purchase, it may carry notebooks, event brochures, small handmade goods, a water bottle, a tablet, or market-day essentials. That is why material selection should begin with the retail promise, not with a vague request for “one canvas messenger bag.”
The common procurement mistake is comparing factory quotes as if every supplier has priced the same product. One quotation may use 10 oz unlined canvas, narrow webbing, light hardware, and minimal reinforcement. Another may include 12 oz canvas, lining, reinforced strap anchors, stronger hardware, and better export packing. The drawing can look identical while the bill of materials is completely different.
Before sending the RFQ, write a short positioning note. State the expected retail price band, target customer, selling environment, display method, intended carrying load in kilograms, event date, and whether this is one-time merchandise or a repeat seasonal line. That small brief helps a supplier recommend the right canvas weight, lining, strap, and closure instead of defaulting to the cheapest build. It also keeps the product from becoming overbuilt. Not every craft fair messenger bag needs a padded laptop sleeve and metal zipper, but every bag should be strong enough for the use you plan to advertise.
- Low-price fair merchandise: compact size, 10-12 oz canvas, simple lining or no lining, one-color screen print, standard trims, and a light carrying claim.
- Lifestyle retail: 12-14 oz canvas, reinforced strap points, inner slip pocket, reliable adjuster, and controlled packing to protect the flap.
- Premium artisan positioning: 14-16 oz canvas, washed handfeel, contrast stitching, woven label, embroidery, or antique-finish hardware.
- Laptop-capable bags: padded sleeve, bottom support, zipper or secure flap closure, stronger strap anchors, and an agreed load test.
- Seasonal event ranges: keep one base body and vary artwork or labels to reduce MOQ pressure and inspection complexity.
Convert canvas weight, GSM, and stiffness without guessing
Canvas weight affects almost everything: appearance, cost, sewing speed, seam bulk, packability, carton volume, and landed cost. Buyers often say “12 oz canvas,” but suppliers may interpret that weight differently. Some quote by square yard, some by square meter, and some refer to fabric before washing, after washing, or after coating. For a clean comparison, ask for both oz and GSM, then require the supplier to state the measurement stage.
As a practical buying range, 10 oz canvas is often about 300-340 GSM, 12 oz about 380-420 GSM, 14 oz about 450-480 GSM, and 16 oz about 500-540 GSM. These are not universal conversions. Yarn count, weave density, sizing, washing, and coating can shift the final handfeel and weight. The signed swatch and pre-production sample should become the approval standard, not the number in a quotation alone.
For many craft fair messenger bags, 12 oz canvas is the balanced middle ground. It gives the flap and front panel enough body while staying flexible enough to sew, fold, pack, and wear comfortably. Moving to 14 oz improves structure and perceived value, but it raises fabric cost and may slow sewing. Moving to 16 oz can create a rugged heritage look, yet thick seam stacks must be considered in the pattern and machinery. Dropping to 8-10 oz can save money, but the finished bag may look more like a promotional pouch than a retail messenger bag.
Stiffness is not the same as GSM. A tightly woven, resin-sized 12 oz canvas may stand firmer than a washed 14 oz fabric. If display matters, hang the sample with a representative light load for 24 hours. Check flap droop, body twisting, strap distortion, and whether the bag still looks attractive on the booth fixture. If the bag will be packed flat, open a packed sample after 48 hours and look for flap creases that do not recover.
- Use 8-10 oz only for small, lightly loaded, price-sensitive bags not marketed as daily carry.
- Use 12 oz for most branded craft fair messenger bags with flap, pockets, adjustable strap, and repeat event handling.
- Use 14 oz when the bag must hold shape better, carry catalogs or tablets, or support a higher retail price.
- Use 16 oz when the design has simple seam stacks, a rugged story, and an accepted increase in freight and sewing cost.
- Set GSM tolerance in the PO, commonly plus or minus 5%, and confirm whether finishing changes the final weight.
Choose the canvas finish and define what variation is acceptable
Natural cotton canvas is popular for craft fairs because it looks honest and tactile: warm off-white color, visible cotton flecks, and a material story that fits handmade, local, and artisan products. It may also support lower MOQ when stock natural canvas is available. The tradeoff is variation. Seed specks, slubs, shade shifts, and weaving irregularities may appear, especially on visible flap panels.
Those natural features are not automatically defects. The buyer has to define the line. If the front flap is the main selling surface, specify whether dark flecks, stains, weaving bars, heavy slubs, or shade patches are rejectable on that panel. A supplier cannot consistently inspect against a vague instruction such as “clean natural look.” Give reference photos, approve a swatch, and identify the most critical visible areas.
Other finishes bring their own controls. Bleached canvas gives a cleaner print ground and brighter appearance, but it shows dirt more easily during handling. Piece-dyed canvas supports brand colors and seasonal ranges, but it requires lab dip approval and dye-lot control. Washed canvas feels softer and more vintage, yet it can shrink, twist, or vary in shade. Water-repellent or coated canvas supports light outdoor utility claims, but it may affect print adhesion and handfeel. Waxed-look canvas can be visually strong, while also showing fold marks from carton compression.
Select the finish before final artwork and packing are locked. A large screen print behaves differently on washed canvas than on crisp natural canvas. Heat transfer may bond differently to coated fabric. Fold marks may be more obvious on waxed-look surfaces. For dyed, washed, coated, or waxed-look goods, approve a fabric swatch first, then approve a pre-production sample made from bulk-intent material before cutting.
- Natural canvas: good for rustic positioning, stock material routes, and simple screen print designs.
- Bleached canvas: useful when a cleaner print background matters more than a natural cotton look.
- Piece-dyed canvas: suitable for brand color programs but requires lab dip, shade band, and dye-lot approval.
- Washed canvas: suitable for soft premium handfeel but needs shrinkage, twisting, and size tolerance checks.
- Water-repellent canvas: useful for light outdoor utility claims but requires print adhesion, rub, and folding tests.
- Waxed-look canvas: visually strong but requires crease, odor, and carton-compression review.
Build lining and pocket details into the BOM, not the sample comments
Many messenger bag problems begin inside the product. Thin lining tears at pocket corners. Loose lining catches in zippers. Shallow pockets cannot hold phones, receipts, notebooks, or small payment devices. If the RFQ focuses only on the outer canvas, every factory will fill in the lining and pocket details differently. The unit prices may look comparable, but the bags will not be built the same way.
For a natural craft fair story, unbleached cotton lining around 120-180 GSM can make the product feel cohesive. It may lint more than polyester and can shrink differently from the outer fabric. Polyester lining, commonly 150D or 210D in many bag programs, gives better color consistency, lower lint, and easier wipeability. A higher-value messenger bag may justify stronger lining, bound internal seams, a zipper pocket, a slip pocket, and reinforced pocket corners.
Avoid vague language such as “inside pocket” or “padded sleeve.” State the pocket opening, pocket depth, zipper length, sleeve height, foam thickness if used, and the device or item the pocket is intended to hold. If the bag is positioned for students or commuters, the bottom panel and side gusset should handle rectangular loads without distorting the flap. If it is positioned for craft fair browsing, internal organization should still hold a phone, wallet, keys, brochures, and small purchases without feeling chaotic.
The inspection team should measure inside features, not only the outside dimensions. A sample photo can hide a pocket that is too narrow or a zipper opening that is too short to be useful. Pocket corners, zipper ends, sleeve tops, and lining seams are small details, but they heavily influence customer satisfaction after the first few uses.
- Basic lining: 150D polyester or light cotton lining for lower-price programs with small personal-item storage.
- Better retail lining: 210D polyester or medium cotton lining with clean seam finish, slip pocket, and optional zipper pocket.
- Laptop or tablet sleeve: define foam thickness, device size, sleeve height, bottom clearance, and top-edge reinforcement.
- Pocket reinforcement: use bartack, backstitch, or triangular stitching at pocket corners and zipper ends.
- Lining tolerance: check twisting, bagging, seam puckering, and whether lining enters the zipper path.
- Inspection detail: measure pocket opening and depth, not only the outside bag dimensions.
Engineer straps, hardware, and closures around real load points
The canvas body is usually not the first thing to fail. Load points fail first: strap anchors, D-rings, adjusters, snap backs, zipper ends, flap corners, and bottom gussets. A bag can use a good canvas and still feel cheap if the strap is narrow, the adjuster slips, the D-ring is thin, or the anchor is held by one casual stitch line. Treat the carrying system as a technical package, not as an accessory.
Specify webbing width, material, thickness if important, adjuster type, D-ring internal width, hardware material, reinforcement patch, stitch pattern, and intended carrying load. Cotton webbing has a natural look and comfortable hand, but it can shrink, stretch, or twist depending on construction. Polyester webbing is often more dimensionally stable and strong, though it may look less natural beside cotton canvas. A 38 mm strap works for compact crossbody styles. A 50 mm strap is usually better when the bag may carry books, tablets, catalogs, or market purchases.
Hardware should fit the strap. A 38 mm strap in a poorly matched 40-45 mm adjuster may twist or slip. An undersized adjuster can drag and create uneven tension. Metal hardware improves retail perception, but it must be checked for burrs, rough edges, rust risk, plating marks, and secure attachment. Plastic hardware may be acceptable for lightweight souvenir bags, but it changes the feel of the product.
Closures also need to match the security promise. A magnetic flap is easy for casual use, but snap backs need reinforcement washers or backing patches so they do not pull through the fabric. A zipper under the flap gives more security for commuter, travel, or student positioning, though it adds cost and must run smoothly. Buckles create a heritage look but slow access. Hook-and-loop tape is inexpensive, but it can feel noisy, collect lint, and reduce perceived value. Approve closure feel on a physical sample.
- Use box-X stitching, bartacks, or an approved equivalent at strap anchors, never only a single stitch line for load-bearing points.
- Match adjuster and D-ring internal width to strap width to prevent slipping, twisting, and uneven shoulder tension.
- Add reinforcement patches behind D-rings, snaps, buckles, rivets, and any hardware pulling against canvas.
- For an 8 kg advertised carrying load, consider a 12-16 kg static pull test as a buyer-defined inspection point.
- Check hardware for burrs, sharp edges, plating inconsistency, rust marks, scratches, and weak attachment.
- Test closures repeatedly on the sample for alignment, ease of use, snap retention, zipper smoothness, and reinforcement.
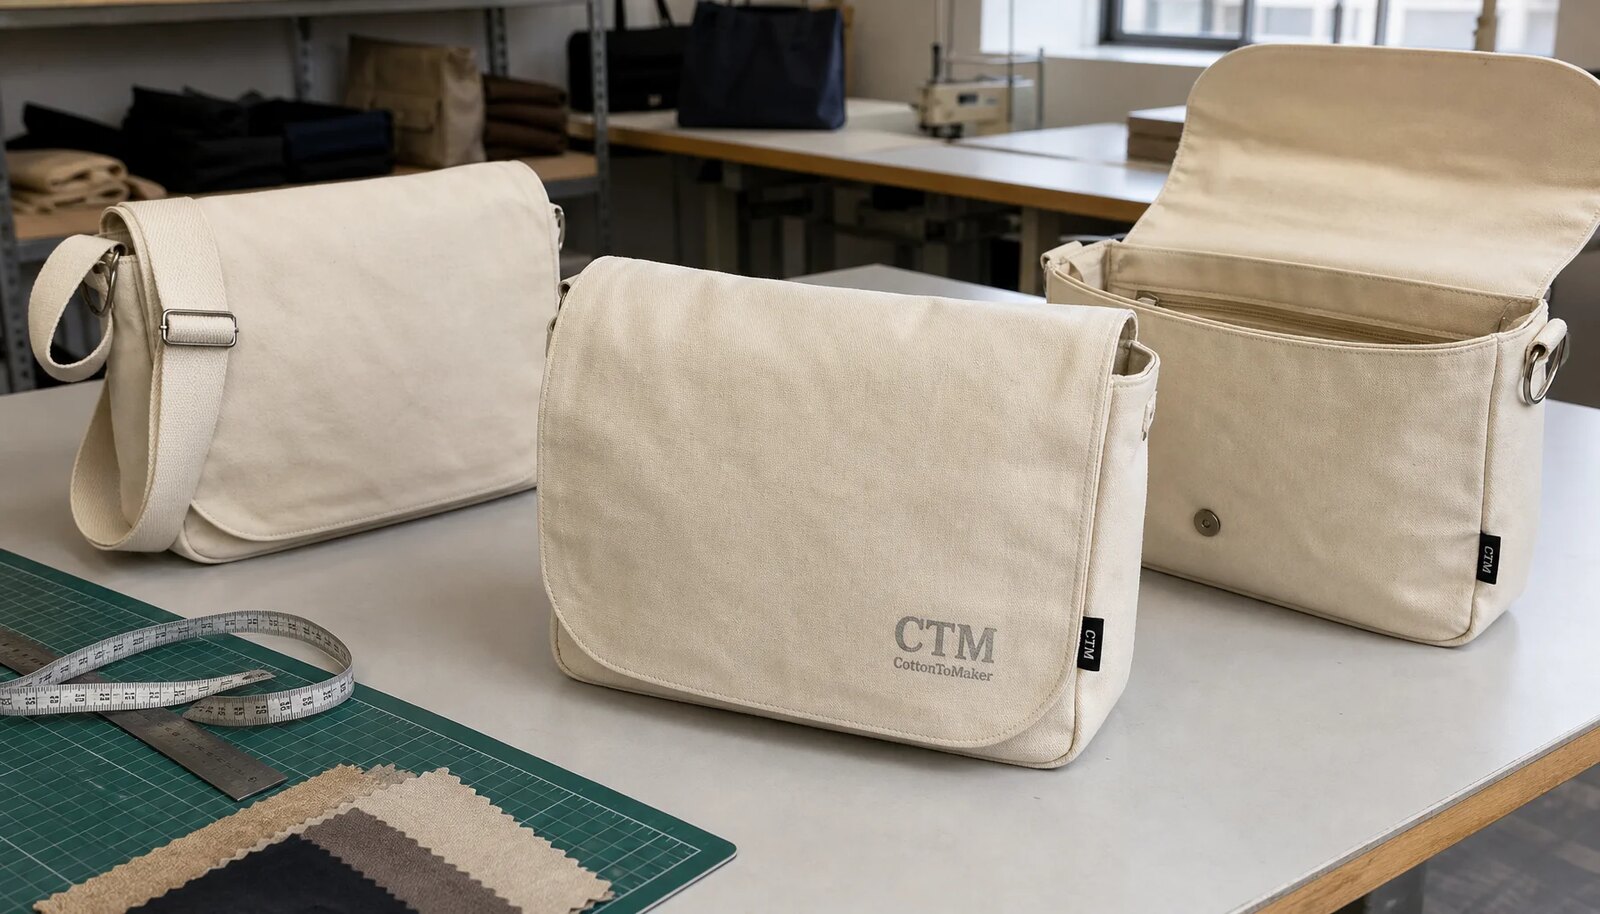
Match branding to canvas texture, not to a digital mockup
Canvas is textured, absorbent, and variable. A logo that looks sharp on a digital mockup may behave very differently on real fabric. Weave density, cotton flecks, washing, coating, and surface hairiness can all affect edge clarity, ink coverage, and color appearance. For craft fair messenger bags, the front flap is often the main branding surface, so print quality needs to be proven on the exact canvas finish.
Screen printing is usually practical for one to three solid colors, bold event marks, local graphics, and simple brand logos. It works best when the artwork avoids very fine lines, tiny reversed text, tight registration, and oversized ink blocks on coarse fabric. Large areas of ink can feel stiff, especially on a flap that must fold and move.
Heat transfer can handle more colors, gradients, or photographic artwork, but it may look less integrated with natural canvas. It must be tested for edge lifting, cracking, adhesion at folds, and abrasion. Embroidery gives a premium effect for small logos, monograms, badges, or maker marks. Large embroidery areas can pucker thinner panels and add weight to the flap. Woven labels, cotton labels, side tabs, and patches are useful when a buyer wants consistent brand identity across seasonal artwork changes.
Branding also changes MOQ and production handling. One canvas color with one print is simple. Six local designs across three fabric colors create more setup, sorting, inspection, and mispack risk. If the base bag is identical, ask whether the factory can sew one body lot and split branding later. That only works if placement, ink colors, label locations, carton marks, and packing rules are tightly controlled.
- Screen print: best for bold logos, solid colors, simple event graphics, and repeat craft fair programs.
- Embroidery: best for small premium marks, not large filled artwork on thin flap panels.
- Heat transfer: useful for multicolor artwork but requires rub, fold, wash-if-claimed, and edge-lift checks.
- Woven label or side tab: strong for seasonal programs where artwork changes but brand identity stays consistent.
- Patch branding: useful for premium positioning, but check edge durability, stitch security, and material compatibility.
- Print tolerance: set placement from fixed edges, commonly plus or minus 3-5 mm for front-flap artwork.
Separate MOQ drivers before negotiating unit price
MOQ is rarely one simple number. A supplier may support a lower quantity when the order uses stock natural canvas, standard webbing, standard lining, standard hardware, and one print design. The same supplier may need a higher minimum for custom dyed canvas, custom lining colors, exclusive hardware finishes, matched webbing, washing, embroidery patches, or several artwork versions. The useful question is not only “What is your MOQ?” It is “Which specification is creating the MOQ?”
Craft fair programs often want local, seasonal, or maker-specific artwork. That can be managed, but each design may need separate screen setup, print handling, labeling, inspection, carton sorting, and inventory control. If the body is identical, a factory may be able to produce one sewn body lot and split the branding into smaller batches. This can reduce waste and simplify cutting, but it requires disciplined artwork placement and carton marking.
Ask for realistic price breaks instead of pushing only for the lowest possible minimum. Depending on factory capability and material availability, useful comparison breaks may include 300, 500, 1000, and 2000 pieces. Confirm whether MOQ applies per style, fabric color, lining color, hardware finish, artwork, shipment, or purchase order. A quote that says “MOQ 500” may mean 500 per canvas color, not 500 total across five designs.
When reducing MOQ, protect the retail promise. Switching from custom dyed canvas to stock natural canvas may be a smart compromise. Removing reinforcement at strap anchors is not. Ask the supplier which single specification change would reduce MOQ or cost with the least damage to appearance and performance.
- Lowest MOQ route: stock natural canvas, stock webbing, stock hardware, standard lining, one size, and one print design.
- Medium MOQ route: stock canvas body with custom print, woven label, or a controlled split of artwork versions.
- Higher MOQ route: custom dyed canvas, custom lining, matched webbing, special hardware finish, or washed finish.
- Highest complexity route: multiple sizes, multiple colors, several prints, custom trims, and mixed carton requirements.
- Quote comparison: request price breaks using the same BOM, packing method, inspection standard, and Incoterm.
- Negotiation question: ask which one specification change would reduce MOQ without weakening retail positioning.
Use sampling to prove use, not just appearance
A photo sample is not enough for a canvas messenger bag. Procurement needs to feel the fabric, wear the strap, open and close the flap, operate the zipper, inspect the pockets, check the print surface, and see how the bag recovers after packing. A shape sample made from substitute fabric can be useful early in development, but it should not release bulk production.
The pre-production sample should use final-intent canvas GSM, finish, lining, trims, branding, stitching, and packing. If the canvas will be washed, coated, dyed, or waxed-look, the sample should reflect that. If the bag will be printed, embroidered, or labeled, the branding should be final enough to judge placement, scale, handfeel, and production risk.
Create a sample approval form with measurable fields: finished width, height, gusset, flap drop, strap minimum and maximum length, pocket opening, pocket depth, zipper length, print size, print position, stitch color, hardware finish, label placement, carton fold, and approved tolerances. If the bag must fit a tablet, laptop, catalog, notebook, or payment device, test it with the actual item or a physical equivalent. If booth display matters, hang it on the intended rack or wall hook and look at the silhouette.
Add simple handling checks before approving bulk. Load the bag with the expected weight and wear it briefly. Open and close snaps or zippers repeatedly. Rub the cured print with a clean white cloth. Check whether hardware touches printed areas when packed. Pack the sample using the proposed carton method and inspect it after 48 hours. These checks do not replace formal lab testing when required, but they catch many preventable problems before cutting begins.
- Approve fabric swatches before full samples for custom dyed, washed, coated, or waxed-look canvas.
- Approve one pre-production sample made with actual bulk-intent materials before bulk cutting.
- Measure the empty bag and a loaded bag because soft canvas can change shape under weight.
- Rub and fold the print after curing to check smearing, cracking, chalking, poor adhesion, or edge lifting.
- Open and close snaps, zippers, and buckles repeatedly to confirm alignment and reinforcement.
- Keep one signed sample with the buyer and one with the factory as the bulk production reference.
Define QC tolerances before the inspector finds defects
Quality control belongs in the PO before production starts. Once defects appear, it is much harder to agree on what is acceptable. For canvas messenger bags, the inspection checklist should cover material, dimensions, stitching, load points, branding, hardware, lining, packing, and carton marks. If you use AQL inspection, define the inspection level and defect classifications in advance.
Classify critical defects separately. Broken strap anchors, sharp hardware, wrong artwork, severe stains, mold odor, unsafe components, or major structural failure should not be treated the same as a minor loose thread. For natural canvas, also define what level of flecks, slubs, shade variation, or panel blemish is acceptable. Otherwise, the buyer may expect a clean retail face while the factory treats natural variation as normal.
Dimensional tolerances should reflect how the bag is used. Width and height may commonly be controlled within plus or minus 5 mm for small panels and plus or minus 10 mm for larger body dimensions, but the buyer should set the final tolerance for the design. Strap length range, pocket size, flap drop, gusset width, and zipper opening are just as important because they affect function. For print placement, plus or minus 3-5 mm from a fixed edge or centerline is usually clearer than “centered.”
Load-point testing should connect to the advertised carrying claim. If the bag is sold for light personal items, the standard can be lower than for books or tablets. A practical buyer-defined method is to test above the intended load, such as 1.5-2 times the claimed carrying weight for a short static pull, then check for seam opening, webbing slippage, hardware deformation, or fabric tearing. Strength comes from the full construction, not canvas weight alone.
- Material QC: GSM, shade, handfeel, finish, flecks, slubs, stains, odor, and shrinkage behavior where relevant.
- Dimension QC: width, height, gusset, flap drop, pocket size, zipper opening, and strap length range.
- Stitch QC: stitch density, tension, skipped stitches, broken threads, needle cuts, bartacks, and box-X reinforcement.
- Branding QC: print color, placement, curing, adhesion, pinholes, cracking, transfer, embroidery puckering, and label alignment.
- Hardware QC: zipper smoothness, snap retention, plating, rust marks, burrs, sharp edges, and secure attachment.
- Packing QC: carton count, artwork separation, barcode or carton mark accuracy, flap crease, moisture, odor, and print transfer.
Control packing, freight, and event deadlines early
Canvas messenger bags are bulkier than flat totes. A small change in gusset depth, strap arrangement, hardware position, or flap fold can change carton volume and landed cost. For craft fair distributors, the goods also need to be clean, countable, and easy to move from storage to vehicles to booth displays. Packing is part of the product specification, not an afterthought.
Poor packing can damage the part of the bag shoppers see first. A sharply folded flap may develop a permanent crease. Metal hardware can mark a printed panel. Fresh prints stacked before full curing can transfer. Waxed-look finishes may show pressure marks. Ask for a packed sample, leave it packed for 48 hours, then open it and inspect the flap, print, strap, odor, and overall recovery.
The right packing method depends on the selling channel and sustainability goals. Individual polybags protect against dirt, moisture, and rubbing during export or warehouse storage. Paper bands, tissue, or master polybag methods can reduce individual plastic use, but they offer less protection. If reduced-plastic packing is chosen, define the acceptable handling risk and cleanliness standard. For heavier bags, set a practical carton gross weight limit and confirm carton strength for the shipping route and warehouse stacking.
Lead time pressure usually comes from approvals, finishing, branding, and trims. A stock natural canvas messenger bag can move faster than a custom dyed, washed, embroidered, or coated version, but every project still needs artwork confirmation, material approval, sample making, sample shipping, buyer review, corrections, bulk material preparation, cutting, branding, sewing, trimming, inspection, packing, and export booking. Work backward from the craft fair date: warehouse arrival, latest ship date, inspection date, sample approval deadline, and final artwork deadline.
- Define whether bags are flat packed, folded once, packed with tissue under the flap, or packed with straps tucked separately.
- Set carton quantity from an actual packed-sample test, not from a similar tote bag estimate.
- Keep hardware away from printed panels with tissue, flap positioning, or inner protection where needed.
- Separate artwork versions, colors, sizes, and purchase order lines clearly in carton marks.
- Inspect packed samples after 48 hours for flap deformation, print transfer, odor, moisture, and heavy creases.
- Tell suppliers the event date, warehouse deadline, and latest acceptable ship date during RFQ, not after sampling.
Specification comparison for buyers
| Spec decision | Recommended option | When it fits | Buyer risk to check |
|---|---|---|---|
| Outer canvas weight | 12 oz cotton canvas, usually about 380-420 GSM before special finishing | Most medium craft fair messenger bags that need structure, comfortable wear, and manageable freight weight | 8-10 oz quotes can look attractive on price but may sag at the flap, wrinkle on display, and feel promotional rather than retail |
| Premium structure option | 14-16 oz canvas, usually about 450-540 GSM depending on weave and finish | Higher-ticket artisan, museum, university, lifestyle, and everyday-carry programs | Bulkier seams may need larger needles, wider seam allowances, slower sewing, and stronger machines; carton CBM and freight cost also rise |
| Canvas finish | Natural, bleached, piece-dyed, washed, waxed-look, or water-repellent finish selected by retail promise | Natural suits rustic craft fairs; dyed supports brand colors; washed supports vintage handfeel; treated canvas supports light outdoor utility | Finish changes shrinkage, shade control, print adhesion, odor, handfeel, MOQ, and sample lead time |
| Lining choice | Unbleached cotton lining around 120-180 GSM or 150D-210D polyester lining | Cotton supports a natural material story; polyester improves color consistency, lower lint, and wipeability | Very thin lining tears at pocket corners; loose lining can catch zippers; dark lining can hide threads and dirt during inspection |
| Closure system | Magnetic snap plus flap for casual use; zipper under flap for higher security | Magnetic flap fits souvenir and lifestyle retail; zipper under flap fits commuter, travel, student, or higher-value programs | Unreinforced snaps can pull through fabric; low-grade zippers can jam, split, or catch lining |
| Strap construction | 38 mm strap for compact crossbody; 50 mm strap for heavier messenger use, with box-X or bartack anchor reinforcement | 38 mm fits small bags; 50 mm improves shoulder comfort for books, tablets, catalogs, or market purchases | Narrow straps, thin webbing, and light adjusters reduce cost but cause slippage, twisting, shoulder discomfort, and weak perceived value |
| Hardware specification | Zinc alloy or iron hardware for most commercial programs; plastic only when weight or cost is the priority | Metal hardware supports retail perception; plastic may suit lightweight souvenir bags or children’s products | Hardware material, plating thickness, edge smoothness, rust risk, and finish consistency must be checked before bulk approval |
| Branding method | Screen print for solid artwork; embroidery or woven label for premium marks; heat transfer only after adhesion testing | Screen print fits bold craft fair logos; woven labels support repeat seasonal programs; embroidery works for small high-value marks | Large ink coverage can feel stiff; embroidery can pucker thin flap panels; transfers need rub, fold, and edge-lift checks |
| Reinforcement points | Bartacks, box-X stitching, backing patches, or bound seams at strap anchors, pocket corners, flap corners, zipper ends, and gusset bottoms | Required for bags that will be tried on, opened repeatedly, and loaded during events | Low quotes often omit hidden reinforcement at D-rings, snap backs, pocket ends, and bottom gussets |
Buyer checklist before sampling
- Define the selling use first: souvenir crossbody, everyday messenger, student bag, laptop-capable bag, premium artisan product, or event merchandise program.
- Specify finished width, height, gusset, flap depth, strap drop, strap length range, pocket layout, and intended carrying load in kilograms before requesting quotes.
- Specify outer canvas by oz and GSM, and state whether fabric weight is measured before washing, after washing, or after coating.
- Set fabric tolerance in writing, commonly plus or minus 5% GSM unless the program requires a tighter internal standard.
- State whether the canvas must be natural, bleached, piece-dyed, yarn-dyed, enzyme washed, garment washed, waxed-look, or water-repellent treated.
- Confirm acceptable cotton flecks, slubs, shade variation, handfeel, shrinkage tolerance, and whether front-flap blemishes are rejectable.
- Define lining material, lining GSM or denier, color, seam finish, pocket dimensions, zipper grade, and sleeve padding if used.
- Set strap width, strap length range, webbing material, adjuster material, D-ring internal width, reinforcement patch size, and stitching method.
- Provide artwork file, print size, placement from fixed edges, Pantone or approved standard, label position, and placement tolerance before sampling.
- Require a pre-production sample made with actual bulk canvas, lining, trims, branding, stitching, and packing method before bulk cutting.
Factory quote questions to send
- What is the exact outer canvas weight in oz and GSM, and is the stated weight measured before washing, after washing, or after coating?
- What GSM tolerance will you control in bulk fabric, and how will you verify it against the approved swatch or signed sample?
- Is the quoted canvas greige, natural, bleached, yarn-dyed, piece-dyed, enzyme washed, garment washed, waxed-look, or water-repellent treated?
- What shrinkage range do you expect after finishing, and will the fabric be pre-shrunk or stabilized before cutting?
- What shade tolerance applies to natural or dyed canvas, and can you provide a bulk cutting or lab dip for approval before production?
- Which lining material, denier or GSM, and lining color are included, and are pocket corners, zipper ends, and sleeve edges reinforced?
- What webbing width, webbing material, webbing thickness, adjuster type, D-ring size, and anchor reinforcement are included?
- What hardware material is quoted for D-rings, adjusters, snaps, rivets, zipper sliders, and zipper teeth, and what plating or finish is included?
- What zipper size and type are quoted, such as nylon coil, metal, or molded plastic, and what slider quality standard will be used?
- What print, embroidery, woven label, or patch method is included, and what maximum artwork size is covered before unit price changes?
Quality-control points to confirm
- Outer canvas GSM should be checked against the approved sample or swatch, with a written tolerance such as plus or minus 5% unless a different tolerance is agreed.
- Canvas shade, handfeel, finish, visible flecks, and slubs should be compared to the approved swatch before cutting bulk fabric.
- Finished dimensions should be measured flat: width and height commonly within plus or minus 5 mm for small panels and plus or minus 10 mm for large body dimensions, unless the buyer sets another tolerance.
- Gusset width, flap drop, pocket opening, pocket depth, and adjustable strap length should be measured because these affect real use more than the front-panel size alone.
- Strap attachment should pass an agreed load test based on the advertised carrying load; for example, if rated for 8 kg use, test at 12-16 kg static load for a defined time with no tearing, seam opening, or webbing slippage.
- Stitch density should be specified, commonly around 7-9 stitches per inch for many canvas bag seams, then checked for consistency, skipped stitches, loose tension, broken threads, and needle cuts.
- Bartacks or box-X stitches should be checked at strap anchors, D-rings, flap corners, pocket corners, zipper ends, and bottom gusset stress points.
- Print position should remain within agreed tolerance, commonly plus or minus 3-5 mm from centerline or fixed edge for front-flap artwork.
- Print surface should be checked after curing for smearing, cracking, pinholes, poor coverage on textured canvas, ink buildup, edge lifting, and transfer marks from stacking.
- Color matching should be reviewed under consistent light using approved standard, Pantone reference, or signed production sample rather than screen images.