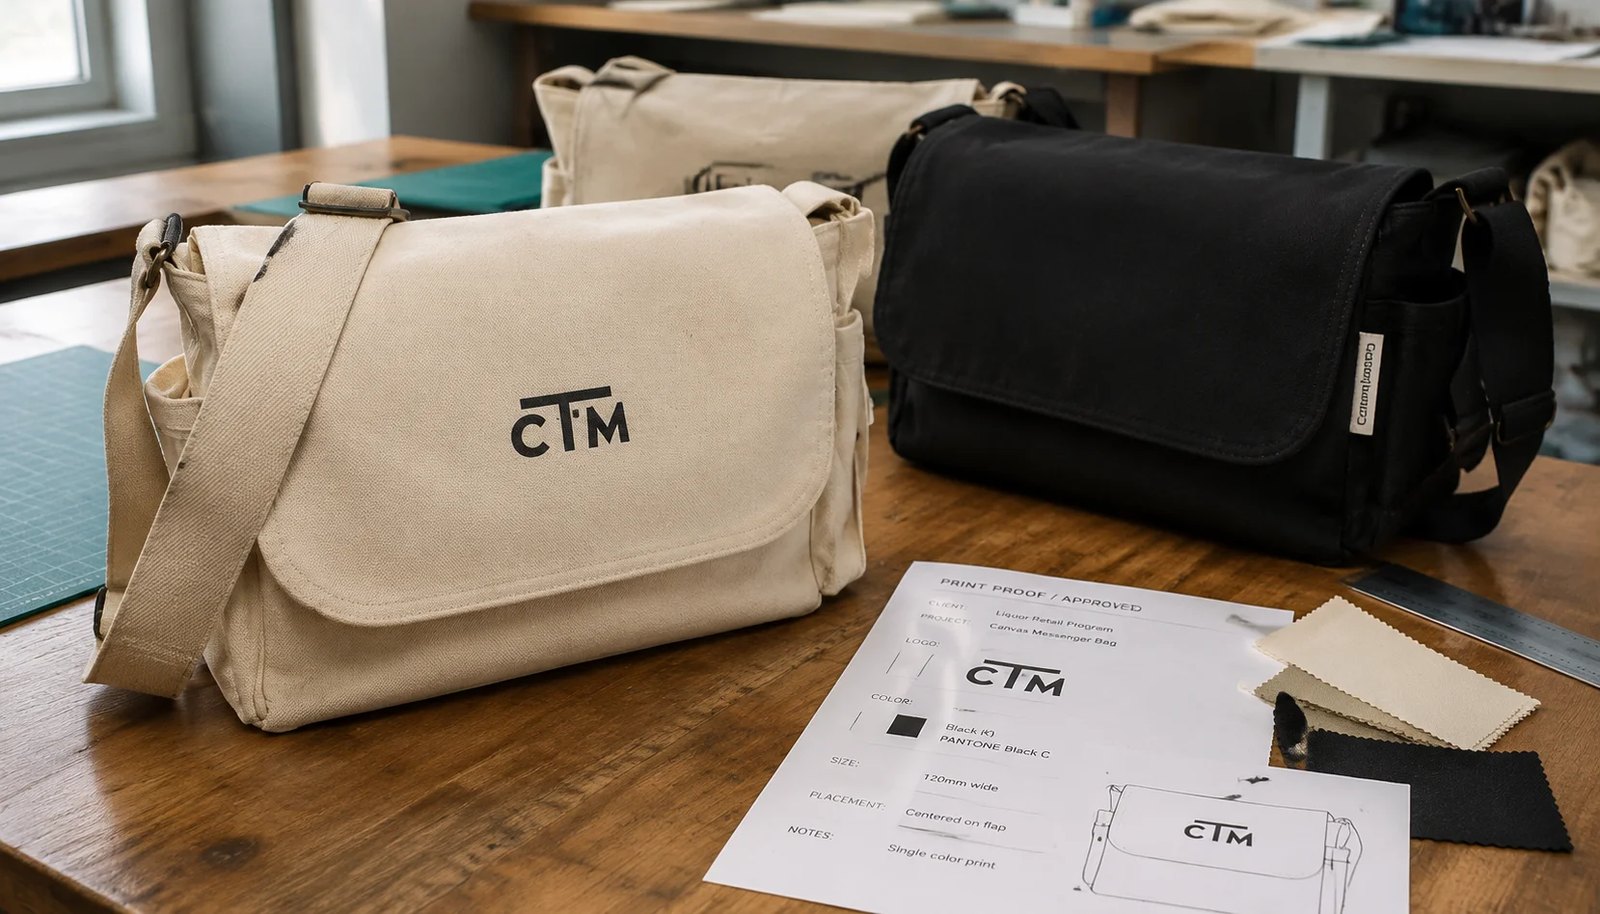
Why print proofing matters more on canvas messenger bags for liquor retail
Canvas messenger bags used by liquor retailers are usually part of a gift presentation, not just a carry bag. That changes the tolerance for print error. A grocery tote with slight logo drift may still pass at store level, but a messenger-style gift bag with a flap, visible front panel, and premium bottle contents gets judged like branded packaging. Buyers often focus on dimensions and price first, then approve artwork too quickly. That is where most avoidable claims start.
The print area on messenger bags is less forgiving than on flat totes because the flap fold, gusset expansion, strap attachments, and closure hardware all interfere with the visible logo zone. If the artwork sits too low, the flap crease cuts through it. If it sits too high, the magnetic snap or Velcro closure crowds the design. If the panel fabric is too soft, the print wrinkles when the bag carries weight. Proofing is not only about logo appearance on a PDF; it is about how the printed panel behaves after cutting, sewing, packing, and retail handling.
- High-risk zones: flap fold line, front pocket seam, magnet area, topstitch line, strap box stitch area
- High-risk bag uses: bottle gift sets, holiday promotions, spirits club merchandise, distributor incentives
- Most common print claims: off-center logo, wrong Pantone match, seam interference, ink cracking, print transfer from poor curing
Start the RFQ with the load case, not the artwork
A cleaner quote starts with what the bag must hold. Many liquor retail programs use the term messenger bag loosely, but factories need the actual load case to price the right body shape and reinforcements. A single wine bottle gift bag, a two-bottle spirits set, and a branded merchandise satchel can all be described as canvas messenger bags, yet their fabric and seam needs differ. If buyers only send artwork and broad dimensions, suppliers may quote the cheapest construction that visually resembles the request.
For bottle-related retail use, 12 oz canvas around 340 GSM is a practical baseline because it balances print quality, shape retention, and freight efficiency. Lighter 8-10 oz canvas can work for promotional merchandise with low weight, but it tends to sag once bottles or boxed products are inserted. Heavier 14-16 oz options improve structure but can raise print setup difficulty, sewing time, and outbound carton cube. The right spec depends on carrying function, not the logo file.
- Single-bottle or light gift item program: 10-12 oz canvas may be enough if gusset is modest
- Two-bottle or boxed set use: 12-14 oz canvas with reinforced bottom is safer
- Premium reusable retail merchandise: consider wider strap, bartacks, and cleaner edge finishing
- RFQ should state target load in kg and whether the contents are rigid bottles, cartons, or mixed items
Choose fabric and color with print performance in mind
Canvas shade and finish affect print output more than many first-time buyers expect. Natural canvas looks simple, but the base tone can vary by cotton crop and bleaching level. That means a dark green, burgundy, or metallic-looking retail brand color may appear different from lot to lot unless the factory controls the fabric source tightly. If the liquor retailer's visual identity is strict, pre-dyed fabric or an approved swatch standard is usually safer than generic natural canvas booked from spot market stock.
Fabric texture also changes the print edge. A coarse, slubby canvas gives a more rustic look but can soften small text and fine lines. For liquor retail branding, where logos often include serif details, crest elements, or narrow linework, buyers should define minimum line thickness and avoid overloading the print file with detail that the fabric cannot hold. If the art requires gradients or photographic elements, screen printing may no longer be the best method. In those cases, heat transfer or digital textile options can reproduce the visual better, but durability and hand feel need separate testing.
- Useful fabric callout: 100% cotton canvas, 12 oz, approx. 340 GSM, dyed black or bleached natural, no heavy wash finish unless approved
- If using dark fabric: state whether white underbase is required beneath the logo
- If using natural fabric: approve a fabric swatch with allowable shade range
- Fine text under 2 mm height on textured canvas is a risk unless tested on actual fabric
Print method selection: when screen print is better and when it is not
For most liquor retail messenger bag programs, screen printing remains the best balance of cost, consistency, and usable lead time. It works especially well for one- or two-color logos, store branding, event marks, and seasonal graphics. On canvas, a proper screen print can produce solid coverage and good wash resistance if the ink is cured correctly. It is also easier to control from batch to batch than some transfer methods when the artwork is straightforward.
The limits show up when buyers try to force photographic branding or very fine gradients onto a rough canvas panel. Heat transfer or digital methods may reproduce the artwork more faithfully, but they can add a visible film, alter the hand feel, and create edge-lift risk if the bag is folded tightly in transit. Print method should be selected from the artwork and end use together, not from unit price alone. A lower quoted print price is meaningless if the approved art cannot survive retail presentation and customer reuse.
- Screen print suits: simple logos, Pantone spot colors, large solid fills, repeat reorders
- Heat transfer suits: photo graphics, gradients, complex color transitions, smaller MOQ trials
- Important quote line items: screens per color, color matching, underbase, oversized print surcharge, curing standard
- Ask for a strike-off on actual fabric, not just a digital color simulation
How to approve artwork placement on a messenger bag without costly surprises
Artwork placement must be approved on a cutting-aware template, not a flat graphic centered on a generic rectangle. Messenger bags have flap overlap, body depth, topstitch margins, and side expansion that visually shift the logo once the bag is sewn and filled. If the retailer wants the logo centered on the flap, the proof should show the finished visible flap area after folding, not the pre-sewn cut panel. If the print sits on the front body below the flap, then the proof should reflect how much of that panel remains visible when the flap is closed.
A practical factory proof pack includes the artwork file, a dimensioned placement drawing, a fabric swatch, and a physical sample with print. This may sound basic, but many claims happen because one supplier approved a vector file while another production team interpreted placement from habit. Buyers should add measurable tolerances. For example, logo centerline may be allowed to drift only plus or minus 5 mm left or right from the approved sample, and print top edge may be held within plus or minus 4 mm from the flap stitch line. Once these limits exist in writing, final inspection becomes objective.
- Show measurements from fixed sewing points, not from a visual estimate
- State acceptable print position tolerance in mm
- Define whether seam overlap into artwork is zero tolerance or commercially acceptable within a small hidden area
- Use actual-scale proofs for any crest, medal icon, or small legal mark
Sample stages that save money instead of adding delay
Buyers often try to skip sample stages to gain time, but the expensive delays usually come later when bulk goods do not match expectations. The lowest-risk sequence for custom canvas messenger bags is: artwork proof, print strike-off, construction sample, then full pre-production sample with final packaging. Not every order needs all four if the factory is repeating an approved style, but a first order for a liquor retail program usually does. Each sample stage answers a different risk: color, print edge, bag function, and packing damage.
A physical pre-production sample is particularly important when the front flap carries the main branding. The flap shape, stiffness, and closure pressure affect how the print reads in real use. A logo that looks balanced on a flat panel can disappear under a fold line after sewing. Samples also reveal details that quotes rarely mention clearly, such as whether the strap twists, whether the gusset keeps the bag standing, or whether the print rubs against hardware during packing. These are practical issues that retail teams notice immediately.
- Artwork proof: confirms content, scale, and rough placement
- Print strike-off: confirms color and edge quality on actual canvas
- Construction sample: confirms dimensions, strap function, gusset shape, and hardware placement
- Pre-production sample: confirms final fabric, final print, labels, packing, and carton method
Where the quote really changes: cost drivers buyers should compare line by line
Canvas messenger bag quotes often look close at first glance, but the real difference sits in hidden assumptions. One factory may quote 10 oz canvas while another quotes 12 oz. One may include one-color screen print on one side only, while another includes Pantone matching and a woven side label. Some include an adjustable webbing strap with metal hardware; others use self-fabric straps with simpler sewing. If the RFQ is vague, the cheapest quote usually wins on paper and loses during approval.
Instead of comparing only FOB unit price, buyers should isolate the main cost blocks: fabric, print setup and run, hardware, sewing complexity, labeling, individual packing, and carton efficiency. This is especially important for liquor retail programs that may split shipments by store group or region. A supplier with a slightly higher unit price may still produce a lower landed cost if carton density is better or if print rejects are lower. Cost comparison only works when the quote basis is normalized.
- Typical quote variables: fabric GSM, print colors, print area, hardware finish, label type, polybag requirement, carton count
- Hidden surcharge areas: dark-fabric underbase, oversized flap print, barcode stickers, split packing by SKU, lower-than-standard MOQ
- Useful quote format: separate one-time setup charges from recurring unit costs
- Ask each supplier to quote the same Incoterm and same packing assumptions before comparing
MOQ logic and order planning for regional or multi-banner liquor retail programs
MOQ problems usually come from mixing too many variables at once. Factories can often support a lower MOQ if the bag construction and fabric stay the same while only the print changes by region or banner. The opposite is harder. If every SKU changes color, hardware, strap width, and print method, the order behaves like multiple small developments rather than one bulk run. Buyers should structure the assortment around shared components to unlock better pricing and smoother production.
For example, a liquor retail group may run one common 12 oz black canvas messenger bag body across three store banners, each with a different one-color logo on the flap. That is much easier for a factory to price competitively than three separate fabrics and constructions. The bag body can share cutting, sewing, and hardware procurement, while only the print screens change. The savings usually appear in material booking, line setup, and reduced sample repetition. This approach also lowers reorder risk because the core spec is already proven.
- Shared body, different logos: often the easiest MOQ-sharing structure
- Shared fabric booking: helps price stability on repeat orders
- Different print colorways: usually manageable if artwork size remains the same
- Different closures or hardware finishes: may trigger separate MOQ and lead-time complexity
Packing, carton design, and freight impact on printed messenger bags
Packing is part of print protection. A well-printed messenger bag can still arrive with offset marks, flap creases, or rubbed corners if the packing method is poor. Buyers should decide early whether the bag needs individual polybags, tissue interleaving, strap tacking, or simple bulk packing. For many liquor retail programs, individual polybags are used not for premium presentation but to prevent dust transfer and print abrasion during long transit. That said, overpacking raises freight cost fast, especially with gusseted bags.
Carton design matters because messenger bags trap air and consume cube inefficiently if folded the wrong way. A supplier that compresses too aggressively may save on carton count but leave permanent fold marks across the print zone. One that packs too loosely increases carton cube and inland freight. The right answer depends on fabric thickness, print type, and whether the bags are headed to a distributor warehouse or directly to retail stores. Packing instructions should match the receiving workflow, not just the factory's default.
- State maximum carton gross weight suitable for your warehouse handling system
- Require outer carton marks by SKU, colorway, quantity, PO number, and destination if shipment is split
- For premium flap prints, consider tissue or facing-direction control to reduce print-to-print contact
- Ask for packed carton dimensions in the quote to estimate freight and pallet efficiency
Lead time, approval bottlenecks, and what causes preventable delays
Lead time for custom canvas messenger bags is often quoted too optimistically because buyers and suppliers count from different starting points. A supplier may say 30 days, meaning 30 days after all materials, artwork, and sample approvals are complete. A buyer may hear 30 days from PO issuance. That gap creates frustration later. For a first-order liquor retail project with custom printing and hardware, it is more realistic to separate development time from production time: roughly 10-15 days for proof and sample cycles, then 30-45 days for bulk after final approval, depending on season and factory loading.
The biggest avoidable delays usually come from three areas: artwork revisions made after sample approval, late confirmation of Pantone or base fabric swatch, and packaging requirements introduced near ship date. Hardware sourcing can also become a bottleneck if the closure or adjuster finish is non-standard. Buyers who lock these decisions early usually gain more schedule reliability than buyers who pressure the factory only on ex-factory date. Schedule control comes from fewer open variables, not only from factory promises.
- Define whether lead time starts from PO date, deposit date, artwork approval date, or final pre-production sample approval
- Build time for strike-off and courier transit into the approval schedule
- Avoid changing barcode, shipping mark, or carton ratio after mass production starts
- If the order is seasonal, reserve capacity before final artwork if the supplier allows it
Specification comparison for buyers
| Spec decision | Recommended option | When it fits | Buyer risk to check |
|---|---|---|---|
| Fabric weight | 12 oz canvas, about 340 GSM | Best for repeat-use liquor retail gift packs and premium bottle-carry promotions | Some suppliers quote lighter 10 oz fabric while calling it heavy canvas; require finished GSM tolerance and fabric test method |
| Bag construction | Side gusset plus bottom panel with reinforced stress points | Needed when bag must hold boxed spirits, two bottles, or promotional kits | Flat-body messenger shapes look cheaper in quotes but distort print and fail faster under bottle weight |
| Print method | Pantone-matched silk screen for simple logos; heat transfer only for photo artwork | Screen print is lower risk for bold retail branding on canvas | Digital or transfer prints may shift color and edge sharpness; define acceptable print variation on approval sample |
| Base fabric color | Pre-dyed black or bleached natural from approved swatch | Useful when the retail brand needs repeatable background color across reorder batches | Natural canvas shade varies by cotton lot; if the logo color is light, background variation becomes visible in stores |
| Proof approval route | Signed physical pre-production sample plus annotated artwork proof | Best for retail programs where the bag becomes part of the gift presentation | PDF-only approval often misses print placement, seam interference, flap fold distortion, and strap shadow on artwork |
| Closure and hardware | Magnetic snap or Velcro with nickel-free metal adjuster | Suitable for retail gift-purchase carryout and branded merchandise use | Unspecified hardware finish causes mixed plating across batches; magnets can mark print area if placed too close to artwork |
| MOQ logic | Split order by print colorway on one approved bag construction if total fabric booking is shared | Useful for regional liquor chains or multiple store banners under one group | Some factories allow style MOQ sharing but not print setup sharing; confirm surcharge by colorway and carton split |
| Packing format | Individual polybag only if needed, then master carton with dividers by colorway and size label outside | Good for distributor receiving and easier retail allocation | Overpacked cartons crush flap prints and raise freight cost; underpacked cartons create edge abrasion and strap creasing |
| Lead-time plan | 10-15 days for sample/proof cycle and 30-45 days bulk after approval | Reasonable for custom canvas with printing and hardware sourcing | Quoting from artwork approval instead of final sample sign-off hides production risk; define the lead-time starting point in the PO |
Buyer checklist before sampling
- Define the bottle or gift load the messenger bag must carry: single bottle, two bottles, boxed set, or mixed promotional items.
- State target fabric weight in oz and GSM, and whether tolerance applies before or after washing and finishing.
- Specify finished bag dimensions including flap, gusset, bottom depth, strap width, and strap length adjustment range.
- Declare whether the bag is natural canvas, dyed canvas, washed canvas, or laminated canvas, because print behavior changes by finish.
- Send vector artwork and Pantone references for every print color, including whether underbase printing is required on dark canvas.
- Mark exact print placement from seams, flap fold, pocket edge, and strap anchors so the logo is not distorted in use.
- Approve a physical pre-production sample with actual fabric, actual print method, and actual hardware before bulk production.
- Set acceptable print tolerances for color difference, registration shift, pinholes, smudging, and print position variance.
- Define carton count, carton size limit, shipping marks, barcode label format, and whether store-ready inner packs are required.
- Write in the PO whether excess or shortage tolerance is allowed, and how replacements or credit will be handled for print defects.
Factory quote questions to send
- What is the quoted canvas specification in both oz and GSM, and is that weight greige, dyed, or finished fabric?
- Is the quote based on cotton canvas, cotton-poly canvas, or recycled blend canvas, and what is the exact composition?
- Which print method is included in the price, how many print colors, and what is the maximum print area without surcharge?
- Does the print price include Pantone matching, white underbase on dark fabric, and strike-off sample approval?
- What is the MOQ by bag construction, by fabric color, and by print colorway, and can multiple SKUs share one fabric booking?
- What sample stages are available: digital proof, print strike-off, blank fit sample, and full pre-production sample with packaging?
- What hardware grade is included, and will all buckles, adjusters, magnets, and rivets be color matched across the order?
- What packing method is quoted, including polybag thickness, carton count, carton dimensions, and gross weight limit?
- What production lead time applies after final sample sign-off, and what are the top three schedule risks for this item?
- What defect standard does the factory use for print blemishes, seam tolerance, and fabric shade variation at final inspection?
Quality-control points to confirm
- Measure fabric weight and hand feel against approved sample; substitute lighter canvas is a common cost-down on repeat orders.
- Inspect print placement on the flap and body using a measurement template; artwork drift is highly visible on messenger bags.
- Check print color against approved standard under daylight or D65 lighting, especially on natural canvas where base shade affects appearance.
- Rub-test printed areas after curing to screen out under-cured ink that can crack or offset during transit.
- Load-test strap anchor points and gusset seams using the intended bottle weight; weak bartacks often fail first.
- Review hardware finish consistency and functional alignment of closures, especially magnet placement under printed flaps.
- Open random cartons to inspect creasing, print offset, moisture exposure, and strap entanglement caused by poor packing.
- Verify assortment labels, carton marks, and barcode accuracy before container loading to avoid distributor receiving errors.