Start With the Retail Job the Tote Must Do
Canvas library tote bags for gift shops fail when the bag is designed around the logo and not around the way it will actually be sold. A gift shop tote is usually grabbed, folded, stacked, carried to the counter, and then reused for books, postcards, souvenirs, or a mix of small purchases. That means the product has to do several things at once: open cleanly, hold its shape well enough to look tidy on a shelf, and survive repeated handling without looking tired after a short retail life.
If the tote is meant to carry books, the real load risk is the handle and the bottom seam, not the front artwork. If it is mostly a souvenir carrier, shelf presence and price point matter more than extra structure. The first sourcing decision is therefore not print color. It is the intended use case. A bag that looks fine in a flat photo can still fail retail if it collapses when folded, twists at the handles, or feels too flimsy next to hardback books.
- Define the primary retail use before you quote the bag.
- Separate shelf appearance from carrying performance.
- Treat handle strength and seam construction as core commercial features, not decoration details.
Lock the Spec Before You Ask for Price
A quote for canvas library tote bags should read like a manufacturing instruction, not a sales inquiry. The supplier needs the finished size, gusset depth, handle length, print method, print area, stitching detail, and packing method before the price means anything. Without that detail, two suppliers can quote very different assumptions and still appear to be quoting the same product.
Write the dimensions as finished measurements. Then give the allowable tolerance on the points that matter commercially: body width, body height, gusset depth, handle length, and handle drop. For most retail tote programs, a practical starting point is plus or minus 6 mm on body dimensions and handle length, with tighter control on print placement if the logo sits close to a seam or top edge. Fabric should be stated in GSM and, if needed, in ounces so there is no conversion confusion between suppliers. A 10 oz bag can work for lighter gift items, but 12 oz is often the safer choice if the tote is expected to carry books and heavier purchases.
The spec also needs a short packing note. If the bag should be folded a certain way, sold with a belly band, or packed without a polybag for moisture reasons, say so now. Once the factory starts cutting and sewing, changing those instructions later can affect the carton count, freight volume, and the appearance of the goods on arrival.
- State fabric weight in GSM and ounces if your suppliers use both systems.
- Use finished size, not cut size, and attach a tolerance band.
- Name the print method before the first quote goes out.
- Put folding and carton requirements in the same spec file as the bag dimensions.
- If the artwork is close to an edge or seam, tighten the print-placement tolerance in writing.
Compare Supplier Routes by Control, Not by Promise
The lowest quoted unit price is not always the lowest-risk route for a tote program. A direct custom cut-and-sew factory usually gives the best control over fabric, stitching, and repeat orders, but it requires a cleaner tech pack and a more disciplined approval process. A trading company can simplify communication when you are buying multiple products or do not have the staffing to manage factory follow-up, but you still need to know which factory is actually making the bags and who is accountable if the bulk lot misses the approved sample. Stock blank plus local decoration can be useful when speed matters more than exact construction, but the blank bag itself has to be inspected before you commit.
The right route depends on where your risk sits. If your biggest risk is inconsistent construction, use a factory that can control sewing and cutting in one place. If your biggest risk is coordination across several vendors, use a trading route but require the real factory details and sample trail. If your biggest risk is launch timing, a stock blank with local print can be the right compromise, as long as you sample the exact blank and do not assume all stock canvas behaves the same under print or embroidery.
- Choose the route that controls your biggest failure point.
- Do not compare prices until you know whether sewing, print, and packing are in one facility or split across vendors.
- Use stock-plus-decoration only when the exact blank bag has been verified.
- Keep a backup source once the style is proven and reorder risk becomes more expensive than duplicate qualification.
Build the RFQ So It Exposes Hidden Cost
A usable RFQ for this category should break the price into the parts procurement actually needs to compare. Ask for the cost of the blank bag, the decoration, the sample stage, carton packing, and export paperwork separately. If the supplier sends one blended number, you cannot tell whether a lower quote comes from thinner fabric, simpler finishing, a cheaper print process, or reduced carton quality. That is a poor basis for a purchase decision because the bag that saves a few cents in production can cost more in defects, freight, or rework.
Sample ownership is another common blind spot. Ask whether the sample fee is chargeable, whether it is credited against the first order, and who owns the approved sample once the order is placed. Keep a retention sample yourself, not just in the factory file. The buyer should also ask for the overrun and underrun policy, because some suppliers build their commercial model around short shipment tolerance. If you do not write the rule down, the factory may treat it as normal, while your retail team treats it as a stockout.
If your company requires an audit, say so before the quote is accepted. The supplier should know whether you need a document review, a virtual line walk, a social compliance record, or a pre-shipment inspection by your own team or third-party inspector. It is better to discover a bad audit fit before sample approval than after the bags are already in production.
- Separate blank bag cost from decoration cost.
- Ask for setup fees, plate or screen charges, carton charges, and freight assumptions.
- Confirm whether sample fees are refundable or credited to the first PO.
- Require named factory disclosure if the quote comes through a trading company.
- State your audit or inspection requirement up front so it is not treated as an extra later.
Approve Samples in the Right Order
A sample for a gift shop tote should be judged as a production reference, not as a display piece. Start with a blank sample when the bag is new, then approve a print strike-off, then approve a pre-production sample made from the actual bulk fabric, thread, and packing material. A sample made from random stock cloth can hide problems with shrinkage, stiffness, print absorption, or shade variation. The pre-production sample is the one that should be signed off for bulk use.
The approval review should be boring and measurable. Measure the finished body with a tape. Check the handle drop against the intended retail use. Look at the top hem and the inside seam finish. Fold the bag the same way it will be displayed or shipped. If the tote is meant to sit upright on a shelf, test whether it still looks neat after being folded and refolded a few times. If the bag is intended to carry books, place weight in it and inspect whether the handle attachment and side seams deform or twist.
Keep the approved sample and the approval record together. The factory should know that any future change to fabric, thread, print ink, or fold method must be re-approved. That protects the reorder, but it also protects the first order from being silently substituted after sign-off.
- Approve blank bag, strike-off, and pre-production sample in sequence when the design is new.
- Measure the sample and write the actual numbers into the approval record.
- Fold the tote the way it will be sold or shipped, not just the way it looks best on a table.
- Reject any sample with crooked handles, print blur, seam gaps, or visible shade mismatch against the approved reference.
Use a Defect Standard the Factory Can Follow
A quality inspection checklist works only if the defects are defined in a way the factory can actually apply. For canvas library tote bags, the simplest structure is critical, major, and minor. Critical defects are the ones that make the bag unsellable or unusable: wrong artwork, missing handle, open seam, heavy contamination, mildew, or a size error so large that the bag no longer matches the approved SKU. Major defects are issues that hurt retail value even if the bag still functions: body dimensions outside tolerance, crooked print placement, weak bartack, broken stitches, or a visible stain on the front face. Minor defects are small but visible issues such as stray thread tails, slight fold marks, or low-impact slub variation.
If your team uses AQL, put the sample size and acceptance number into the purchase order or quality annex. For retail tote programs, many buyers start with zero critical defects and a practical target around 2.5 major and 4.0 minor, but the exact rule should match your internal policy and price point. The important part is consistency. The factory should know the reject rule before the first batch is cut, not after a carton of finished bags is opened on the receiving dock.
The other half of the defect standard is measurement tolerance. A useful starting point is plus or minus 6 mm for body width, body height, and handle length on typical retail-sized totes, with tighter control on print placement when the artwork sits near a seam or top edge. Fabric GSM should also be checked against the approved spec, ideally within about 5 percent of target unless you have a different written band. If the supplier cannot hold those tolerances, the quote should not be treated as equivalent to a tighter spec.
- Define critical, major, and minor defects in the PO.
- Use zero acceptance for critical defects.
- If you use AQL, name the exact sample size and acceptance numbers.
- Measure the bag, not just the appearance of the bag.
- Treat size drift, print misplacement, and seam failure as commercial defects, not cosmetic preferences.
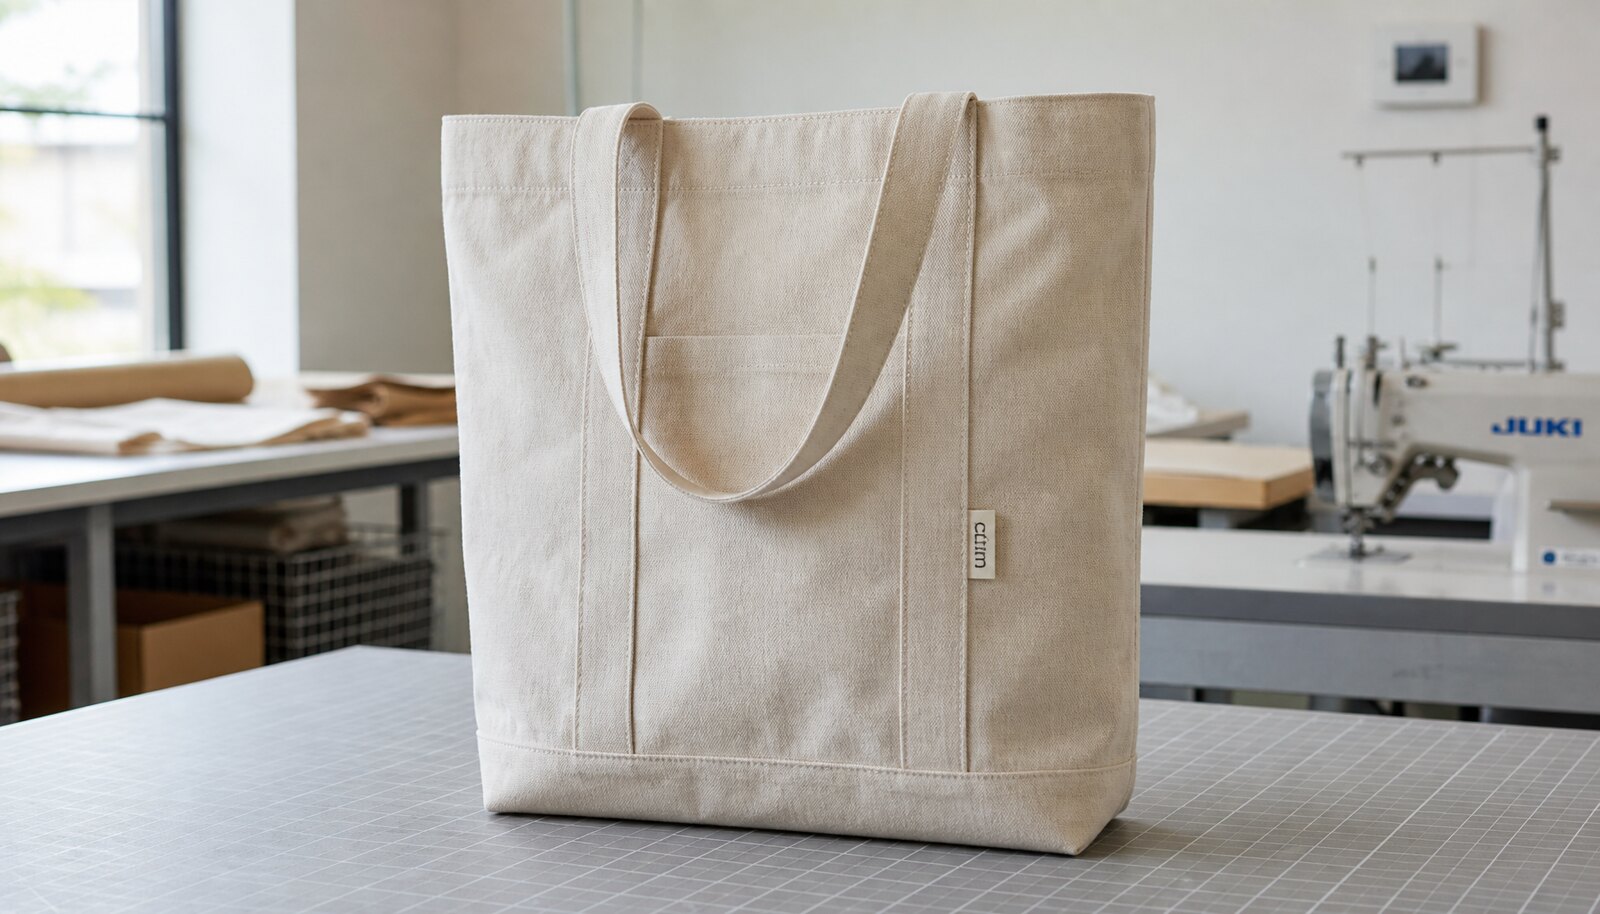
Inspect Print, Stitching, and Handles as the Main Failure Points
For this product, print quality is usually the first thing the customer sees and the first thing procurement should inspect. One-color screen print is often the safest choice because it tends to stay sharp, repeatable, and economical on canvas. Heat transfer can work for small runs or urgent orders, but it should be tested for fold resistance and color stability on the actual blank bag. Embroidery can look premium on some programs, yet it can also pucker lighter canvas or distort a larger logo. The right decoration method is the one the factory can repeat without turning the tote into a moving target.
Stitching and handle attachment are the next two checkpoints. The bag should show clean top hems, even seam lines, and a handle attachment pattern that matches the weight the tote is meant to carry. Reinforced bartacks or an X-box style reinforcement are usually more defensible than a purely decorative seam, especially if the tote will carry books. Inspect both sides of the handle attachment because one side can look fine while the reverse side reveals loose tension, skipped stitches, or poor backtack. Also check whether the handles twist when the bag is lifted; twist is a useful signal that the cutting or attachment process is not consistent.
Canvas itself deserves an inspection pass. Look for weak slubs, visible holes, oil marks, heavy shade patching, needle damage, loose fibers, and smell or moisture that would make the bag awkward to put directly into retail stock. If the fabric is dyed, compare against the approved shade band rather than a generic idea of natural or beige. Many disputes happen because the buyer assumed the bag would be visually uniform when the approved sample had already shown a normal level of canvas variation.
- Use screen print for the most repeatable one-color logo programs.
- Test any transfer method on the actual blank before bulk approval.
- Require reinforcement at handle stress points.
- Reject twisted handles, print bleed, and visible front-face stains.
- Inspect shade variation against the approved sample, not against memory.
Check Pack-Out, Cartons, and Shelf Readiness
Packing is part of the product for gift shop totes. If the bag goes from carton to shelf, the fold direction, insert card, belly band, or retail label becomes part of the buyer experience. A clean, repeatable fold helps the bag look intentional when it is stacked or hung. If the bag will be sold as a simple gift item, a tidy fold and consistent front presentation matter more than an elaborate package. If it is going through wholesale distribution, carton efficiency and damage resistance may matter more than shelf dressing.
Carton inspection should be specific. Verify that carton marks match the PO, the style code, color, size, and quantity. Check that the cartons are closed cleanly and that the piece count is correct in the first carton, a middle carton, and the last carton. Confirm whether mixed lots are allowed; if they are not, the cartons should be clearly segregated by shade, size, or artwork version. Look at carton dimensions and gross weight because freight cost changes quickly when a supplier overpacks or uses a carton that is too tall for efficient stacking.
If the route is humid or the shipment may sit in transit, use moisture control and avoid packaging that traps dampness against the canvas. A polybag can be useful in some programs, but it is not automatically the best choice for every tote because some gift shop buyers prefer a cleaner retail presentation and less trapped moisture. The right pack-out decision should match the shelf, not the factory preference.
- Write the fold method into the order when retail presentation matters.
- Check carton marks on the first, middle, and last cartons.
- Confirm whether mixed lots are allowed before packing starts.
- Match carton dimensions to freight and shelf handling, not just to what is easiest for the supplier.
- Use moisture protection when the transit or storage route makes it necessary.
Use Lead Time and Landed Cost to Choose the Order Plan
Lead time for canvas library tote bags is usually a chain of smaller decisions, not one number. Sampling, strike-off approval, fabric sourcing, cutting, sewing, printing, packing, and freight each add time. If a supplier gives only the shortest possible production date, ask for the realistic date after sample sign-off and the realistic ship date after bulk approval. That distinction matters because launch plans are often built on a best-case factory promise, not on a schedule that accounts for approvals, rework, or material delay.
Landed cost should include more than the factory quote. Add decoration setup, packing, carton volume, freight mode, duty, inspection cost if you use one, and the cost of a defect or short shipment. A slightly higher factory price can still be the better commercial choice if the bag is packed efficiently, the size stays consistent, and the supplier can produce a clean reorder without re-qualifying the entire style. On the other hand, a low unit price is not a saving if the shipment forces extra freight, relabeling, or store-level sorting.
The best order plan is the one that fits the launch date and the shelf life of the program. If the tote is seasonal or tied to a short promotion, use the fastest route that still lets you inspect the exact blank and approve the decoration. If the tote is a steady gift shop SKU, use the route that gives the strongest repeatability and the easiest reorder control.
- Ask for the real ship date after sample approval, not the earliest possible date.
- Compare factory price and landed cost as separate numbers.
- Model inspection, freight, and rework cost before approving a low quote.
- Choose speed only when it does not destroy the margin or the quality window.
Close the Loop With a Sign-Off Package
Before the purchase order is released, put the approval record into one sign-off package. Include the spec sheet, the approved sample photos, the artwork file, the print method, the defect standard, the packing method, and the carton spec. If the supplier later proposes a fabric substitution, a different thread, or a different fold, the buyer needs one record that shows what was approved and what would count as a deviation. That is how you keep a tote program from drifting between seasons.
The sign-off package also helps internal handoff. Merchandising wants the tote to look right in the shop. Procurement wants stable cost and reorder terms. Operations wants cartons that are easy to receive and store. A single approval file keeps those requirements from splintering into separate expectations. It also reduces the chance that a reorder will be quoted from memory instead of from the actual approved reference. For canvas tote programs, the reorder is often where quality drifts first, because the first order is still in everyone’s head but not always on paper.
Keep one retention sample with the final approval notes. If you can, store it with the date, buyer name, supplier name, and any allowed tolerances written on a tag or in the file. That gives you a neutral reference when a new season, a new color, or a second supplier enters the program.
- Store the approved sample, spec sheet, artwork, and packing standard together.
- Record any allowed substitutions before production starts.
- Attach the final carton spec and packing method to the PO.
- Keep a retention sample so reorder disputes can be resolved against the same reference.
Specification comparison for buyers
| Supplier route | Best fit | Typical price drivers | Control points and audit hooks | When to choose |
|---|---|---|---|---|
| Direct custom cut-and-sew factory | Repeat programs with your own dimensions, fabric, and trim | Fabric GSM, cutting efficiency, stitch labor, print setup, carton spec | Ask for factory identity, line photos, pre-production sample, and retention sample; verify whether cutting, sewing, and print are all in one facility | Choose when the tote is a core SKU and you need consistent reorders |
| Trading company or sourcing agent | Multi-product buys or buyers who need one contact across suppliers | Factory margin, coordination fees, hidden sub-supplier costs, sample handling | Require named factory disclosure, sample ownership terms, and a photo trail for each approval stage | Choose when internal sourcing bandwidth is limited and paperwork coordination matters |
| Stock blank plus local decoration | Urgent launches or test orders with low design risk | Blank bag availability, local print or embroidery setup, freight, and rush fees | Inspect the exact blank, confirm decoration method, and keep the blank sample on file | Choose when speed matters more than custom fabric or exact panel construction |
| Factory with in-house printing | One-color logos and programs that need fewer handoffs | Print screen count, color matching, curing, and reject rate on registration | Ask who controls print curing, whether the art is kept on file, and how print shade is approved | Choose when you want tighter control over print and fewer blame gaps |
| High-MOQ export factory | Chain gift shops and distributors with stable volume | Lower unit price, but more dependence on minimums, dye lot planning, and full-carton efficiency | Request dye lot control, overrun/underrun policy, and line-level QC records | Choose when the volume justifies stronger pricing and repeatability |
| Low-MOQ sample-friendly supplier | Seasonal shops, pilots, or first-time programs | Higher unit cost, more setup per bag, possible fabric substitutions | Confirm sample fee policy, whether sample fees are credited back, and what happens if material runs short | Choose when you need a small test order without overcommitting stock |
| Domestic decorator for rush orders | Local replenishment or event-driven orders | Higher labor cost, blank bag cost, and faster freight or pickup | Check blank origin, color match, and retail finish before decoration starts | Choose when the lead time window is shorter than the overseas production cycle |
| Backup supplier | Risk hedge after the main style is approved | Duplicate sampling, spec replication, and carton re-qualification | Keep the same approved sample, artwork file, and packing standard so the backup does not drift | Choose when the bag already sells and stockout risk is more expensive than duplicate qualification |
Buyer checklist before sampling
- State fabric weight in GSM and, if your suppliers use it, in ounces.
- Write finished body width, height, gusset depth, handle length, and handle drop with tolerances.
- Approve the exact print method, artwork size, placement, and color target before sampling.
- Ask for a blank fabric swatch, a printed strike-off, and a pre-production sample made from the intended bulk materials.
- Define defect grades in the PO, including what counts as critical, major, and minor.
- If you use AQL, state the standard on the order; many retail programs use zero critical defects and 2.5 major / 4.0 minor as a practical starting point.
- Lock the fold method, insert card or belly band, barcode format, and carton marks before bulk production.
- Specify carton quantity, carton dimensions, gross weight target, and any pallet or moisture requirements.
- Ask for first-carton photos, a final carton count, and a signed packing list before shipment release.
- Keep one retention sample with the approved artwork, measurements, and date code for reorder comparisons.
Factory quote questions to send
- What is the exact canvas construction, GSM, and fabric width, and is the cloth greige, bleached, or dyed?
- Which costs are included in the quote: blank bag, print setup, screens or plates, labels, folding, carton, and export paperwork?
- What is the MOQ per color, per artwork, and per carton specification, and does the MOQ change if we use stock fabric?
- Who owns the approved sample, and will the sample fee be credited back to the first bulk order?
- What is your allowed overrun or underrun percentage, and how do you price short shipments?
- What size tolerance do you apply on finished body, gusset, and handle length, and what is the reject rule for each?
- Can you name the actual factory, not only the trading office, and can you share a recent in-line or final inspection report?
- Where is the print done, and how do you verify curing, color match, and registration before packing?
- What carton dimensions, carton count, and gross weight will you ship against the PO?
- What documents and images will you provide at shipment, including packing list, carton labels, and bulk inspection photos?
Quality-control points to confirm
- Critical defects should be zero: wrong artwork, missing handle, open seam, severe contamination, mildew, or a bag so far out of size that it cannot be sold as the approved SKU.
- Major defects should trigger rejection or rework: body width or height outside the agreed tolerance, crooked logo placement, handle length mismatch, weak bartack, broken stitches, or visible stain on the retail face.
- Minor defects can be limited but should still be counted: small loose threads, slight fold marks, minor slub variation, or light creasing that does not affect shelf presentation.
- Practical measurement targets should be written into the spec: finished body width and height within plus or minus 6 mm for most retail totes, handle length and handle drop within plus or minus 6 mm, and print placement within plus or minus 3 mm unless the artwork is especially close to an edge.
- Fabric weight should be checked against the approved spec, ideally within about 5 percent of the target GSM unless your program defines a wider band.
- Inspect the first article, a middle carton, and a last carton so you can catch line drift, not only the first good-looking sample.
- Record stitches per inch on the approved sample and require the bulk run to match the same construction, especially on handle attachment and top hem seams.
- Check the handle attachment from both sides of the bag and verify reinforcement is consistent, not just present on one sample piece.
- Inspect print edges for blur, ghosting, bleed, or off-center placement; the logo should remain readable when the tote is folded and hung.
- Open several folded units from each carton to confirm the pack style is repeatable and not hiding a damaged top seam or crushed corner.