Start With The Tote’s Real Job, Not The Logo Mockup
Canvas grocery totes are often sourced as if they are simple branded rectangles. For procurement buyers, that is where most problems begin. A reusable grocery tote has to carry weight, stand up to repeated handling, fold cleanly, present well at retail, and hold the brand print without distortion. The print proofing checklist for eco apparel brands should therefore begin with the bag’s job: what it carries, how it is displayed, how it ships, and how the end customer will use it.
An eco apparel brand may use the same tote in several channels: as a paid reusable shopping bag, a gift-with-purchase, a wholesale retail item, a launch kit component, or a grocery collaboration. Each channel changes the spec. A tote sold at retail needs cleaner folding, barcode planning, and more consistent print placement. A checkout tote needs capacity and handle comfort. A promotional tote may prioritize budget but still needs enough structure to avoid looking disposable.
Before discussing artwork, define the load and carry mode. If shoppers will carry bottles, produce, shoes, folded garments, or multi-item purchases, handle reinforcement is not optional. If the bag will hang on a peg or sit in a shelf stack, the fold line and carton compression matter. If the tote will be photographed for ecommerce, print position and wrinkle control matter more than they would for a one-day giveaway.
- Write the primary use case into the RFQ: grocery carry, apparel retail bag, merchandise tote, event giveaway, or subscription packaging.
- Define the expected carry mode: hand carry, shoulder carry, cart placement, shelf display, or ecommerce shipment.
- Use practical starting dimensions such as 14-16 in wide x 15-18 in high x 4-6 in gusset, then adjust for your product mix and packing plan.
- Specify whether the tote must stand open, fold flat, hang on a peg, fit into a shelf tray, or ship in a specific master carton.
- Treat the artwork as one part of the product spec, not the only approval point.
Build A Complete Tote Spec Before Comparing Supplier Quotes
Two suppliers can quote “natural canvas grocery tote with one-color print” and still be pricing two different products. One may assume 8 oz cotton canvas, basic top hem, simple handle stitching, and bulk packing. Another may assume 10 or 12 oz canvas, reinforced handles, tighter stitch control, and retail packing. The cheaper quote may not be cheaper; it may simply be incomplete.
A strong procurement spec removes interpretation. It tells the factory the finished size, fabric weight, fabric color, handle construction, seam style, print method, print position, packing method, and inspection standard. This makes supplier comparison fair and gives your team leverage when the sample or bulk production does not match the approved details.
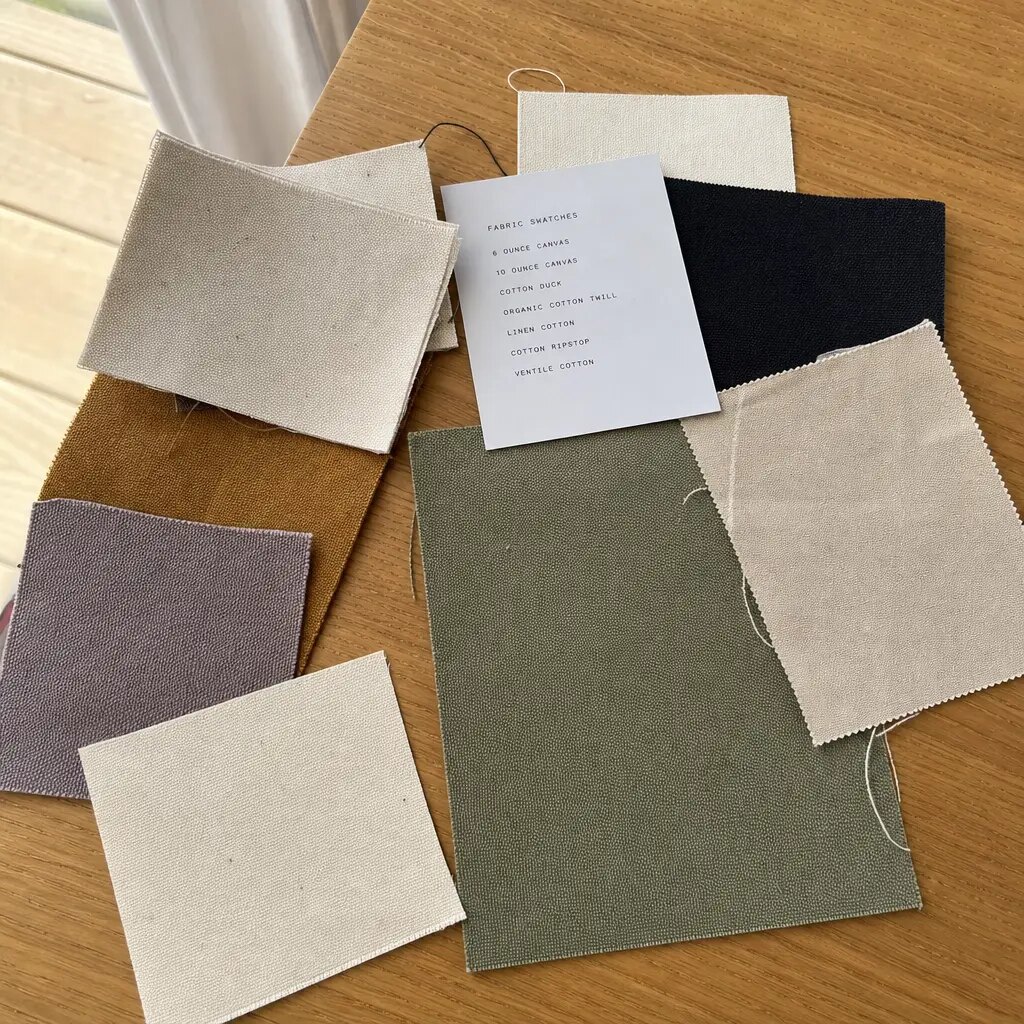
For canvas grocery totes, the fabric weight should be expressed in oz or gsm. A common retail baseline is 10 oz, roughly 340 gsm. A 12 oz canvas, roughly 400 gsm, gives more structure and a heavier hand feel but increases cost, carton weight, and sometimes fold bulk. Lighter 6-8 oz canvas may be appropriate for low-cost promotional programs, but it usually feels less substantial and may not match the expectations of eco apparel customers buying reusable goods.
Also separate natural, bleached, dyed, and custom-color canvas. Natural canvas varies in tone and may show cotton seed flecks or shade variation. Bleached canvas can make prints appear cleaner but may change the sustainability, cost, and hand feel discussion. Dyed canvas requires color approval and can affect ink opacity, especially for light logos.
- State finished dimensions, not only pattern dimensions, because sewing and pressing can change the final measurement.
- Specify canvas weight in oz and gsm where possible, plus color and finish.
- Define handle type: self-fabric, cotton webbing, handle width, handle length, and handle drop.
- Call out seam construction: top hem, side seam, bottom seam, gusset seam, binding, or interior finishing if required.
- Require reinforcement details at handle joins, such as bartack, box-X, double row stitching, or another agreed method.
- If the tote has labels, pockets, snaps, zippers, hang loops, or interior prints, quote those as separate construction items.
Choose Print Method Based On Artwork And Canvas Behavior
The best print method is the one that matches the artwork, fabric texture, order quantity, and acceptable tolerance. For many canvas grocery totes, one- or two-color screen printing remains the most practical option. It works well for solid brand marks, simple campaign graphics, and repeat orders because the color can be controlled, the edges can be predictable, and the unit cost becomes efficient after setup.
That does not mean screen print is automatically right for every design. Fine-line illustrations, gradients, photographic artwork, many spot colors, or very small order quantities may push the supplier toward transfer or digital methods. These can be useful, but procurement teams should not treat them as risk-free shortcuts. Transfers can feel different on canvas, may behave differently at fold points, and may change the hand feel of the bag. Digital print can show detail but may require special preparation and clear expectations for color and wash or rub performance.
The important point is that canvas is not a smooth paper surface. The weave absorbs ink, interrupts thin lines, and changes the visual result of pale colors. A logo that looks sharp on a PDF can lose legibility when printed across slubs, seams, or a textured natural canvas. This is why the proofing checklist must include minimum line weight, minimum text size, ink opacity, underbase needs, and the distance from seams or gusset folds.
White ink on natural or dyed canvas deserves special attention. Depending on the canvas shade and print system, a white or cream logo may need an underbase or multiple passes to look opaque. Without that, the print can appear dull, uneven, or yellowed. The same risk applies to pale green, beige, pastel, and metallic effects. Ask the supplier to explain how the ink will sit on the actual fabric, then confirm with a physical proof.
- Use spot-color screen print for solid logos, repeat programs, and stable brand marks.
- Ask for minimum readable text size and minimum line weight before approving detailed art.
- Confirm whether white or light ink requires an underbase, second pass, or special curing step.
- Avoid placing important artwork across gusset folds, seam ridges, or high-crease areas unless the effect is intentional.
- If artwork has gradients or photographs, ask the supplier to recommend the method and explain the tradeoffs in cost, texture, and color accuracy.
- Require the artwork proof to show real scale, print side, print placement, and distance from bag edges or seams.
Use A Print Proofing Checklist Before Releasing The Sample
Print proofing should not be limited to confirming that the logo is centered. For canvas grocery totes, print approval needs to cover file version, color reference, print size, print position, print side, ink coverage, and how the artwork interacts with the finished bag shape. The more versions you run, the more important this becomes. A multi-store or multi-campaign order can easily mix up artwork if file naming and proof approval are loose.
Start with file control. The factory should receive one current artwork package, not a chain of email attachments with conflicting revisions. Procurement should identify the final file name, date, artboard size, color references, and any notes about trapping, underbase, or converted fonts. Editable vector files are usually preferred for screen print because they help the printer control separations and edges. If the supplier also needs a print-ready file, send both and label them clearly.
Next, proof placement by measurement. “Centered on front” is not enough. A grocery tote may not be perfectly symmetrical after sewing, and the gusset or top hem can affect the visual center. State the print size and measure the placement from stable reference points such as the top edge, side seam, or centerline. If the bag has a bottom gusset, check how the print looks when the bag is opened and filled, not only when it is lying flat.
Finally, confirm color on fabric. Pantone references are useful, but a Pantone chip on coated paper will not look identical to ink on woven canvas. Natural cotton shade, ink absorption, and print thickness all affect the result. The approval record should say whether the color is accepted as a close match on the actual fabric, not as an abstract digital target.
- Identify the final artwork file name, revision date, print size, and print side in the approval record.
- Confirm fonts are outlined or supplied, and that line weights are suitable for canvas printing.
- State print placement with measurements, such as top edge to print top, side seam to print edge, and center alignment tolerance.
- Require a proof for each artwork version, each bag color, and each print colorway.
- Check whether the print appears correct when the bag is flat, opened, and lightly filled.
- Keep an approved physical sample or signed proof as the gold reference for bulk production.
Make MOQ, Setup Fees, And Price Bands Transparent
MOQ is not only a sales threshold. It reflects fabric purchasing, cutting efficiency, print setup, sewing line planning, packing labor, and carton utilization. A supplier may be willing to produce below the normal MOQ, but the cost of screens, ink setup, labor changeover, and unused fabric still has to be recovered somewhere. That recovery may appear as a surcharge, a higher unit price, a sample fee, or a simplified spec.
For eco apparel brands running seasonal capsules or store-specific artwork, MOQ should be discussed by variable. A 2,000-piece order with one bag color and one print may be efficient. The same 2,000 pieces split across four bag colors and five artworks is a different production plan. Each artwork version can require separate proofing, screen setup, production tracking, and packing control.
Ask suppliers for price bands rather than one number. Request the exact target quantity, one lower quantity, and one higher quantity. This helps procurement see where the real cost break occurs. It also helps the brand decide whether to consolidate artwork versions, reduce colorways, or increase volume to reach a more efficient production level.
A clear quote should show what is included in the unit price and what is separate. Print setup, screen charges, PMS matching, sample charges, individual packing, barcode labels, hangtags, inserts, carton upgrades, and inspection support should not be hidden. If one supplier includes retail packing and another quotes bulk pack only, the unit prices cannot be compared directly.
- Request MOQ by fabric color, artwork version, print color count, and packing style.
- Ask for price bands at low, target, and higher volumes to identify cost breaks.
- Separate unit cost from setup fees, sample fees, screen charges, packing charges, and carton charges.
- Confirm whether the pre-production sample cost is refundable against the bulk order.
- Ask whether overruns or underruns are allowed and whether overruns are automatically billed.
- Compare quotes on landed or delivered cost when freight, packing, and documentation materially affect the total.
Treat The Pre-Production Sample As A Contract Reference
A pre-production sample is not a courtesy photo; it is the physical reference that turns the specification into a product. For canvas grocery totes, it should include the intended canvas, correct fabric weight, final dimensions, handle construction, print method, print position, label details, fold method, and packing components. If the supplier sends a sample made from substitute fabric or unfinished artwork, it may be useful for early development but should not be treated as the bulk approval sample.
Measure the sample carefully. Canvas bags can vary because of cutting, sewing tension, fabric finishing, and pressing. That is normal within an agreed tolerance, but the tolerance must be written down. Procurement teams should check finished width, finished height, gusset depth, handle length, handle drop, and print placement. If the bag is intended for shoulder carry, physically test the handle drop on different body types or compare it to an approved prior tote.
The print should be inspected in normal light and close-up. Look for opacity, edge sharpness, registration, pinholes, ink bleed, cracking, tackiness, and color match. On natural canvas, a small amount of texture interaction may be acceptable, but the standard must be defined. If the brand expects a crisp retail look, do not approve a sample with broken fine text and assume bulk will improve.
Once approved, label the sample as the gold sample and record any allowed deviations. Keep one sample with the buyer and require the factory to keep a matching sample at the production site. This reduces arguments later. If the bulk shipment differs, both parties can compare to a physical reference instead of relying on memory or email descriptions.
- Approve only a sample made with the intended fabric, print method, reinforcement, label, fold, and packing method.
- Measure bag dimensions and print placement with a ruler and record the results.
- Inspect handle reinforcement and seam quality under practical tension, not only visually.
- Check print color, opacity, line clarity, and ink feel on the actual canvas shade.
- Approve barcode, insert, hangtag, polybag, and fold style at sample stage for retail orders.
- Photograph and label the approved gold sample, then store the approval record with the PO and tech pack.
Control Bulk QC From Fabric Receiving To First Packed Carton
Quality control should begin before sewing starts. Incoming canvas should be checked for weight, shade, stains, slubs, weaving defects, odor, and obvious variation. Natural canvas will not look as uniform as coated synthetic material, but that does not mean all variation is acceptable. The approved fabric swatch and sample should guide what is normal and what is rejectable.
The first production pieces are the highest-value inspection point. At that stage, the factory can still adjust print placement, sewing guides, thread tension, reinforcement, or folding method before hundreds or thousands of units are affected. Ask for photos or an inline review of the first bulk pieces, especially when the order has a tight retail delivery window or multiple artwork versions.
Inspection should include both construction and print. Construction checks include seam strength, handle symmetry, stitch density, skipped stitches, loose threads, puckering, bottom corners, and gusset shape. Print checks include position, ink coverage, edge definition, color, registration, curing, and whether the print distorts when the bag is opened. For grocery totes, a practical load check is also useful. It does not need to be a laboratory claim; it should simply reflect the intended use case and be agreed in advance.
The first packed carton should also be reviewed before the entire order is packed. This catches wrong fold direction, barcode errors, carton count mistakes, mixed SKU issues, missing inserts, poor polybag sizing, and incorrect carton marks. Once the full order is sealed, correcting these issues becomes slower and more expensive.
- Check incoming canvas before cutting and document any shade or defect concerns.
- Review first bulk print and first sewn pieces before full production continues.
- Use measurement tolerances for dimensions and print placement, not subjective approval.
- Inspect handle joins, side seams, bottom seams, gusset corners, and top hems for strength and consistency.
- Perform a practical load check that matches expected grocery or apparel retail use.
- Verify barcode scan, fold method, SKU separation, carton count, and carton marks on the first packed carton.
Specify Packing For Retail, Wholesale, And Warehouse Handling
Packing is a product decision, not an afterthought. A canvas grocery tote can be bulk packed for a promotional handout, folded with no individual wrap for a low-waste retail program, packed in individual polybags for distribution-center handling, or prepared with hangtags, insert cards, barcodes, and carton labels for wholesale delivery. Each option changes labor, cost, carton volume, and receiving accuracy.
Eco apparel brands often want to reduce unnecessary plastic, but the packing choice still has to protect the product and fit the retail channel. If individual polybags are not used, the buyer should decide whether paper bands, kraft sleeves, belly wraps, inner cartons, or direct carton packing are acceptable. If polybags are required by a retailer or warehouse, clarify whether recycled-content bags, warning text, suffocation warnings, vent holes, or specific barcode placement is needed.
Fold method also matters. A fold that hides the print may be fine for warehouse storage but poor for shelf display. A fold that creates a deep crease through the logo can make the product look defective when opened. A bulky gusset can also increase carton dimensions and freight cost. Ask the supplier to show the fold on the pre-production sample and again on the first packed carton.
Carton requirements should include units per carton, carton size, gross weight, inner packing, SKU markings, country-of-origin marking, purchase order number, destination labels, and any retailer routing labels. If the tote is part of a mixed assortment, specify whether each artwork version is packed separately or mixed in a controlled ratio.
- Decide whether the order is bulk pack, individual pack, paper band, hangtag, insert card, barcode label, or retail-ready pack.
- Approve the fold direction and confirm whether the print is visible, protected, or likely to crease.
- Set carton quantity, carton dimensions, gross weight limit, and carton marking format.
- Confirm barcode location and scanability before mass packing.
- Separate SKUs clearly when multiple bag colors or artwork versions are produced.
- Include packing requirements in the RFQ so quotes reflect real labor and carton cost.
Plan Lead Time Around Approval Gates And Change Control
A realistic lead time is built around approval gates, not only the number of days on a production line. The normal sequence is artwork preparation, supplier review, digital layout, physical sample, buyer comments, revised sample if needed, final approval, material booking, cutting, sewing, printing, finishing, QC, packing, export preparation, and transit. If the buyer treats all of this as one vague production window, the launch calendar becomes fragile.
For a straightforward one-color canvas tote, bulk production may often be planned in a few weeks after final approval, but the exact timeline depends on fabric availability, dyeing, artwork complexity, packing requirements, factory capacity, and inspection timing. Custom dyed canvas, multi-color artwork, revised proofs, retail packaging, or split shipments can extend the schedule. Procurement should ask the supplier to separate sample time from bulk time and transit time in writing.
The most common schedule risk is late change control. A small logo size change may require a new screen. A print color correction may require reproofing. A barcode update may delay packing. A tote size change after sample approval can change fabric usage, carton count, and cost. These changes are sometimes necessary, but they should be treated as formal revisions with impact on price and lead time.
Version control is especially important for eco apparel brands with marketing, design, procurement, and retail teams all involved. Keep one approved artwork folder, one approved tech pack, and one approval log. Do not let old mockups or early dielines re-enter the supplier conversation after the sample has been approved.
- Separate artwork approval, sample production, sample approval, bulk production, QC, packing, and transit in the timeline.
- Freeze artwork, print placement, fabric color, and packing before bulk materials or screens are prepared.
- Use version-controlled file names and remove outdated artwork from supplier-facing folders.
- Ask which buyer-side changes restart sampling, screen making, carton work, or lead time.
- Build time for reproofing if brand color, print opacity, or retail packing must be exact.
- For fixed launches, request first bulk photos and first carton photos early enough to correct issues.
Send An RFQ Pack That Forces Comparable Quotes
The best supplier quote is not the fastest number. It is the number based on the same assumptions you will use to place the purchase order. A complete RFQ pack for canvas grocery totes should include the product spec, artwork, quantities, packing plan, quality expectations, delivery terms, and approval process. Without these details, suppliers will fill the gaps differently, and procurement will spend days trying to reconcile mismatched quotes.
A strong RFQ tells the supplier what matters most. If the bag is a premium retail item for an eco apparel brand, say that the hand feel, print clarity, and shelf presentation are priorities. If the tote is a cost-controlled grocery promotion, state the budget sensitivity and required durability level. If the order is going into a retailer’s distribution center, include barcode, carton, and routing requirements from the beginning.
Include a quote comparison template if possible. Ask each supplier to return the same fields: fabric weight, dimensions, handle construction, print method, setup fees, packing, MOQ, price bands, sample time, production time, Incoterms, carton information, and assumptions. This prevents vague answers and makes it easier to identify where one supplier is excluding something important.
When reviewing responses, look beyond unit price. A supplier that asks precise questions about artwork, tolerance, packing, and QC may be protecting the order from rework. A supplier that gives a very low number without asking about fabric weight, print method, or packing may be quoting the simplest interpretation. For B2B procurement, the goal is not just to buy a tote; it is to buy a repeatable tote that arrives as approved.
- Send one tech pack with final dimensions, canvas weight, handle spec, seam style, reinforcement, label details, and tolerances.
- Attach artwork in editable vector format and print-ready format, with file names and color references clearly marked.
- List quantities by fabric color, artwork version, print color count, and packing style.
- Define packing, barcode, carton, labeling, inspection, Incoterms, destination, and required documents.
- Ask suppliers to state assumptions and exclusions rather than hiding them inside the unit price.
- Compare total landed cost, sample reliability, QC capability, and rework risk, not unit price alone.
Specification comparison for buyers
| Spec decision | Recommended option | When it fits | Buyer risk to check |
|---|---|---|---|
| Canvas weight | 10 oz / about 340 gsm for standard grocery use; 12 oz / about 400 gsm for premium retail, heavier carry, or a stiffer shelf presentation | Eco apparel brands, grocery retail programs, reusable checkout totes, and wholesale merchandise that must feel durable without becoming too bulky | Many quotes say only “canvas” or “cotton canvas.” Require oz or gsm, fabric color, finish, and whether the weight is quoted before or after washing/finishing. |
| Bag size and gusset | A practical grocery format is usually 14-16 in wide x 15-18 in high with a 4-6 in bottom/side gusset, adjusted to your retail shelf, POS display, or carton plan | Reusable grocery totes, farmers market bags, lifestyle merchandise, and branded store totes that need volume without becoming hard to fold | Oversized gussets increase fabric use, carton bulk, and crease risk. Undersized gussets make the tote look flat and reduce usable grocery capacity. |
| Handle construction | Cotton webbing or self-fabric handles with bartacks, box-X stitching, or dense reinforcement at the load points | Bags expected to carry bottles, produce, folded apparel, shoes, boxed goods, or multi-item grocery purchases | Simple topstitching at the handle join can pass a photo review but fail under repeated load. Ask for reinforcement photos and a practical load test. |
| Print method | 1-2 color screen print for solid logos and repeat programs; transfer, digital, or specialty methods only when artwork complexity justifies them | Eco apparel brands with logo marks, campaign artwork, store graphics, or limited seasonal drops on natural or dyed canvas | Fine type, thin lines, white ink on natural canvas, and print near seams need special proofing. Confirm minimum line weight, ink opacity, and placement tolerance. |
| Artwork proof | Physical pre-production sample using the actual canvas, actual ink/print method, and final placement; digital mockup only as an early layout tool | Any retail, wholesale, or branded merchandise order where color, logo position, and hand feel matter | Digital mockups hide weave texture, ink absorption, seam distortion, and true scale. Do not release bulk production from a screen image alone. |
| Supplier route | Direct bag factory with coordinated sewing and printing when the spec is stable; trading company or local decorator only when the sourcing reason is clear | Repeat programs, controlled QC, stable reorders, and procurement teams that need transparent tolerances and packing specs | A low ex-factory number may exclude print setup, packing, barcode work, sample reproofs, inland freight, or inspection support. |
| MOQ strategy | Set MOQ by fabric color, artwork version, print color count, and packing style, not one vague total quantity | Multi-SKU retail programs, eco apparel capsule drops, store openings, wholesale assortments, and split artwork orders | A supplier may accept a low MOQ but recover the cost through setup fees, higher unit pricing, simplified packing, or less flexible sampling. |
| Packing route | Bulk pack for promo or internal distribution; folded individual polybag, barcode, insert card, and carton marking for retail or DC programs | Store-ready shipments, ecommerce bundles, wholesale buyers, and distribution-center receiving requirements | Packing changes labor, carton count, dimensional weight, scan accuracy, and shelf presentation. Compare quotes only after packing is specified. |
| QC inspection | Inline check after first production pieces plus final inspection against approved sample, AQL/tolerance plan, carton markings, and packing photos | Orders with brand standards, retail delivery windows, repeat replenishment, or multiple artwork versions | If QC begins only after packing, print drift, weak handles, wrong fold, or mixed SKUs may already be expensive to correct. |
Buyer checklist before sampling
- Define the tote use case in writing: grocery checkout, apparel retail bag, event merchandise, subscription packaging, staff kit, or wholesale resale item.
- Fix final dimensions, gusset depth, handle length, handle drop, seam style, and handle reinforcement before any supplier comparison.
- Specify canvas weight in oz or gsm, plus color, finish, shrinkage expectation if washed, and whether the fabric is natural, bleached, dyed, or custom matched.
- State the artwork file name and version, print side, print location, number of colors, print method, target Pantone or brand color reference, and acceptable placement tolerance.
- Confirm minimum line weight, minimum text size, and whether white or light ink requires an underbase on the selected canvas shade.
- Require a physical pre-production sample made with the intended fabric, print method, reinforcement, fold, label, and packing components before bulk cutting or printing starts.
- Measure the sample against a written tolerance table for width, height, gusset, handle length, handle drop, and print placement from seams or edges.
- Approve print color on the actual canvas, not only against a paper Pantone chip or digital rendering.
- Document whether the approved sample is the gold sample, keep one retained sample with the buyer, and require the factory to keep one matching sample for production reference.
- Break MOQ and pricing down by fabric color, artwork version, print color count, packing method, and quantity band.
Factory quote questions to send
- What exact canvas weight are you quoting in oz and gsm, and is that greige fabric weight or finished fabric weight?
- What fabric construction, yarn count if available, color, finish, and shrinkage expectation are included in this quote?
- Are the handles self-fabric or webbing, what is the handle width, and what reinforcement method is used at the join?
- What finished dimension tolerance do you allow for bag width, height, gusset depth, handle length, and handle drop?
- Is the quoted print price for one side or both sides, and how many print colors are included?
- Which print method are you recommending for this artwork, and what minimum line weight and minimum text size can you hold on this canvas?
- If the artwork uses white, cream, metallic, fluorescent, or pale ink, is an underbase needed and is it included in the quote?
- What print placement tolerance do you use from the top edge, side seam, bottom seam, or gusset fold?
- Can you provide a physical pre-production sample using the actual fabric, ink, reinforcement, and packing method?
- Does the sample charge get credited back on the bulk order, and what happens if the sample must be revised because of factory error?
Quality-control points to confirm
- Check incoming fabric against the approved swatch for weight, shade, hand feel, obvious slubs, stains, oil marks, weaving defects, and dye variation before cutting.
- Measure finished width, height, gusset, handle length, and handle drop against the approved tech pack, using agreed tolerances rather than subjective judgment.
- Inspect handle joins for bartacks, box-X stitching, stitch density, thread security, symmetry, and placement consistency across the lot.
- Review side seams, bottom seam, gusset corners, top hem, and any binding for skipped stitches, needle cuts, loose threads, puckering, or uneven seam allowance.
- Confirm print location using a ruler from the top edge, side seam, bottom seam, or centerline. Do not approve placement only by eye.
- Check print opacity, edge sharpness, registration, pinholes, ink spread, and coverage on the actual bulk canvas shade.
- Compare print color to the approved physical sample under consistent lighting, and record any acceptable variation before bulk release.
- Perform a practical load check that reflects intended use, such as filled grocery weight held statically and lifted by the handles, with the method agreed in advance.
- Rub and flex the printed area lightly to identify poor curing, cracking, tackiness, transfer, or weak adhesion before cartons are packed.
- Verify that print does not land over unintended seam ridges, gusset folds, deep creases, or areas that distort when the tote is opened.