Start with the carton, not just the tote
For a coffee roaster, a canvas grocery tote can play several roles. It may be a paid retail item, a gift set carrier, an event giveaway, a wholesale account support piece, or a reusable shopping bag sold near beans and brewing gear. At sample stage, all of those uses can look similar. One neat tote on a table tells you very little about how 3,000 pieces will arrive after folding, bundling, cartoning, inland trucking, and warehouse handling.
The problems usually appear later. Cartons arrive swollen. Black logo ink shows light scuffing. Warehouse staff cannot count quickly because pieces are loose. A 3PL complains that carton weights exceed its manual handling rule. Freight cost looks higher than expected because packed cube was never compared across suppliers. None of these issues are solved by a nicer product photo. They are solved by writing the carton packing plan into the buying specification from the beginning.
That is why a canvas grocery totes for coffee roasters carton packing plan should connect product design, print approval, inner pack, master carton, carton marks, and inspection. The aim is not to force the largest possible quantity into every carton. The aim is a stable, countable, protective carton that lands in a condition suitable for your sales channel.
- Require carton dimensions, gross weight, net weight, CBM, pieces per carton, and board type before approving the supplier quote.
- Approve the fold method and inner pack at the same time as the tote sample, especially when the logo is dense or dark.
- Use real coffee products to validate size, load, and folding before locking carton count.
- Treat bulging cartons as a packing defect, not as a normal feature of soft goods.
- Keep the approved carton plan in the purchase order, packing list, and inspection checklist.
Define the coffee use case before choosing fabric or pack count
Coffee is small, dense, and often paired with breakable or rigid accessories. Two 1 lb coffee bags, a ceramic mug, and a compact brewer can stress a tote more than their footprint suggests. A bag that looks roomy when empty can twist under load, pull at handle anchors, or become difficult to fold cleanly once the gusset and handles add bulk.
The use case changes the right specification. A retail merchandise tote needs good body, clean stitch presentation, consistent folding, and low print-scuff risk. A gift carrier needs to fit inserts, tissue, tins, mugs, or drippers without distorting the side seams. An event giveaway may accept lighter fabric and tighter compression if the item will be handed out quickly. A wholesale café support tote may need tougher cartons and clearer marks because goods are split, re-shipped, and touched by several teams.
Put this use-case statement into the RFQ. It gives the factory practical context for fabric GSM, handle reinforcement, gusset depth, print placement, and carton count. Without it, one supplier may quote the lightest workable construction to win the price comparison, while your team expects a grocery-style tote that feels appropriate for premium coffee retail.
- Retail merchandise: prioritize hand feel, fold quality, clean print, and low scuff risk.
- Gift bundle: test the tote with actual coffee bags, mugs, tins, drippers, inserts, and tissue before approval.
- Events: prioritize manageable cartons, quick counting, and practical unit cost.
- Wholesale account support: prioritize carton durability, accurate carton marks, and consistent bundle quantities.
- Customer grocery reuse: specify fabric body, handle comfort, and repeated carry performance, not only logo appearance.
Fabric terminology, GSM, and natural canvas limits
Canvas weight sounds simple until quotes arrive. In tote sourcing, suppliers may refer to 8 oz, 10 oz, or 12 oz canvas, often based on ounces per square yard. Others quote GSM. Some use the weight of greige fabric before finishing, while buyers assume the figure describes finished fabric after dyeing, washing, shrinking, coating, or other finishing. That gap can make bulk goods feel lighter than the approved sample.
For most coffee roaster grocery totes, 10 oz to 12 oz canvas, roughly 280 to 340 GSM finished fabric, is a practical starting range. It gives enough body for coffee retail use without making cartons unreasonably bulky. An 8 oz fabric can still be suitable for light promotional distribution, but it usually has a softer hand, less structure, and less premium shelf presence. Moving heavier, meanwhile, can improve body but may reduce pieces per carton and increase freight cube.
Natural canvas also needs clear defect language. Seed flecks, small slubs, and slight shade movement can be part of the natural character. Oil marks, stains, holes, severe shade panels, weaving defects, and strong odor should not be treated as normal. If you choose custom dyeing, add lab dip approval, bulk shade tolerance, and lot segregation rules before production starts.
- Ask for finished GSM with a tolerance, such as +/- 5% unless your program needs tighter control.
- Confirm whether GSM is tested before or after finishing and whether the approved sample matches the production fabric lot.
- Use 280 to 340 GSM as a practical starting range for premium grocery-style coffee totes.
- Separate acceptable natural canvas character from rejectable defects such as stains, holes, oil marks, and strong odor.
- For custom dyeing, approve lab dip, bulk shade standard, and carton segregation rules if lot variation is possible.
Size, gusset, handle drop, and load details to put in the PO
Write tote dimensions as finished measurements, not approximate sample impressions. A common starting size for coffee roasters is about 35 cm wide x 38 cm high with a 10 to 12 cm gusset, but the right answer depends on your coffee bag format and add-ons. Tall pillow-style bags, block-bottom bags, tins, bottles, mugs, and drippers all fill the tote differently.
Tolerance matters because sewn cotton products move. A practical tolerance for this type of tote may be around +/- 1 cm on width and height, with separate limits for gusset and handle drop. If the tote will hang on retail pegs or wall fixtures, handle drop should be controlled more carefully because uneven handles are immediately visible. For shoulder-friendly grocery use, a 25 to 30 cm handle drop is common, but the approved sample should be tested when filled, not only measured flat.
Handle construction deserves more detail than 'strong handles.' State whether the handles are self-fabric or separate cotton webbing, the finished width, total handle length, visible drop, reinforcement type, stitch box size, bartack count if used, thread color, and stitch density. The reinforcement must spread load into the bag body. Handles sewn too close to the top hem, with short stitch boxes or loose backstitching, can fail during repeated lifts even if the bag looks acceptable at first glance.
- Specify finished width, height, gusset depth, top hem width, handle width, and handle drop.
- Confirm whether dimensions are measured flat, with the gusset folded, or with the bag opened.
- Use planned contents for fit checks before approving bulk dimensions.
- Define handle material, webbing width, stitch box size, bartack position, stitch density, and thread color.
- Include a practical load check based on intended contents, with repeated lift and hold.
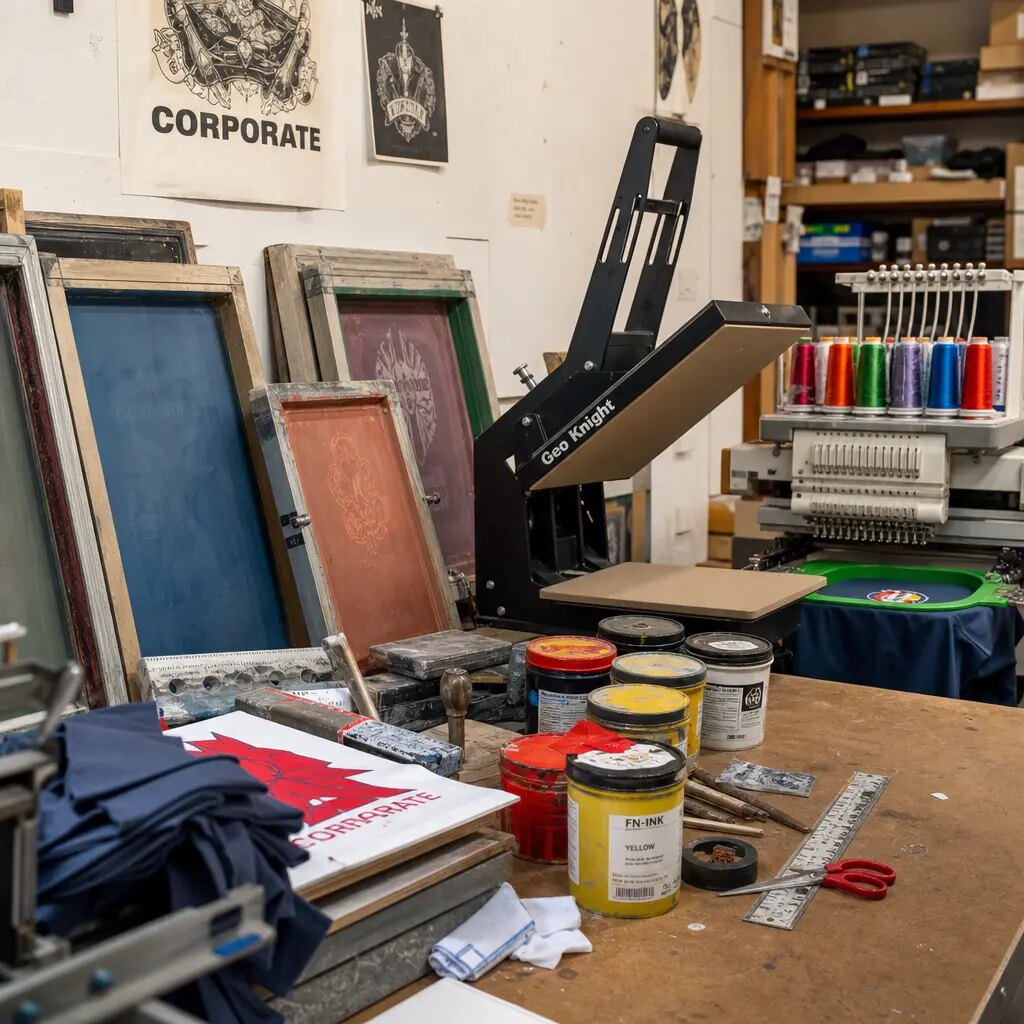
Print placement and curing controls for roaster logos
Many coffee roaster totes use bold café marks, wordmarks, or one-color illustrations. Screen printing is often the best value for that style of artwork, but the print sequence still needs control. Printing on cut panels before sewing gives a flatter surface and efficient production. The trade-off is that final logo placement can shift slightly after sewing. Printing on finished bags can help some placement decisions, but it is slower and more difficult near seams, gussets, and thick hems.
Do not rely on 'center front' as an inspection standard. Give the factory vector artwork, final print size, color count, Pantone or approved color reference, and a measurement point. For example, measure from the finished top hem and the side seam, not from an unfinished cut panel. For many simple tote prints, +/- 5 mm to +/- 10 mm placement tolerance is realistic, depending on artwork size and construction. Agree on it before bulk production.
Curing and folding belong in the same conversation. Dense black or dark ink on natural canvas may feel dry, yet still scuff, set off, or polish under carton pressure if folded too soon. Ask for a strike-off, curing method, minimum resting time before folding, and a dry rub check. If the logo crosses a fold line, sits near a gusset, or is close to the handle stitch zone, approve a folded sample photo as well as the flat print.
- Provide vector artwork, final print size, color count, and Pantone or approved color reference.
- Confirm whether printing is on cut panels before sewing or on finished bags after sewing.
- Measure placement from finished top hem and side seam, not only from the cut panel.
- Avoid critical artwork details across gussets, bottom folds, and handle stitch zones unless sampled.
- For dense ink, check cure, dry rub, light wet rub if required, and setoff after folding under pressure.
Build the packing plan from one folded tote
A useful packing plan starts with one finished tote in your hand. Decide how the gussets flatten, how the handles tuck, whether the front logo faces inward or outward, and where the main fold line sits. These choices affect carton height, pressure points, logo condition, and the appearance of the tote after unpacking. A fold that saves two centimeters of carton height may not be worth it if it leaves a hard crease through the logo.
After the fold is approved, define the inner pack. Many B2B programs use 5 or 10 pieces per bundle because those counts are easy for receiving, store replenishment, and shortage checks. Polybags protect against dust and scuffing, especially on light natural canvas and dark prints. Paper bands or kraft sleeves reduce plastic and can look cleaner, but they provide less barrier protection. The right option depends on market rules, sustainability policy, warehouse cleanliness, and how many times cartons will be opened before final use.
Only then should the master carton count be confirmed. Many canvas tote programs fall between 50 and 100 pieces per carton, but the correct count must be validated with real folded samples. A 12 oz gusseted tote with thick webbing handles will not pack like an 8 oz flat promotional bag. The closed carton should stay rectangular, stack cleanly, and seal without force. For manual handling, many buyers prefer gross carton weight below about 18 kg, although your 3PL or retailer rule should control.
- Approve one folded piece before approving bundle and carton quantity.
- Use 5 pcs or 10 pcs inner bundles when counting accuracy and replenishment speed matter.
- Request actual carton dimensions, gross weight, net weight, CBM, and pieces per carton.
- Treat bulging sides, crushed corners, and over-tight top flaps as packing risks.
- Revalidate carton count whenever GSM, handle type, gusset, pocket, or fold method changes.
Carton board, marks, and pallet details to quote early
'Export carton' is not a full carton specification. Buyers should know the ply count, board strength language used by the carton supplier, carton dimensions, sealing tape width, and whether hand holes are included. A 5-ply carton is a common baseline for sea freight, but heavier pack counts, long inland trucking, multiple warehouse transfers, or retailer distribution center handling may justify stronger double-wall board.
Carton size affects both freight and receiving. Very large cartons may look efficient in CBM but become awkward to lift, stack, or open. Very small cartons increase label count, warehouse touches, and receiving time. Ask suppliers to quote CBM per carton and, if possible, CBM per 1,000 pieces. That makes landed-cost comparison more honest when one quote has a lower FOB unit price but a larger packed cube.
Carton marks are a quality-control item, not a clerical afterthought. They should match the PO, packing list, and receiving rules. Typical marks include PO number, SKU or style number, color, quantity, carton number, country of origin if required, gross weight, net weight, carton size, and barcode where needed. For multi-destination orders, confirm destination marks before cartons are printed or labeled, because mark changes can slow packing and inspection.
- Ask for carton board type, ply count, sealing method, and hand-hole details if used.
- Request CBM per carton and CBM per 1,000 pieces for landed-cost comparison.
- Keep carton gross weight within your warehouse, 3PL, or retailer handling rule.
- Approve carton marks before bulk carton printing or label application.
- For palletized goods, define pallet size, carton orientation, max pallet height, label-facing direction, and stretch-wrap requirements.
Compare RFQs by landed value, not only tote unit price
Two tote quotes can look nearly identical at first glance while carrying very different risk. One supplier may quote lighter canvas, narrower handles, a smaller reinforcement area, thinner cartons, and a high carton count. Another may quote stronger construction, lower carton count, and better board. The first price may win on FOB unit cost, but freight cube, repacking labor, scuffed prints, and retailer complaints can erase that saving.
A useful RFQ separates the main cost drivers. Product drivers include finished GSM, fabric composition, bag size, gusset depth, handle type, stitch reinforcement, labels, and print colors. Packing drivers include individual or bundle packing, inner pack quantity, master carton board, carton dimensions, barcode labels, and palletization. Freight drivers include carton CBM and gross weight. Once those details are visible, procurement can compare landed value instead of guessing.
MOQ language also needs attention. Natural canvas may have a lower MOQ than custom dyed fabric. Custom webbing colors, woven side labels, special barcode labels, extra print colors, or multiple carton mark versions may each add separate MOQs or handling charges. Ask early, before artwork, launch dates, and retail commitments are locked.
- Compare finished GSM, not only fabric ounce labels.
- Compare carton CBM, not only pieces per carton.
- Ask which packing materials are included in the unit price and which are extra.
- Confirm MOQ by fabric color, print color count, label type, webbing color, and carton mark version.
- Quote samples, strike-offs, packed-carton trials, and inspection support as visible line items when needed.
QC plan: inspect the tote and the packed carton
Final inspection should not stop at the tote body. A strong QC plan checks fabric, sewing, printing, folding, inner packs, master cartons, carton marks, and stack condition. For fabric, inspect GSM, shade, hand feel, odor, stains, oil marks, weaving defects, and consistency against the approved sample. For sewing, measure finished dimensions after pressing, not cut panels, and check seam alignment, hem quality, skipped stitches, thread trimming, and reinforcement security.
Handle testing should reflect the real load. If the tote will carry coffee bags and a mug, use those items or an agreed equivalent weight. A practical check should include repeated lifting and holding rather than only one static pull. Record whether seams stretch, handle anchors distort, thread breaks, or the bag body twists. The point is not to create an unsupported performance claim; it is to confirm that the construction fits the buyer's stated use.
Packing QC should start before every carton is sealed. Inspectors should check fold direction, bundle count, print-to-print contact, carton quantity, carton squareness, tape sealing, label placement, barcode readability, and carton marks. Review the first completed cartons early enough to adjust the fold method, carton strength, or pack count. Discovering over-compressed cartons after the full order is packed can mean rework, delayed shipment, and avoidable cost.
- Set measurement tolerances for body size, gusset, top hem, handle width, handle drop, and print placement.
- Use the approved sample and signed artwork placement sheet as inspection references.
- Check print cure and rub resistance before folding bulk goods tightly.
- Verify inner pack and master carton counts against the approved packing sheet.
- Reject or correct cartons that bulge, rock when stacked, split at corners, or require excessive force to seal.
- Photograph inspection findings for fabric defects, handle failures, print scuffing, and carton deformation.
Common mistakes and practical corrections
One frequent mistake is upgrading the tote while copying an old packing plan. A buyer moves from 8 oz to 12 oz canvas, adds a deeper gusset, chooses thicker webbing, and increases logo coverage, then expects the previous 100-piece carton to work. It probably will not. Require a new folded sample and packed-carton trial whenever construction changes affect bulk.
Another mistake is approving a beautiful flat print without checking the fold. Coffee roaster artwork often uses dark ink on natural canvas, so scuffs are easy to see. If the print sits on a pressure fold or rubs against another printed face, the problem may show up only after transit. Approve the strike-off, placement, and folded packed appearance together.
Carton marking can also cause expensive friction. Mixed SKUs, missing carton sequence numbers, wrong quantities, or unreadable barcodes slow receiving and can create shortage disputes. The carton mark format should be part of the PO package, and the first printed or labeled carton should be approved before the supplier marks the full order.
Finally, replace vague acceptance language with measurable details. 'Good quality,' 'strong handle,' 'standard packing,' and 'export carton' are not enough for B2B sourcing. Use finished GSM, dimensions, tolerances, stitch reinforcement, load simulation, bundle count, carton board, gross weight, CBM, and inspection checkpoints.
- Do not approve carton quantity from a previous order unless the new folded tote is tested.
- Do not let the supplier change fold method after approval just to reach a higher pack count.
- Do not pack dense fresh prints face-to-face without cure and rub checks.
- Do not accept export carton as a complete carton specification.
- Do not wait until final inspection to discover carton bulging or incorrect marks.
- Do not compare quotes until fabric, print, packing, carton, and freight details are visible.
Specification comparison for buyers
| Spec decision | Recommended buying control | Useful target range | Buyer risk to check |
|---|---|---|---|
| Fabric weight | Quote finished fabric weight and approve hand feel from a pre-production sample | 10 oz to 12 oz canvas, about 280 to 340 GSM finished fabric for most coffee retail totes | Greige weight, loose terminology, or unverified oz/GSM conversion can make bulk fabric lighter than approved |
| Bag size | Specify finished width, height, gusset, top hem, and measurement tolerance | Approx. 35 x 38 x 10 to 12 cm for 2 to 4 coffee bags plus small add-ons | Oversizing increases carton cube; undersizing makes gift sets hard to load and can distort side seams |
| Dimensional tolerance | Measure after sewing, pressing, and final finishing | Common target: +/- 1 cm on width/height, +/- 0.5 to 1 cm on handle drop depending on display needs | Loose tolerance causes uneven retail display, inconsistent folding, and carton quantity variation |
| Handle construction | Define material, width, length, reinforcement type, and stitch density | 2.5 to 3 cm cotton webbing or self-fabric handles with box-x stitch and/or bartack reinforcement | Weak anchoring, short stitch boxes, or handles sewn too close to the hem can fail during repeated lifts |
| Load expectation | State intended contents and run a practical load simulation | Typical test load: real retail contents or equivalent weight, often 4 to 6 kg for grocery-style margin depending on use | A tote that passes light visual inspection may distort or fail when packed with dense coffee bags and mugs |
| Print method | Confirm printing sequence, ink system, color reference, curing, and placement reference point | 1-color or 2-color screen print on cut panels before sewing for many bold roaster logos | Artwork may shift after sewing; dense dark ink can scuff if folded before full cure |
| Print tolerance | Approve strike-off and placement sheet before bulk | Placement tolerance often +/- 5 mm to +/- 10 mm depending on artwork size and construction | Judging by eye at final inspection creates disputes over off-center logos and fold-line conflicts |
| Inner packing | Match bundle size to warehouse, store, or fulfillment use | 5 pcs or 10 pcs per paper band, kraft sleeve, or polybag as required | Loose pieces slow receiving, increase miscounts, and expose natural canvas to dust and handling marks |
| Master carton quantity | Validate with real folded samples before bulk packing | Often 50 to 100 pcs per carton; set by GSM, gusset, handle bulk, carton strength, and gross weight | Overfilled cartons bulge, crush lower bags, create logo scuffing, and may exceed manual handling limits |
Buyer checklist before sampling
- Define the commercial use before requesting price: retail merchandise, gift set carrier, event giveaway, wholesale café support, or grocery-style customer reuse.
- List the intended contents, such as two 340 g or 12 oz coffee bags, two 1 lb bags, one mug, one dripper, retail inserts, or gift tissue, and state the expected loaded weight.
- Specify finished bag dimensions with tolerances for width, height, gusset depth, top hem width, handle width, and handle drop after sewing and pressing.
- Ask the supplier to quote finished canvas GSM and fabric description, including cotton, recycled cotton blend, cotton/poly blend, dyed fabric, natural canvas, or washed finish.
- Confirm whether the quoted ounce weight is based on square yard conversion and whether it matches the finished fabric after finishing, not only greige fabric before finishing.
- Define handle material, width, finished length, handle drop, reinforcement type, stitch box size, bartack count if used, thread color, and acceptable stitch density.
- Provide artwork with print size, color count, Pantone or approved reference, print position, and measurement point from finished top hem, side seam, or bottom edge.
- State whether the logo may cross fold lines, gusset edges, seam zones, or handle stitch areas; request a folded sample photo if artwork is close to those areas.
- Set the fold method in writing, including whether the front logo faces inward or outward, how handles are tucked, how gussets are flattened, and whether printed surfaces touch.
- Choose inner pack quantity before sampling, commonly 5 or 10 pieces per bundle, and state whether bundles use polybags, paper bands, kraft sleeves, or no plastic.
Factory quote questions to send
- What finished fabric GSM and ounce weight are you quoting, and is this measured after finishing, washing, coating, or dyeing?
- What is the fabric composition and construction, such as plain-weave cotton canvas, recycled cotton blend, cotton/poly canvas, or organic cotton, and what tolerance will apply to GSM?
- What shrinkage, color shade, slub level, seed fleck visibility, and odor controls will you use for natural canvas or dyed canvas bulk fabric?
- What finished bag dimensions and tolerances are included in the price for width, height, gusset, top hem, and bottom construction?
- Is the handle self-fabric or separate webbing, what are the width and finished length, and what reinforcement is included at each handle end?
- What stitch type, stitch density, seam allowance, bartack length, or box-x stitch size will be used for handle attachment?
- Does the quoted print price assume screen printing on cut panels before sewing or printing on finished bags after sewing?
- How many colors, print positions, and maximum print area are included, and what are the extra charges for another color, side, strike-off, or screen?
- What print curing process and minimum resting time before folding are assumed, and can you perform dry rub and light wet rub checks on bulk pieces?
- What MOQ applies separately to natural canvas, custom dyed fabric, custom webbing, woven labels, print colors, barcode labels, and carton marking variations?
Quality-control points to confirm
- Verify finished fabric GSM from random bulk rolls or cut panels and compare against the approved sample and agreed tolerance.
- Check fabric composition documents where required, and inspect visible fabric quality for slubs, stains, oil marks, holes, weaving defects, shade variation, and objectionable odor.
- Measure finished bag width, height, gusset depth, top hem width, handle width, and handle drop after sewing and pressing, using the agreed tolerance table.
- Check cutting and sewing symmetry, including side seam alignment, bottom gusset alignment, top hem waviness, corner shape, and whether the bag opens cleanly when lightly filled.
- Inspect handle attachment for box-x stitch size, bartack position, stitch density, seam allowance, skipped stitches, loose threads, backstitch security, and reinforcement symmetry.
- Run a practical handle and seam load simulation using the intended coffee contents or an agreed equivalent weight, including repeated lift and hold rather than only a static pull.
- Inspect screen print registration, color density, Pantone match or approved standard, edge sharpness, ink hand feel, curing, adhesion, rub resistance, and setoff risk.
- Confirm print placement from the approved reference point, such as finished top hem and side seam, and record actual measurements instead of judging only by visual center.
- Check whether dense printed panels touch each other after folding, especially on natural canvas with black or dark ink coverage.
- Verify inner bundle quantity, bundle material, fold direction, handle tuck position, and whether the approved folding method is used consistently.