What the buyer is actually deciding when choosing a print method
For wineries, a canvas tote is not just a giveaway. It may be a tasting-room carry bag, a trade-show handout, a retail item, or a wine club gift that needs to hold up in daily use. The print method determines how the bag will look on the shelf, how long the brand mark stays readable, how much the decoration adds to cost, and how much risk the buyer carries if the first lot disappoints. Procurement teams are not simply buying a logo application. They are buying a mix of brand visibility, use-life, defect risk, and landed cost.
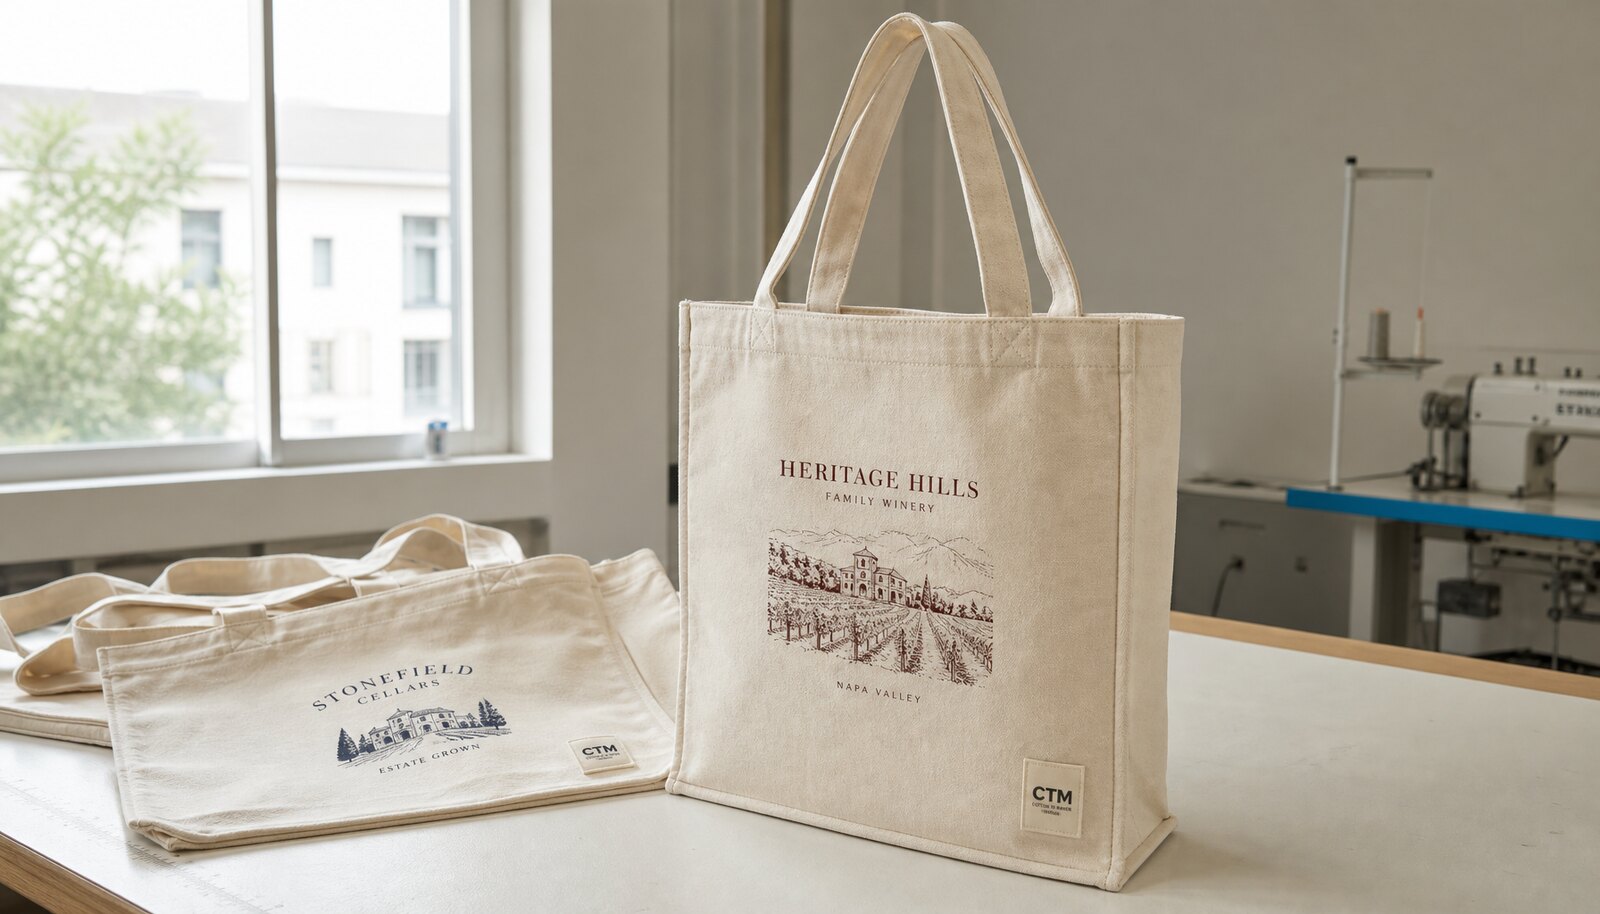
For canvas exhibition tote bags for wineries, the usual methods are spot-color screen print, water-based screen print, DTF or heat transfer, embroidery, and woven patch decoration. Each option has a different cost curve and a different failure mode. Screen print is usually the economical standard for fixed artwork. Water-based print trades some process control for a softer finish. Transfer methods handle detail and short runs. Embroidery and patches raise perceived value, but they add labor, approval steps, and more constraints on fabric and artwork.
The best buying question is not 'Which method is best?' It is 'Which method is best for this bag spec, this artwork, this channel, and this reorder plan?' A tote handed out at a regional event can tolerate a simpler decoration spec than a retail tote sold beside bottles and gift packs. That difference is the line between a quote that looks cheap and a quote that is actually fit for purpose.
A buyer also needs to think in channels. If the tote will be reordered every quarter, repeatability matters as much as style. If the art is seasonal, speed and flexibility may matter more than the lowest unit cost. If the bag will be sold, then packaging, consistency, and finish become part of the product value. Those decisions should be made before asking for decoration pricing, not after the sample arrives.
In practice, the strongest RFQs start with four decisions: what the bag will carry, where it will be used, what artwork complexity must be reproduced, and whether the program is a one-off or a reorder item. That is the frame procurement teams need before they compare print methods.
- Trade show handout: prioritize clear logo visibility, low setup burden, and predictable replenishment.
- Retail resale: prioritize hand feel, print precision, seam quality, and packaging.
- Wine club gift: prioritize perceived value and carton presentation, even if unit price rises.
- Distributor pack-in: prioritize speed, stable packing, and low rejection risk over decorative complexity.
Set the canvas spec first, because print quality starts with the fabric
Canvas weight is one of the first cost drivers, but it should not be chosen only by price. If the bag body is too light, the tote may collapse, wrinkle, or show print distortion at the fold line. If it is too heavy, the unit cost rises and some decoration methods can look rigid or sit awkwardly on the surface. For winery exhibition totes, 10 oz to 12 oz canvas is often the practical middle ground. That range usually gives enough body for daily carry and retail presentation without pushing the bag into a heavier, more expensive build that many buyers do not need.
There are important bounds to that general rule. A light promotional bag may work at 8 oz to 10 oz if it is only carrying brochures or a folded flyer set. A more premium gift tote or a bag intended to carry heavier packs may justify 12 oz to 14 oz. The buyer should not treat 'usually' as a substitute for a spec. Ask the supplier to quote the actual oz or gsm, the yarn composition, the weave density, and the shrinkage allowance. Those values affect both print quality and final dimensions.
Weave density matters because canvas is not a smooth coating. A more open weave can make fine text look broken, especially if the logo uses thin lines or small serif details. A tighter weave usually gives better registration and edge definition, but it can increase price. Finish matters too. Uncoated or lightly finished canvas generally accepts ink better than heavily treated fabric, but a treatment may improve stain resistance or reduce dust pickup. The supplier should explain what the finish does to odor, hand feel, and color absorption, not just what it sounds like on paper.
Color of the base cloth is another procurement detail that is often underestimated. Natural cotton can range from warm ivory to a slightly gray or beige tone. That changes how the logo reads, especially when the mark uses light colors or a brand red that must stay strong against the base. If the bag will sit next to premium bottles or retail packaging, the canvas tone should be treated as part of the approval, not an afterthought.
If the supplier only says 'canvas' and does not state weight, weave, and finish, the quote is incomplete. A buyer comparing two offers should insist on the same fabric basis before comparing decoration methods.
- 8–10 oz: workable for lighter promotional use and lower cost.
- 10–12 oz: the most balanced range for many winery exhibition totes.
- 12–14 oz: better for premium presentation or heavier contents, but verify cost and bulk.
- Ask for oz or gsm, weave density, shrinkage allowance, and a fabric swatch before order release.
Print method comparison: what each option does well and where it fails
Spot-color screen print remains the baseline method for many winery tote programs because it is predictable and economical once setup is complete. It performs best when the artwork uses one to three solid colors, the logo must be visible from a distance, and the order size is large enough to amortize screen making and registration time. On a simple logo, screen print usually gives the cleanest value. If the buyer wants a softer look, water-based screen print can reduce the plastic feel. The trade-off is tighter curing control and, on darker or rougher canvas, potentially lower opacity and more shade variation.
DTF and heat transfer are strongest when the artwork is detailed, full-color, gradient-heavy, or likely to change before approval. They are a good short-run tool for seasonal winery graphics, vineyard illustrations, and small launch quantities where making screens would be too slow or too costly. The downside is not just price. Transfers can show edge lift, gloss differences, or cracking at fold lines if the tote is packed tightly or flexed often. They can be a smart procurement choice, but only if the buyer accepts the need for more careful testing and a realistic use pattern.
Embroidery and woven patches sit in the premium lane. They are worth considering when the bag is part of a gift set, club welcome pack, or higher-ticket retail bundle where texture and perceived value matter as much as decoration cost. Embroidery can look strong on sturdy canvas, but it is less suitable for very fine details, large filled graphics, or thin fabric that may pucker under thread tension. Woven patches can preserve a detailed crest or emblem better than embroidery alone, but they add sewing steps and another approval layer. For many winery buyers, that extra complexity only makes sense when the bag is sold or used as a premium insert, not when it is handed out broadly.
The decisive commercial point is that no method is universally best. Each has a different balance of cost, lead time, detail fidelity, and durability. A buyer who compares them only on unit price is likely to select the wrong one.
- Screen print: best for simple logos, stable repeat orders, and low unit cost at volume.
- Water-based print: best when a softer hand feel matters and the artwork remains simple.
- Transfer/DTF: best for short runs, detailed artwork, and rapid sampling.
- Embroidery/patch: best when the tote needs a more premium retail or gifting signal.
Buyer-ready comparison table: cost, lead time, MOQ, and verdicts
Procurement decisions are easier when the comparison is tied to commercial parameters, not just description. For canvas exhibition tote bags for wineries, the important questions are what the method costs, how fast it ships, what minimum order it needs to be efficient, and what failure mode the buyer must manage. The table below is designed for RFQ comparison rather than marketing explanation.
The pricing bands are indicative, not promises. They vary by bag size, canvas weight, print area, color count, packaging, and destination. The point is to show relative direction so the buyer can spot quotes that are out of line. If a supplier is much lower than the band but has not changed the spec, the buyer should check what has been removed from the build or what risk has been shifted into the process.
Lead times also deserve realism. Sampling is often the first friction point because it includes material sourcing, setup, and approval cycles. Bulk time is then driven by whether the supplier already has blank stock, how many print colors are needed, and how much handwork the decoration requires. MOQ thresholds are not fixed industry standards; they are practical ranges that often show up in winery tote sourcing.
- Use the table to compare like-for-like specs only.
- Treat unusually low pricing as a signal to inspect the fabric basis or packing scope.
- For reorder items, ask whether the supplier retains screens, files, or patch dies.
- For short-run campaigns, confirm whether setup fees will be recharged on every run.
How wineries should choose decoration by use case, not by habit
Tasting-room bags and exhibition handouts behave differently. Tasting-room bags are seen up close, held longer, and compared against other gift items. That makes texture, print neatness, and seam quality more important. Exhibition bags need to communicate the logo quickly and at controlled cost. A clear mark, stable packing, and low rejection risk matter more than a luxurious surface. If the buyer uses the same decoration method for both channels, the program can end up overspending in one place and underperforming in the other.
Retail resale introduces even stricter scrutiny. Consumers may compare the tote against premium packaging, gift sets, or bottle accessories. In that setting, crooked placement, loose threads, weak stitch reinforcement, or inconsistent canvas shade become product issues rather than minor defects. A soft water-based print or a neatly executed embroidered mark can work well, but only if the full build quality supports the price point. Retail bags also need a pack format that protects the item through handling and shelf display.
Wine club gifts and VIP packs often justify a more premium decoration choice because the bag is part of a curated experience. That does not mean embroidery is always the answer. It means the buyer should judge the bag as one component in a gift program. If the bag is meant to signal quality, then the decoration, pack format, and carton presentation all need to align. If the bag is meant for broad distribution, then simplicity and repeatability usually win.
The practical procurement habit is to build two quotes from the same bag spec when the channel mix is uncertain: a lower-cost version for handout volume and a premium version for retail or club gifting. That exposes where extra decoration truly adds business value and where it only adds cost.
- Tasting room: prioritize close-up appearance, soft hand feel, and consistent color.
- Exhibition: prioritize logo readability, low setup burden, and fast replenishment.
- Retail resale: prioritize print precision, seam quality, and protective packing.
- Wine club gifting: prioritize perceived value and presentation consistency.
What really drives quote differences and hidden cost traps
A low quote is only meaningful if the spec is truly the same. One supplier may quote a lower number because the canvas is lighter, the handle webbing is narrower, the print area is smaller, or the packing is simpler. Another supplier may quote higher because they included a stronger stitch allowance, a more realistic curing process, or a better-controlled color match. Those are not the same product. Procurement teams should treat any comparison as unreliable until the fabric and decoration scope are aligned.
Setup cost is one of the most common surprises. Screen print may look inexpensive on the per-piece line, but the setup includes screen making, separations, registration, and sometimes an underbase if the canvas is dark. Transfers can look easy to price, but costs can move if the art changes, the print area grows, or the supplier needs an extra press cycle. Embroidery can appear straightforward, yet stitch count changes can alter both cost and lead time. Buyers should ask exactly how price changes with logo size, number of colors, and print coverage so the quote does not drift later.
Another hidden cost is rework risk. A method that does not suit the canvas can create extra sampling rounds, more rejection, or slower packing. Fine text on rough canvas may fail to reproduce cleanly. Complex multi-color screen print on a compressed timeline can create registration issues. A good RFQ asks not just for price but for the supplier’s main risk point and how they control it. That is how procurement sees real cost, not just list price.
There is also a reorder trap. If the factory does not retain screens, print data, or patch dies, a cheap first order can become expensive later. For winery programs that repeat seasonally, retention of decoration assets is a real commercial advantage and should be discussed before the PO is issued.
- Ask for blank bag cost and decoration cost separately.
- Ask whether the quote includes one setup charge or multiple setup charges.
- Ask how the price changes with logo size, color count, and print area.
- Ask whether setup assets are retained for reorder and what it costs if they are not.
MOQ strategy: how to avoid paying for the wrong production model
The MOQ on paper is often not the real MOQ in practice. A factory may be able to sew the bag body in a small batch, but the decoration method may need a larger run to make setup efficient. Or the decoration method may support a low quantity, but the bag fabric may only be economical above a certain volume. Buyers need to ask which part is driving the minimum: fabric purchase, sewing line efficiency, decoration setup, or packing. That separates commercial truth from sales language.
For winery exhibition programs, a higher MOQ can be acceptable if the artwork is stable and the bag is likely to reorder. In that scenario, screen print often makes sense because setup can be spread across a larger quantity. For a seasonal campaign or a new vineyard illustration, a lower MOQ may be safer even if the unit price is higher, because the risk of overbuying is lower. The key is not 'What is your MOQ?' but 'What MOQ is driven by the bag body, what MOQ is driven by decoration, and what happens if we split the order into multiple SKUs?'
If the tote will serve both tasting-room and retail use, it can be worth quoting two decoration options against the same bag body. For example, a simple screen print for a broad giveaway channel and a more premium embroidered or patch version for retail. That helps the buyer see where decoration spending creates real brand value and where it does not. It also shows whether the supplier can manage multiple decoration types without turning the project into a coordination problem.
A good rule for sourcing is this: use the higher-complexity method only when the commercial value of the channel pays for it. If the tote is going to be distributed widely and not sold, premium decoration may not return enough value. If it is sold or included in a high-value pack, a more premium finish can be justified.
- Promotional event programs can tolerate a higher MOQ if the artwork is fixed.
- Retail and club gift programs usually need more flexibility on quantity and more control on appearance.
- Always ask whether screens, files, or patch dies are retained for reorders.
- If the supplier cannot separate body MOQ from decoration MOQ, the quote is incomplete.
Sampling and approval: what the sample must prove before bulk starts
A useful sample should prove the whole system, not just the logo image. For winery canvas totes, the approval sample needs to show the final canvas, final decoration method, final stitch quality, and final pack format. A flat artwork proof on unrelated fabric does not tell the buyer enough. It does not show whether the print holds on the chosen weave, whether the handle base is reinforced well enough, or whether the folding method creates a visible crease through the graphic. The sample should be treated like a short production run, not a presentation mock-up.
The sample should also protect against quiet substitutions. The supplier should not swap canvas weights, inks, handle construction, or packaging without written approval. If the first sample uses a different canvas finish, the buyer may approve a look that cannot be reproduced in bulk. The same issue appears with transfer methods, which may look excellent in a one-off sample but behave differently at scale. Ask the factory to identify the exact material and process used in the sample and to state whether any later change requires reapproval.
For winery buyers, it helps to test the sample in the actual channel. Place the tote next to bottles, tasting-room brochures, or shelf packaging. Check whether the logo reads clearly at arm’s length and whether the bag looks premium enough next to the products it will support. This is one of the simplest ways to catch a common mistake: approving a sample that looks acceptable on its own but weak in context.
A clean approval trail matters as much as the sample itself. Keep dated photos, signed comments, and the final sample in a control file. If there is any dispute during bulk, the team should be able to show what was approved and what was not.
- Approve the final canvas, not just a printed panel.
- Fold the sample the same way it will be packed in bulk cartons.
- Measure logo position against the spec instead of approving by eye.
- Confirm that the sample and bulk will use the same ink, file, and finishing process.
QC standards specific enough to use in a purchase order
A useful QC plan needs measurable thresholds. Broad comments like 'good quality' or 'no defects' are not enough. The buyer should define critical defects, major defects, and minor defects before bulk starts, and those definitions should be attached to the PO. For example, a critical defect could be a broken handle, open seam, or unreadable branding. A major defect could be severe print misregistration, obvious color drift, or a gusset that fails dimensional tolerance. A minor defect could be a small loose thread that does not affect use. That language gives the supplier a common standard and gives the receiving team a defensible inspection basis.
Print adhesion needs a specific test method. For screen print and water-based print, use a rub test after curing and after a short rest period, ideally with a clean white cotton cloth under moderate pressure. If the artwork is intended for frequent handling, use a tape adhesion check on a hidden or test area if the supplier allows it. For transfer methods, inspect the edges after folding the bag to shipping format and after brief flexing. The goal is not to recreate a laboratory; it is to catch likely failure before the cartons leave the factory.
Construction standards need equal attention. Define handle width, stitch density, seam alignment, and reinforcement at the handle base and gusset corners. If the tote is meant to carry wine bottles or heavier brochure packs, request a simple load check using a realistic product weight. A bag may look fine in a photo but fail when filled. Also define acceptable dimensional variation for the body, gusset, and handle drop so the supplier knows which deviations are negotiable and which are not.
For natural canvas, shade variation should be controlled within an agreed sample range. Buyers do not need to force identical color on a natural substrate, but they do need to define the acceptable band. That should be approved in sample stage, not discussed after shipment. The tighter the retail requirement, the tighter the shade approval should be.
- Use AQL-style language for defects, even if you do not run a formal lab program.
- Define print shift tolerance in millimeters.
- Require a 24-hour rub test on cured print.
- Inspect carton-level random samples from multiple cartons, not only the first carton.
Packing, shelf presentation, and damage risk are part of the product
Packing quality can make a good tote look weak. Canvas bags crease easily if they are folded too tightly or packed under too much pressure. A print that looks sharp on the sample table can gain a hard fold line in transit, especially when the print sits across the bag center or the gusset. If the bag will be sold at retail, the pack format should be specified early: whether it uses a polybag, insert card, barcode label, hanger fold, or simple bulk pack. Each choice affects presentation, shelf appearance, and shipping damage risk.
For tasting-room use, simpler packing may be acceptable because the bags will be opened quickly and distributed directly. For distributor or retail channels, the pack needs to survive warehouse handling and still look clean when opened. That means carton count, carton marks, and outer protection should be agreed before production. If the supplier uses a moisture barrier or only a basic polybag, ask why. Canvas is not fragile, but it can pick up dust, odor, or scuff marks during transport if the packing spec is too loose.
There is also a commercial effect beyond damage control. Poor packing can make a bag appear lower quality than it actually is, which hurts retail pricing power. If the winery plans to sell the tote, presentation is part of the margin model. If the bag arrives wrinkled, compressed, or marked, it may still be usable but no longer suitable for the intended channel. That is why pack format belongs in the RFQ next to print method and canvas weight, not in a later email thread.
A buyer who wants fewer disputes should ask the supplier to show the folded and packed sample before bulk. One photo can prevent a lot of confusion.
- Retail packs need stable folding, clean carton marks, and clear label placement.
- Promo packs can be simpler if the bags are distributed immediately.
- Avoid overfilling cartons, which can crease print panels and distort handles.
- Ask whether the bag will ship in a moisture barrier or standard polybag.
Specification comparison for buyers
| Print method | Typical MOQ threshold | Indicative pricing band | Typical lead time | Best use case |
|---|---|---|---|---|
| Screen print, spot color | Usually 500–1,000 pcs per design becomes efficient; lower is possible but setup is less attractive | Blank bag + print often lands in the lowest band at volume; add setup per color | Sampling 5–10 days; bulk 15–25 days after approval | Simple winery logos, trade show giveaways, reorder programs |
| Water-based screen print | Usually 500 pcs+ to justify setup; small runs are possible but pricing rises | Slightly above standard screen print in many factories because of tighter process control | Sampling 7–12 days; bulk 18–28 days | Retail-facing bags where a softer, less plastic look matters |
| DTF or heat transfer | Often 100–300 pcs is workable; some suppliers will do lower | Higher unit cost than screen print at scale, but lower setup burden for short runs | Sampling 3–7 days; bulk 10–20 days | Small launches, seasonal artwork, detailed full-color logos |
| Embroidery | Commonly 300–500 pcs+ for efficient pricing on simple logos | Higher than print because of stitch count and machine time | Sampling 7–14 days; bulk 20–35 days | Premium gifting, wine club packs, higher-ticket retail bundles |
| Woven patch plus stitching | Often 300 pcs+ | Usually in the premium-mid to premium band depending on patch complexity | Sampling 10–15 days; bulk 25–40 days | Crests, emblems, detailed logos, premium retail bags |
| Dark canvas with white underbase screen print | Usually 500 pcs+ | Higher than light-canvas screen print because of extra ink and process steps | Sampling 7–12 days; bulk 18–30 days | Charcoal, black, or dyed canvas that must read clearly |
| Large-volume promo order | 1,000–5,000 pcs+ | Lowest landed cost per unit when fixed artwork is repeated | Sampling 5–10 days; bulk 15–25 days | Trade fairs, distributor events, broad handout programs |
| Small-batch test launch | 50–300 pcs | Highest unit cost but lowest inventory risk | Sampling 3–7 days; bulk 10–18 days | New winery products, pilot retail programs, seasonal activations |
Buyer checklist before sampling
- Confirm the actual use case before asking for print quotes: tasting room gift, exhibition handout, retail resale, wine club gift, or distributor pack-in. The use case determines acceptable finish, structure, and durability.
- Lock the bag spec before decoration quotes: body size, gusset depth, handle length, handle drop, canvas weight in oz or gsm, and whether the bag is lined or unlined.
- Send print-ready vector artwork, Pantone references, font outlines, and a minimum line thickness requirement. Ask the supplier to flag elements too fine for the chosen method.
- Ask for separate pricing on blank bag, decoration setup, decoration per piece, packaging, carton marks, and any insert card or barcode label.
- Request a pre-production sample on the final canvas, with the final print method, final pack method, and final carton count. Do not approve on a digital mockup alone.
- Define acceptance limits in writing for print shift, color tolerance, seam quality, and defective rate before bulk starts.
- Clarify whether the factory will retain screens, films, embroidery files, patch dies, or print data for reorders, and what re-setup fees apply if they do not.
- Ask for a photo of the packed sample and the carton marks before the first shipment leaves the factory.
Factory quote questions to send
- What canvas weight, weave density, and shrinkage allowance are you quoting for the bag body, and how does that change print clarity and hand feel?
- Which decoration method do you recommend for this artwork, and what is the technical reason it is better than the next cheaper option?
- What is the setup cost per color or per decoration process, and does it change if we adjust logo size, placement, or print area?
- What is the MOQ for the bag body, the decoration process, and the packing format, and which of those is the real limiting factor?
- Can you quote the same bag in two versions: one for tasting room use and one for retail resale, so we can compare structure and cost side by side?
- How will you control Pantone matching or color consistency on natural canvas, and what tolerance can you hold between sample and bulk?
- What is your curing or finishing method for the chosen print, and how does it affect rub resistance, odor, gloss, and fold durability?
- Will you provide a pre-production sample, a bulk reference sample, and a photo record of the approved packaging and carton marks?
- Do you keep screens, digital files, embroidery programs, or patch dies for reorder? If not, what is the re-setup cost?
- What lead time applies to sampling, bulk production, and corrective rework if the first sample or first bulk inspection fails?
Quality-control points to confirm
- Measure bag dimensions against the approved spec, including body width, body height, gusset depth, handle length, and handle drop. Set a dimensional tolerance in the PO, such as +/- 3 mm for small bags or +/- 5 mm for larger totes, instead of accepting 'normal variation.'
- Inspect print placement against the centerline and seam margin. Define a maximum shift in millimeters for logo position and a maximum misregistration tolerance for multi-color artwork; many buyers use 2–3 mm for small logos and 3–5 mm for larger graphics.
- Use a rub test on the cured print after 24 hours, not just immediately after printing. Rub with a clean white cotton cloth under moderate hand pressure and check for color transfer, smearing, gloss change, or tackiness.
- For screen print, perform a tape adhesion test on a small hidden or test area if the factory agrees. The goal is to confirm the ink bonds well enough that tape lift is minimal after cure.
- For transfer or DTF, inspect the edges after folding and after brief flexing to see whether corners lift, crack, or gloss differently from the center of the design.
- Check stitch density, seam straightness, and reinforcement at the handle base and gusset corners. A bag can pass a visual print check and still fail under carrying load.
- If the bag is intended to carry wine bottles, request a simple load test with a realistic weight. Check for seam strain, handle distortion, base sag, and loose thread growth before bulk release.
- Inspect canvas shade variation across cartons. Natural canvas can vary, but the variation should stay within the buyer’s agreed acceptable range for the program; approve the acceptable swatch range before bulk.
- Set an AQL-style inspection plan for bulk orders, with clear definitions for critical defects, major defects, and minor defects. Example: critical defects include broken handles or unreadable branding; major defects include severe print shift or open seams; minor defects include small loose threads.
- Require carton-level random checks, not only first-piece inspection. Pull bags from the top, middle, and bottom of cartons to catch packing compression, lot variation, or dust contamination.