Start With the Event Job the Tote Has to Do
When buyers search for canvas exhibition tote bags for wineries event giveaway planning, the first mistake is to start with decoration instead of use case. A winery event bag is rarely just a bag. It may need to carry a single bottle, a tasting card, a brochure pack, a corkscrew insert, a club signup form, or a small retail purchase from the booth. The load determines everything that follows: body size, gusset depth, handle length, canvas weight, print area, and whether the bottom needs extra reinforcement. If the bag is sized to look neat on a sample table but cannot hold the actual contents, the program fails at the event, not in the warehouse.
The second decision is how long the bag is meant to live after the event. A one-day giveaway can be lighter and simpler. A tasting-room gift, club welcome item, or retail crossover bag needs cleaner sewing, stronger handles, and a finish that does not feel disposable after one use. That distinction matters commercially because it changes what a buyer should accept on cost, inspection, and packaging. If the tote is going into guests' hands as a brand object rather than a simple carrier, the spec has to support that expectation instead of hiding behind a generic promo bag description.
- Single-bottle handoff: prioritize base stability and reinforced handle anchors.
- Brochure carrier: prioritize flat packing, low unit weight, and fast event distribution.
- Retail crossover: prioritize finish quality, repeat-use durability, and print clarity at arm's length.
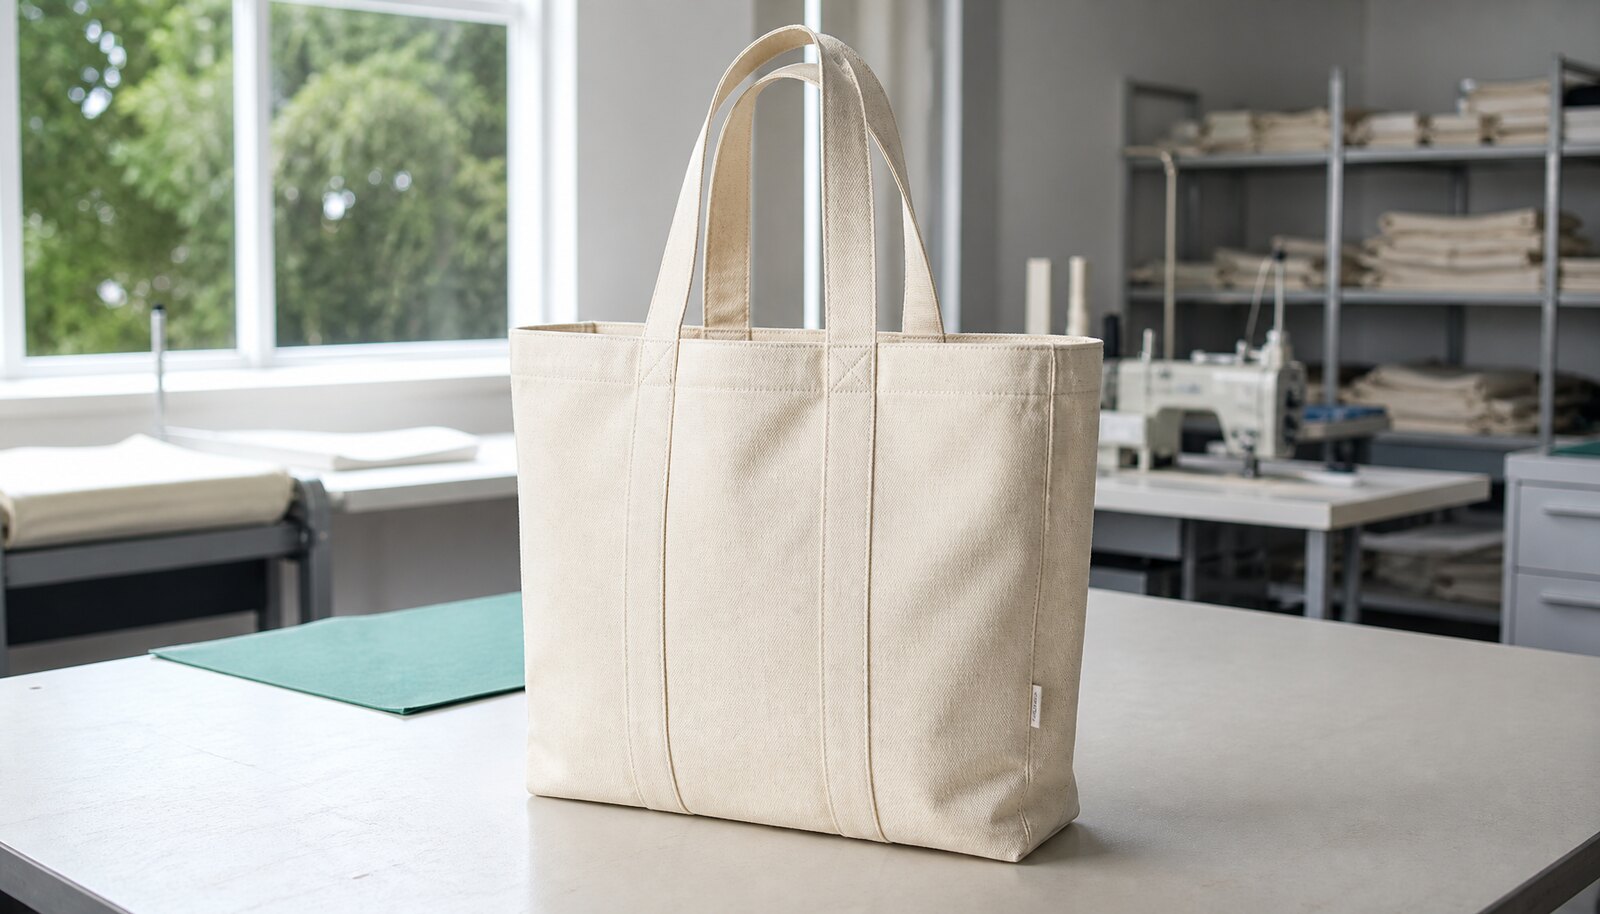
Choose the Tote Construction That Matches the Load
The comparison table should be a product comparison, not a supplier comparison, because buyers need to see which tote configuration fits the job. A flat 8 oz brochure tote is efficient for literature and compact handouts, but it is not the same product as a gusseted 10 oz event tote that can sit upright with a bottle inside. A reinforced 12 oz bottle tote solves a different problem again: it is meant to survive point load at the base and repeated pull at the handles. If those structures are mixed up during sourcing, the quote may look good while the bag performs poorly.
For winery events, the most common practical range sits between 10 oz and 12 oz canvas, with a gusset around 3 to 4 in for mixed collateral and a reinforced bottom if the bag will hold glass. That said, heavier is not automatically better. A 14 oz retail tote can feel premium, but it adds weight and freight cost, and it may slow packing if the event team needs to build hundreds of kits. Buyers should choose the product architecture first, then ask suppliers to quote only the variants that actually fit the event use case.
- Use a flat tote only when the pack contents stay flat.
- Use a gusseted tote when a bottle or bulky insert needs vertical space.
- Use reinforced handle anchors whenever the event load is not trivial.
Set Fabric Weight, Dimensions, and Tolerances Up Front
Fabric weight is one of the clearest procurement controls in this category because it separates real product design from vague marketing language. For light literature, 8 oz canvas can be enough. For most winery event giveaways, 10 oz to 12 oz is the practical range because it supports a bottle, brochure, or mixed insert without collapsing into a flimsy shape. If the tote will be reused outside the event, 12 oz to 14 oz is a more defensible spec. Buyers should quote the weight in oz and, when suppliers use metric systems, ask for the GSM equivalent and the measurement method used by the mill or factory.
Dimensions need to be controlled with the same discipline. Ask for finished body width, height, gusset depth, handle drop, and seam allowance in the RFQ. A bag that is 0.5 in smaller than expected can change how easily a bottle enters the tote; a handle that is too short can make the bag awkward once it is filled. For procurement purposes, a workable internal tolerance is +/-0.5 in on body dimensions and +/-0.25 in on gusset and handle drop, unless the bag is going into a rigid insert or a very tight retail program that requires tighter control. Also define acceptable shrinkage or dimensional drift if the canvas is washed or heat-set after printing.
Do not let suppliers quote only a generic size name such as standard tote or wine tote. Those terms hide too much variation. A buyer should know the exact finished dimension, the approved master sample, and what variance is acceptable on the first production run and on repeat orders.
- For bottle loads, treat 10 oz as the low end and 12 oz as the safer baseline.
- For premium retail use, consider 12 oz to 14 oz if freight and handling allow it.
- Write the tolerance into the RFQ so the supplier is quoting the same thing you are buying.
Match the Print Method to the Artwork, Not the Habits of the Supplier
On canvas, the decoration method should be selected from the artwork and run size, not from the supplier's default preference. A one-color screen print is still the cleanest commercial option for most winery logos because it is durable, crisp, and economical once the setup is absorbed. It works especially well for bold marks, simple typography, and vineyard emblems that need to stay readable across a crowded event table. If the artwork includes gradients, tiny reverse text, thin hairlines, or multiple color transitions, the buyer should ask whether those details will survive the weave of the canvas at final size rather than assuming a digital file will translate cleanly.
Premium finishes have their place, but they should be chosen with an understanding of the tradeoff. A woven label, patch, or embroidery can make the tote feel more like retail merch, yet it adds setup time, extra MOQ pressure, and another point where the sample can diverge from the order. Transfer decoration can help when the artwork is detailed or the order is short, but the sample must be tested on the exact canvas because some transfers crack, sit too heavily, or look mismatched after folding. For winery event giveaways, the best method is the one that keeps the logo legible, survives handling, and does not add unnecessary failure points at production or packing.
- Screen print: best for simple logos, high legibility, and repeatable cost.
- Transfer print: best for smaller runs or artwork with more detail.
- Woven label or patch: best when the bag needs a premium, retail-style finish.
Build the RFQ So You Can Compare Real Cost
A usable RFQ exposes the cost drivers instead of hiding them in a single bag number. Ask the supplier to break out the bag construction, print setup, print run cost, label cost, packing cost, and export packing. That structure makes it easier to compare quotes from direct factories, trading companies, and decorators without confusing different service levels with different product specs. It also forces the supplier to reveal whether a low quote is coming from a thinner canvas, a weaker handle reinforcement, a smaller carton count, or reduced packing labor. For procurement teams, the goal is not a low line item. The goal is a comparable and defensible landed cost.
MOQ logic should be written in the quote, not discovered later. Many tote programs have separate minimums for fabric color, print setup, woven label, special fold, or carton marking. If the winery wants a natural canvas body, a custom logo, and a premium label, the real MOQ may be driven by the smallest of those components rather than by the bag itself. The buyer should also request the overrun and underrun policy, because a loose tolerance can turn a fixed event count into a planning problem. If the event needs 2,000 bags, the quote should say how the supplier handles a shortfall and what replacement path exists for damaged or rejected pieces.
- Ask for separate lines instead of accepting one all-in price.
- Compare quotes by landed cost per usable bag, not by ex-factory price alone.
- Treat setup charges and packing choices as part of the program cost, not as optional extras.
Approve Samples as Production Evidence
A sample is only useful if it proves the production risk. For winery event tote bags, the sample should confirm the exact canvas weight, weave appearance, color tone, handle length, seam behavior, logo placement, and fold shape. A digital mockup cannot prove any of that. The buyer should request a sewn pre-production sample whenever the order is meaningful or the event date is fixed, because the gap between a screen image and a stitched bag is where most avoidable problems appear. If the supplier cannot provide a sewn sample made from production materials, the order is still in quotation territory, not approval territory.
Set acceptance criteria before the sample arrives. The sample should match the approved dimensions, use the same print method that will be run in bulk, and carry the same thread, label, and packing concept where those details matter. If the bag will hold a bottle, test it with the actual bottle. If it will carry a brochure kit, test it with the actual insert stack. A practical internal test is a 5 kg filled-carry check held for 60 seconds, followed by repeated lifts, so the team can see whether the handle anchors or bottom seam show stress. The point is not to create a lab exercise. The point is to approve a bag that performs as a bag, not as a mockup.
Natural canvas has another wrinkle: small shade shifts and fiber slubs are normal. The real question is whether those variations stay within the approved reference sample and whether the buyer can live with that natural texture across a full shipment. If the brand needs highly uniform color, plain natural canvas may not be the right construction and the spec should reflect that from the beginning.
- Approve the sample under the same lighting and distance the bag will get at the event.
- Use the actual bottle or insert load during sample testing.
- Do not approve size, color, or print position from a digital image alone.
Specify Quality Control in a Way the Factory Can Actually Follow
Quality control for canvas totes should be more specific than general language such as good workmanship or clean finish. If the buyer wants a reliable production lot, the QC plan should name the defect types that matter most: wrong dimensions, weak handle attachment, print defects, dirty fabric, and poor carton packing. One practical way to run the order is to use an AQL plan with major defects at 2.5 and minor defects at 4.0, then classify critical defects separately for wrong size, wrong artwork, or open seams. That gives the factory a usable target and gives the buyer a clear inspection basis if there is a dispute.
The product-level checks should be concrete. Inspect handle anchors for even reinforcement and no skipped stitches. Check the seams where the bag will flex under bottle weight. Look for pinholes, smears, and registration issues in the print, especially on rough canvas where detail can disappear. If the artwork includes fine text, require the supplier to prove that the final size remains legible on the actual weave. If color matters, define whether the approval standard is the physical master sample or a measured threshold such as Delta E 2.5 or better. For bulk packing, confirm that the count per carton, style code, and PO reference are visible on the outside of the box before the shipment leaves the factory.
The best QC plans are not long. They are exact. If the factory knows what to measure, what to photograph, and what to stop for, the buyer gets fewer surprises at receiving.
- Use the physical master sample as the default reference when exact color is important.
- Require a static load check on the handle and a visual check for print defects.
- Inspect the first cartons before full shipment when the event date is fixed.
Plan Packing and Cartons Around Warehouse Reality
Packing is part of the product, not a separate clerical task. For winery giveaways, bulk carton packing is usually the right choice because the bags are meant to be distributed quickly, not displayed individually. That said, bulk packing only works if the fold style is consistent, the handles sit cleanly, and the printed area is protected from abrasion or ink transfer. If the tote has a label, pocket, zipper, or bottle divider, the packing method should be tested before production starts, because those features can change how the bag folds and how much space each carton consumes. A poor fold spec can create crushed print, scuffed fabric, or cartons that exceed warehouse handling limits.
Carton details should be locked in the RFQ. Ask for carton count, gross weight, carton dimensions, and shipping marks, including PO, style, color, and quantity. If the bags will be moved through a distributor, agency, or retail warehouse, ask whether they need barcodes, case codes, or pallet patterns. For manual receiving, carton weight matters because anything too heavy slows handling and increases breakage risk. If the shipment is crossing borders, ask for a 60 cm corner or edge drop expectation on the carton and a simple packing photo set from the supplier before shipment release. That makes the receiving team's work much easier and reduces the chance that the tote arrives ready to hand out but not ready to store.
A smart packing spec saves time twice: once in transit and again at the event when the team opens cartons and starts distributing bags under pressure.
- Use bulk cartons unless the downstream team truly needs retail-ready individual bags.
- Define fold direction, carton count, and outer labels before sewing starts.
- Keep carton weight manageable for the receiving team that will handle the shipment.
Work Backward From the Winery Calendar
Event timing is where many tote programs go wrong because the factory schedule gets treated as the only schedule. Winery programs have their own demand spikes: harvest, trade fairs, tasting-room campaigns, club member mailers, and year-end gifting can all compete for the same production window. A quote that says 20 or 25 days means very little unless the buyer has already allowed time for artwork signoff, sample review, revision, packing approval, and freight. The real schedule risk is usually not sewing time. It is the work that happens before and after sewing. If the event is fixed, the buyer should back-schedule from the delivery date and include at least one sample cycle plus a transport buffer.
The safest process is to freeze the bag art first, approve the sewn sample second, and release production only after packing and carton details are locked. Any change to logo color, body shade, handle length, or label type after that point should be treated as a formal revision with a known time and cost impact. That keeps procurement aligned with the event team, which often cares less about unit price than about whether 2,000 bags arrive in the same week as the tasting event. If the program will repeat seasonally, keep a reorder file with the approved sample, quote, carton spec, and packing photo so the next run does not have to rediscover the same details.
For buyers managing multiple wineries, this is also where a small safety stock strategy can help. A short buffer quantity is often cheaper than a late-airfreight rescue, especially when the bags are part of a fixed guest experience or sponsor commitment.
- Work backward from the event date, not forward from the factory's standard lead time.
- Freeze art, sample approval, and packing spec before release whenever possible.
- Keep a reorder file so the next event does not require a fresh specification cycle.
Avoid the Common Failure Modes That Hurt Giveaway Programs
Most tote problems are predictable. The first is buying a bag that fits paper but not the actual event load. The second is approving a mockup instead of a sewn sample. The third is ignoring handle drop, which can make a good-looking tote awkward to carry once it is filled. The fourth is comparing quotes without carton and packing detail, which hides real cost and makes receiving harder. The fifth is failing to keep a master sample, so the second production run becomes a different product even though the SKU number stayed the same. None of these problems are dramatic on their own, but together they create the kind of procurement friction that consumes time during event season.
A better approach is to treat the tote as a controlled product, not a promotional afterthought. The buyer should start with the load, choose the structure, write the dimensions, select the print method, and then inspect the sample against the actual event use. That sequence makes the bag easier to compare across suppliers and easier to repeat next season. It also keeps the language in the RFQ tied to the real business job. A winery does not need a generic canvas bag. It needs a tote that carries the intended contents, holds up on the floor, and arrives with enough consistency that the event team can hand it out without improvisation.
- Do not let a brochure tote masquerade as a bottle tote.
- Do not accept a quote that hides print setup or packing detail.
- Do keep a master sample and the approved carton spec for reorders.
Specification comparison for buyers
| Tote type | Typical spec | Best winery use | Buyer checks |
|---|---|---|---|
| Flat brochure tote | 8 oz canvas, no gusset, roughly 14 x 16 in body, 20-22 in handles | Menus, tasting notes, press kits, and low-load event handouts | Confirm it is not being sold as a bottle carrier; check handle stitching and print legibility when folded |
| Gusseted event tote | 10 oz canvas, 3-4 in gusset, roughly 15 x 16 x 4 in | Standard winery giveaway programs that carry literature plus a bottle or small insert | Test the tote with the actual intended load and verify the base stays open and stable |
| Reinforced bottle tote | 12 oz canvas, box-X or bar-tack handle anchors, roughly 12 x 15 x 4-5 in | Single-bottle handoff at tastings, trade booths, and club sign-up events | Ask for reinforced handle attachment and a filled-carry test using the bottle weight |
| Heavy retail tote | 14 oz canvas or heavier, firmer hand, clean inner finish | Premium tasting-room merch and resale-oriented programs | Check sewing consistency, carton weight, and whether the extra fabric weight changes freight cost |
| Zip-top secure tote | 12 oz+ canvas with zipper closure | Event kits with valuables, gift cards, or mixed inserts that should stay contained | Inspect zipper alignment, slider quality, and how the zipper affects fold size and packing speed |
| Long-handle shoulder tote | 10-12 oz canvas with longer drop, usually 9-11 in | Walkable events where guests carry the bag for an extended time | Confirm handle drop under load and make sure the logo remains visible when worn on the shoulder |
| Short-handle carry tote | 10-12 oz canvas with short handles, usually 4-6 in drop | Counter handoff, single-bottle giveaways, and compact event packs | Check hand clearance, grip comfort, and whether the short handle competes with the bottle neck |
| Pocketed premium tote | 12 oz+ canvas with sewn front pocket or interior divider | Club onboarding kits, premium promotions, and retail crossover items | Verify pocket stitch quality, added labor MOQ, and whether the pocket distorts the front print area |
Buyer checklist before sampling
- Define the tote's real load: one bottle, a literature pack, a retail purchase, or a mixed event kit.
- Choose the tote style first, then quote fabric weight, handle length, gusset depth, and print method.
- Specify canvas weight in both oz and GSM if your suppliers use mixed units.
- Lock finished dimensions and acceptable tolerance before comparing quotes.
- Ask for a sewn pre-production sample or a production-equivalent reference sample, not only a digital mockup.
- Request the quote as separate lines for bag construction, print setup, labels, packing, and freight terms.
- Set the acceptance standard in writing, including any fill-load or pull-test requirement.
- Confirm carton count, carton labels, and pallet pattern before production starts.
- Back-schedule the order from the event date with time for sampling, revision, production, packing, and transport.
- Keep one approved master sample for reorders so the winery does not drift into a different bag on the next event.
Factory quote questions to send
- What exact fabric construction are you quoting, and is it plain canvas, duck canvas, or another weave?
- What is the finished fabric weight in oz and GSM, and what tolerance do you allow on the approved spec?
- What are the finished bag dimensions, handle drop, gusset depth, and seam allowance in the quote?
- Which print method are you quoting, how many colors are included, and what registration tolerance do you guarantee?
- Can you separate bag cost, printing cost, label cost, packing cost, and export packing cost on the quote?
- What is the MOQ per color, per artwork version, and per packaging format?
- Will the sample be a sewn pre-production sample made from production materials, or only a visual mockup?
- What is your overrun or underrun tolerance, and how do you handle defective replacements?
- What carton size, carton count, gross weight, and shipping marks are you quoting?
- What is the production lead time after sample approval and deposit, and when does that clock start?
Quality-control points to confirm
- Set the major defect level to AQL 2.5 and minor defects to AQL 4.0 if you use an AQL plan, with critical defects reserved for wrong size, wrong art, or open seams.
- Fabric weight should stay within +/-5% of the approved spec or master sample so the hand feel does not drift between lots.
- Finished width, height, and handle drop should stay within +/-0.5 in, and gusset depth within +/-0.25 in, unless your internal spec is tighter.
- Handle anchors should use reinforced stitching or bar-tacks with no skipped stitches, loose knots, or open thread ends at the stress point.
- Run a filled-carry test using the actual bottle or insert load and hold it for 60 seconds without seam separation or handle tear-out.
- If you measure color, set a Delta E target of 2.5 or better against the approved strike-off; otherwise compare directly to the signed master sample.
- Print registration should stay within 2 mm and the image should show no smearing, pinholes, washed-out areas, or unexpected haloing on the canvas weave.
- Exterior surfaces should be free of oil marks, dirt, strong odor, broken needles, and visible loose threads longer than 5 mm.
- Master cartons should match the agreed count, style, color, and PO reference, and should survive a 60 cm corner or edge drop without burst failure on export shipments.