1. Start with the museum use case, not just the artwork
For museum buyers, canvas exhibition tote bags are not generic promotional items. They sit at the intersection of retail merchandising, visitor experience, and operational practicality. A tote sold in the shop may need to hold a hardback catalog, a postcard set, and a bottle; a tote given away at an opening may only need to carry handouts and a light brochure pack. Those are different product requirements, even if the artwork is the same. The sample approval checklist should therefore begin with the use case, because the use case determines fabric weight, handle strength, bag size, and packing method.
This is where procurement teams often lose time. A buyer receives a sample that looks attractive but has not been evaluated against the actual contents it must carry. The result is a tote that may be visually acceptable but functionally weak. Museum merchandise also tends to be scrutinized closely by retail staff and visitors, which means hand feel, seam finish, and print quality matter more than they do for a one-time event pouch. If the bag is intended to live in a shop for months, the approval standard needs to reflect that shelf life.
The first internal decision is to define whether the tote is a souvenir, a catalog carrier, a shopping bag, or a hybrid. Then note the items it must carry at maximum load, the desired retail presentation, and whether the museum needs sustainability-friendly packing. Once those three points are set, the supplier brief becomes much clearer and the sample can be judged against a real commercial purpose instead of a vague creative brief.
- Define the tote’s primary role: retail, giveaway, catalog carrier, or hybrid.
- List the real carry contents and the maximum expected load.
- Set the shelf-life expectation: one event, one season, or a recurring museum shop line.
2. Write the base specification before sample development begins
A strong sample approval process starts before anything is sewn. The base specification should be written as a procurement document, not just an email thread. Include finished size, gusset depth, handle drop, handle width, seam allowance expectations, fabric composition, fabric weight range, print placement, and any accessory requirements such as lining, pocket, woven label, hangtag, zipper, or snap closure. If the museum uses both metric and imperial systems in its internal paperwork, include both sets of measurements so there is no conversion drift later.
For canvas exhibition tote bags, the specification should also identify how the bag is intended to feel in the hand. Some programs want a natural, rugged canvas; others want a smoother retail finish with cleaner edges and a more premium drape. That preference influences whether the supplier proposes raw canvas, bleached canvas, dyed canvas, or a tighter weave. It also affects how sharply the artwork prints. A detailed spec does not remove creativity; it narrows the field so the sample can be judged properly.
Do not leave the supplier to decide the product architecture unless the buyer is explicitly buying a development service. If the line is for a museum store with a specific budget and opening date, uncontrolled design iteration can quietly expand both lead time and cost. The RFQ should specify which attributes are fixed, which are negotiable, and which are open only for supplier recommendations.
A practical internal rule is to freeze size, load target, and retail presentation first, then allow the factory to suggest fabric finishing or print technique. That approach keeps the sample process efficient while still leaving room for technical optimization.
- Lock body size, gusset depth, handle drop, and print area before the first sample.
- State whether the buyer wants a rugged, natural finish or a smoother retail finish.
- Mark which details are non-negotiable and which are open to supplier suggestion.
3. Choose canvas weight and construction based on load, not habit
Many tote briefs use fabric-weight language loosely, which creates avoidable risk. Rather than relying on a “usual” GSM number, tie the fabric choice to the actual load and the expected life of the bag. A lighter canvas may be perfectly acceptable for a visitor handout tote, while a heavier, tighter weave is more appropriate for a museum shop item carrying books or boxed merchandise. The right answer is not a universal GSM threshold; it is the fabric construction that can support the load without distorting, thinning, or tearing at the seams.
Ask the supplier to identify the weave type, finishing process, and any shrinkage treatment. Canvas that looks similar on paper can behave differently once it is cut, printed, folded, and packed. The buyer should also ask whether the fabric is raw, bleached, dyed, or washed, because those choices change print sharpness and hand feel. A bleached or dyed fabric may support a different visual outcome than an untreated natural canvas. If the tote needs a premium retail appearance, the body fabric and the trim should be assessed together, not as separate decisions.
Construction details matter as much as the textile itself. Handle reinforcement, bottom seam structure, and stitch density are what keep the tote usable after repeated carry cycles. When the sample arrives, the buyer should inspect the stress points before even focusing on the art. If the tote is likely to carry hardcover publications, bottle packs, or bundled retail items, request the supplier to show how the handles are attached and what seam method is used to resist pull force. A museum tote that fails at the handle base is a procurement failure, not a cosmetic one.
- Match fabric weight and weave to the real load instead of assuming one standard is enough.
- Ask whether the canvas is raw, bleached, dyed, or washed because each option changes print behavior.
- Require visible reinforcement at the handle base and main seam stress points.
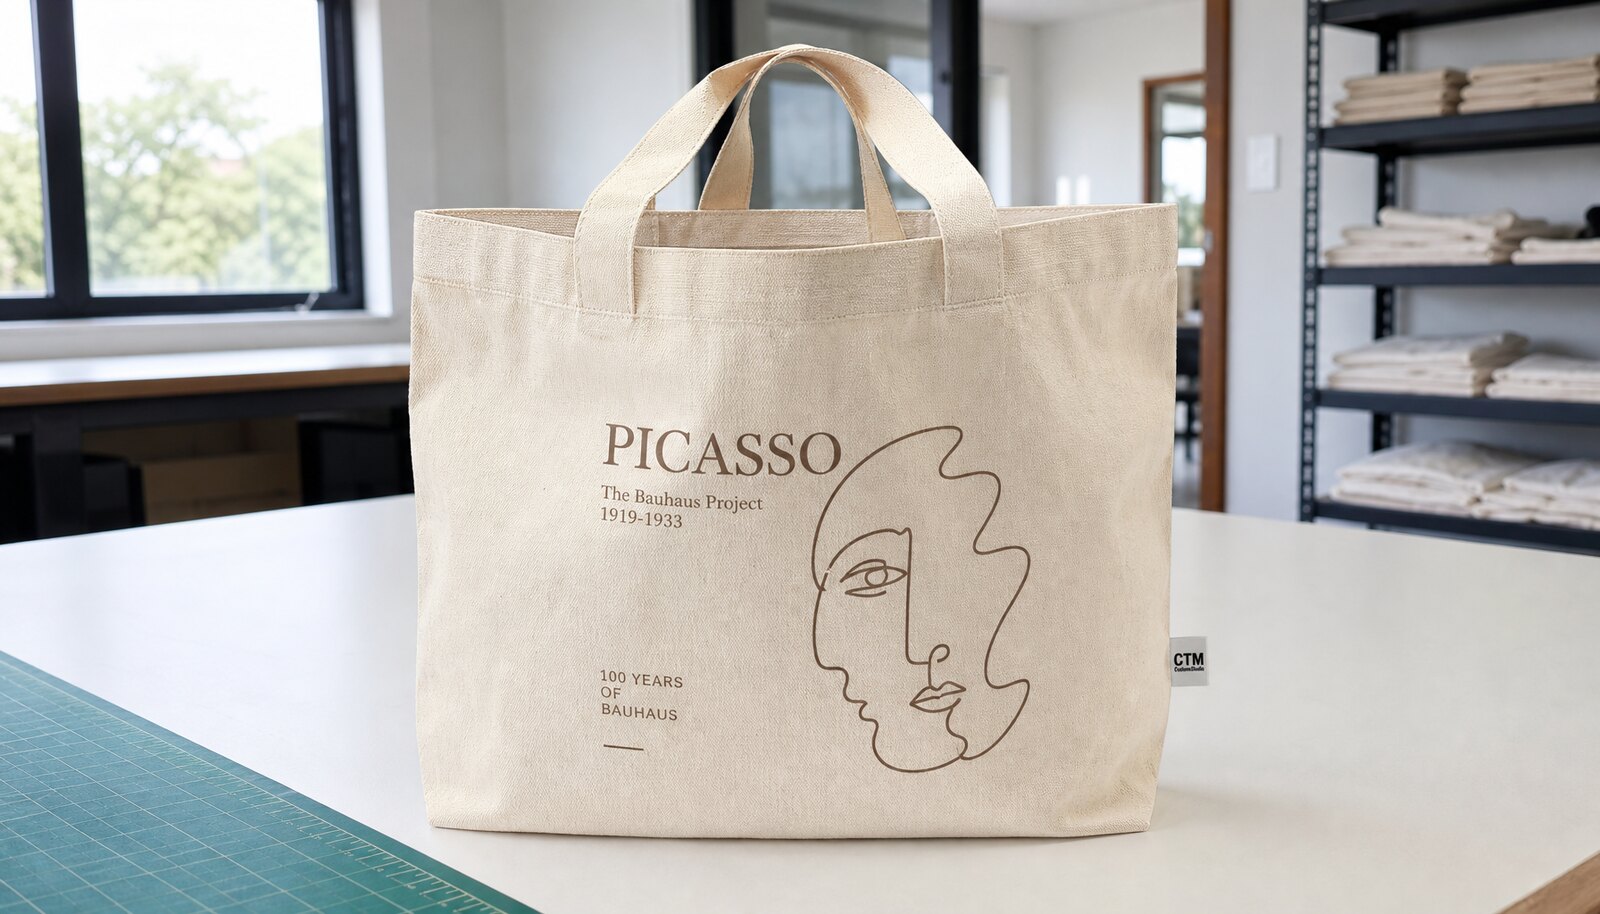
4. Decide the print method with artwork complexity and order size in mind
Museum graphics are often more demanding than standard corporate logos. Exhibition artwork can include fine linework, layered illustration, tonal gradients, or text that must remain legible at a distance. The print method must be selected for that specific artwork, not because a vendor says it is “usual.” Screen printing often works well for bold graphics, controlled color counts, and repeatable production. It is typically the best fit when the buyer needs stable output across a meaningful quantity and the artwork uses solid blocks, simple vectors, or a limited palette.
For more intricate graphics or lower volumes, a transfer or alternative decoration process may be more practical. That does not mean it is automatically better. A transfer can alter hand feel, reflectivity, abrasion behavior, and perceived premium value. The sample should therefore be judged under the actual conditions the museum cares about: daylight, retail lighting, and close inspection at point of sale. If the tote will be sold next to exhibition books or designer objects, the print finish has to hold up to that comparison.
Procurement teams should ask the supplier to mark the sample with the exact artwork version, Pantone or color target references if relevant, and the print location measured from the bag edge or centerline. That is especially important when a design includes typography or symmetrical positioning. A print that is technically acceptable but visibly off-center can be a rework item if the museum display standard is strict. The sample file should also note whether the artwork placement is for a small-front chest print, a centered full-front image, or a wraparound composition, because each one has different placement risk.
The main decision logic is simple: choose the method that best controls the artwork quality at the expected quantity, then verify that it is repeatable in bulk. Decorative creativity is not the problem; uncontrolled variation is.
- Match the print method to line detail, color count, and order volume.
- Approve artwork under the same lighting the buyer expects in store.
- Measure and record print position from fixed bag reference points.
5. Use a procurement spec table to make the sample measurable
A sample is much easier to approve when the buyer turns subjective impressions into a short technical spec table. This table should sit inside the RFQ or sample approval sheet and include the approved size, fabric range, handle construction, print method, packaging, and tolerance. If the supplier knows exactly what is being measured, the conversation shifts away from opinion and toward compliance. That is particularly helpful for museum teams that may include retail, marketing, and procurement stakeholders, each of whom tends to focus on different aspects of the same tote.
At minimum, the spec table should include the finished body width, finished body height, gusset depth, handle length, handle drop, fabric type, fabric weight range, print area, label type, and packing format. It is also useful to mark what is advisory versus mandatory. For example, a supplier can recommend a slightly different seam construction if it improves strength, but they should not be free to change bag size or print placement without approval. The sample approval process gets stronger when the buyer distinguishes controlled variables from flexible ones.
For museums, the table should also reflect retail reality. If the bag will sit on hooks or shelves, consider how it hangs and whether the handle drop allows a neat display. If it will be folded into an exhibition brochure pack, verify that the fold size fits the pack dimensions. These operational details are not decorative extras; they affect store handling and the customer experience. A useful specification table helps the buyer see those relationships before production starts.
- Put the core dimensions and materials into a single controlled spec table.
- Mark which variables are fixed and which can be supplier-recommended.
- Include shelf, hook, and folded-pack use cases where relevant.
6. Build a sample approval workflow with written checkpoints
An approved sample is not just a bag with a signature on it. It is a documented workflow with checkpoints. The most reliable process is to treat sample approval as a small project: initial sample, buyer comments, revision, final sample, and written sign-off. Every round should be tracked with dates, a version number, and a short list of open issues. That creates traceability if the bulk order later differs from what was agreed. It also prevents the common problem where a conversation in one department never reaches the person who signs the purchase order.
For the final sample, the buyer should require both a physical sample and a written approval record. The written record should state which elements are fully approved, which are conditionally approved, and which remain subject to bulk verification. If the bag includes artwork that is sensitive to color variation, the approval file should include a photograph of the sample under neutral light, plus a note that the physical reference remains the master. This is more reliable than relying on memory or a chat thread.
A useful workflow for procurement teams is to add a decision gate after sample review: either approve for pilot production, approve for bulk with no changes, or reject and resample. Each gate should have an owner and a response deadline. Without that discipline, sample reviews can drift indefinitely, especially when marketing, retail, and procurement are all asking different questions. The checklist should therefore make approval status impossible to misunderstand.
If the museum is managing a seasonal or opening-date-driven launch, this workflow should be time-boxed. The approval schedule needs a hard end date to protect production and freight booking. A sample that is “almost approved” is not commercially useful.
- Track each sample round with a version number and date.
- Require both physical sign-off and written approval notes.
- Use clear gates: approve, conditionally approve, or reject for resample.
7. Add operational QC thresholds, not just general quality language
Generic quality statements such as “good stitching” or “nice print” are not enough for procurement. The sample approval checklist should translate quality into operational thresholds the supplier can actually follow. For example, dimensions should be checked against the approved spec with a defined tolerance; print position should be measured from the bag edge or centerline; and seam integrity should be tested under a realistic load. The buyer does not need to overcomplicate the document, but it should be specific enough that a factory QC team can inspect against it without guessing.
A strong QC plan normally separates critical, major, and minor defects. Critical defects are the ones that affect usability or brand perception in a way the museum would not accept, such as handle failure, open seams, or serious print misplacement. Major defects might include substantial size deviation, visible color mismatch, or obvious packing errors. Minor defects may cover small thread tails or slight cosmetic imperfections if they are within the agreed standard. The important thing is not the label itself but the fact that the supplier knows what triggers rework, rejection, or conditional acceptance.
The buyer should also ask for the inspection logic. Some teams use an AQL-based pre-shipment inspection; others use a supplier internal standard with buyer review of results. Either way, the expectation should be documented before bulk starts. If an inspection will be performed, specify the sample size, the defect categories, and who signs the release. This avoids a situation where the buyer assumes one standard and the supplier applies another.
QC should also extend to packaging. A tote that passes sewing inspection but arrives scuffed, creased, or mislabeled is still a problem. Packaging QC is not secondary for museum retail; it is part of the deliverable.
- Define measurement method and tolerance for dimensions, print placement, and handle length.
- Separate critical, major, and minor defects in the approval file.
- Include packaging defects in the inspection scope, not only bag construction.
8. Check packaging, carton structure, and store receiving needs
Museum buyers often focus on the tote itself and then discover the packing format is wrong for their warehouse or shop team. That is avoidable. Packaging should be approved at the same time as the sample because folding, inner pack count, polybag use, and carton labeling all affect receiving speed and retail presentation. If the store team wants shelf-ready bags, the fold method must produce a tidy stack. If the buyer wants sustainability-friendly delivery, the no-polybag decision must be balanced against print rub, dust exposure, and transit damage.
Ask the supplier for carton dimensions, inner pack count, gross weight, and carton marks before the order is confirmed. Those details matter for freight planning, warehouse handling, and retail unpacking. Large cartons may reduce carton count but create handling issues; small cartons may protect better but increase freight cost and labor. The right format depends on the museum’s storage space and receiving flow. If multiple exhibition products will arrive together, carton marks and barcode labels should be clear enough for quick sorting.
Packaging also affects complaint risk. A tote that rubs against itself or against the carton wall during transit can show abrasion or fold marks by the time it reaches the store. If the print is delicate, ask whether the factory recommends tissue, a slip sheet, or another protective layer. If the museum wants a minimal-packaging approach, that should still be stress-tested in sample form. In other words, the sample should prove the packing method works, not just describe it.
For procurement teams, the best practice is to approve the retail pack and ship pack as part of the same sign-off document. That prevents later arguments about who changed the folding or why the carton count changed.
- Approve folding method, pack count, and carton marks with the sample.
- Request carton dimensions and gross weight before freight planning.
- Test whether the chosen packing prevents print rub and crushing in transit.
9. Compare quotes on landed cost, revision risk, and best-use scenario
A useful quote comparison has to do more than show factory price. For canvas exhibition tote bags, the apparent unit cost can shift materially once the buyer adds print setup, sample revisions, packaging, inland freight, export handling, and destination freight. That is why a procurement comparison table should include more than “sourcing route.” It should show MOQ impact, sample risk, QC control, timeline, price structure, and the best-use scenario for each route. This is especially important for museums where the opening date and merchandising calendar are often fixed long before purchase order release.
The buyer should ask every supplier to quote on the same basis: same bag size, same fabric weight range, same print method, same packaging format, same incoterm, and same artwork version. If one quote uses a lighter canvas or excludes retail packing, it is not a meaningful comparison. The question is not which quote is numerically lowest; it is which quote gives the museum the best balance of control, predictability, and total delivered cost. Procurement teams should also watch for hidden cost layers such as extra sample rounds, label remakes, carton rework, or color matching charges.
For first-time museum programs, the safest route is often the one that lowers revision risk even if the sticker price is not the lowest. For repeat programs, the better route is the one that can reproduce the approved sample consistently without re-qualification. The decision should be driven by the program’s life cycle. A temporary exhibition line and a permanent shop staple should not be sourced by the same logic unless their risk profile is truly the same.
If the museum wants to compare suppliers intelligently, it should ask each one to explain not only what they can make, but what they can make repeatedly. That distinction matters in procurement more than a small unit-price gap.
- Compare quotes only after size, fabric, print, packing, and incoterm are fixed.
- Treat sample remake policy and revision count as commercial terms, not small details.
- Choose the sourcing route that best fits the item’s life cycle: pilot, seasonal, or recurring reorder.
10. Turn the approved sample into a controlled reorder file
The end goal of sample approval is not a single green light. It is a controlled product file that can support repeat orders, supplier comparison, and audit traceability. Once the tote is approved, the buyer should archive the physical reference, measurement sheet, artwork file version, packaging spec, carton data, and approval notes in one location. This gives the museum a consistent basis for the next print run, even if staff changes or the supplier account is transferred.
A reusable order file should make it easy to answer three questions: what was approved, what can never change without reapproval, and what can be reviewed on reorder. For example, the approved size and artwork placement may be fixed, while carton marks or delivery routing can be updated per shipment. The more clearly those items are separated, the less chance there is of accidental spec drift. This is useful for museum shops that reorder seasonal exhibition totes or split quantity across multiple store locations.
Good document control also improves supplier accountability. If a new vendor says it can match the existing tote, procurement can send the same file set and compare the response against the approved standard. That keeps later sourcing discussions grounded in evidence rather than memory. For a museum buyer, this is one of the biggest advantages of a disciplined sample approval checklist: it reduces the need to rediscover the product every time the next exhibition comes around.
In practical terms, the approved file becomes the museum’s product memory. Protect it, label it clearly, and use it every time the tote is reordered or re-sourced.
- Archive the final sample photos, spec sheet, artwork version, and carton data together.
- Use the same file set for reorders and supplier benchmarking.
- Separate fixed approvals from items that may be updated per shipment.
Specification comparison for buyers
| Sourcing route | Best fit for museum buyers | MOQ / sample impact | QC control and risk | Timeline and pricing profile |
|---|---|---|---|---|
| Direct factory sourcing | Best when you want one accountable manufacturer to cut, sew, print, inspect, and pack the order | Usually better for repeat programs and controlled sample revision; MOQs may be higher but sample-to-bulk alignment is stronger | Higher control over fabric, thread, stitch method, print placement, and carton packing if the factory is genuinely integrated | Often the clearest pricing structure, but sample remake and setup charges should be defined upfront |
| Trading company sourcing | Useful when you need one coordinator for multiple items, special packaging, or internal procurement support | May offer flexible sampling across different factories, but approval risk rises if the sample and bulk source are not the same | Control depends on who owns the final production line; buyers must confirm the actual factory, not only the exporter | Can simplify communication, though margin layers may be less visible in the quote |
| Local print shop on imported blanks | Works for urgent launches, smaller museum stores, or pilot quantities where speed matters more than exact spec control | Often lower MOQ, but blank tote quality can vary by supplier and by inbound lot | Print QC may be easier locally, but fabric weight, shrinkage, handle strength, and seam construction are outside the printer's control | Fastest path in some markets, but unit price can rise once blank sourcing, freight, and rework are included |
| Split sourcing | Appropriate when one vendor specializes in blank bags and another in decoration or finishing | Sampling can take longer because both vendors must agree on the final reference | Higher risk of color mismatch, finger-pointing on defects, and timing gaps between steps | Can look cost-effective line by line, but coordination cost often appears later |
| Stock-program supplier with overprint | Good for first-time museum shop launches or pilot orders where the buyer can accept a standard tote base | Usually lowest setup friction, but the buyer gives up control on exact fabric shade, trim details, or label placement | Sample risk is moderate: the bag may look acceptable but still differ in hand feel or packout | Quoting is often straightforward; pricing improves with volume, but customization options are limited |
| OEM merch supplier with retail packing service | Best when the museum needs shelf-ready delivery, barcode labels, inserts, and retail-ready folding | Sampling must include the final pack format, not only the bag itself | Good if the supplier has packaging QC, but buyers must verify inner pack count, carton marks, and transit protection | Higher quote complexity because packaging, inserts, and retail finishing are all itemized |
| Compliance-focused exporter | Fits public institutions, chain retail, or procurement teams that need documentation and traceability | MOQs may be less flexible because compliance and documentation overhead adds cost | Useful when audit files, production records, and export docs are required, though lead time is usually longer | Pricing may be higher, but the quote is often more transparent on documentation and inspection steps |
| Regional supplier near the destination market | Helpful when transit time is critical or import lead time is constrained | May support lower replenishment MOQ and quicker sample turnarounds | Can reduce shipping risk, but the buyer should still confirm fabric repeatability across lots | Often better for speed and freight savings, though local manufacturing capacity may limit customization |
Buyer checklist before sampling
- Approved the bag role: retail souvenir tote, catalog carrier, visitor giveaway, or mixed-use exhibition bag
- Defined finished size, gusset depth, handle drop, and any pocket, zipper, snap, or label requirement on one spec sheet
- Specified fabric type and construction: raw canvas, bleached canvas, dyed canvas, or lined tote, with the target weight stated as a range rather than a guess
- Confirmed whether the bag must carry books, catalogs, boxed merch, bottles, or only lightweight handouts, and set the load assumption accordingly
- Locked the print method, artwork file version, color reference, print placement, and maximum print area before sample approval
- Checked that the sample uses the same bulk fabric, thread, handle tape, and print consumables unless a documented deviation is accepted
- Reviewed reinforcement details at the handle stress points, side seams, and bottom seams for the intended load
- Verified sample fit with actual items the museum store will sell or pack, not just with a hand-carry test
- Approved folding style, inner pack count, polybag or no-polybag decision, tissue or insert needs, and carton marks
- Set acceptable measurement tolerances and defect thresholds in writing before the first sample is signed off
Factory quote questions to send
- What exact canvas construction will you use for bulk production, including fabric type, weight range, weave style, and whether the fabric is pre-shrunk or not?
- Will the sample be made from the same fabric lot, thread, handle material, ink system, and packaging method that you will use in production? If not, what will differ?
- What is your MOQ by bag size, print color count, and packaging format? Please separate standard MOQ from custom MOQ.
- How many sample revisions are included before a remake charge applies, and what will trigger an extra sampling fee?
- Which print method do you recommend for this artwork, and what technical reason supports that recommendation for this exact size and quantity?
- What finished-size tolerances do you commit to for body width, body height, gusset depth, handle length, and handle drop?
- What inspection method do you use for pre-shipment QC, and do you work to AQL or an internal pass/fail standard? Please share the level.
- What is the seam construction at the handle attachment, bottom seam, and side seam, and can you show whether the stress points are boxed, bar-tacked, or double-stitched?
- Can you provide carton dimensions, inner pack count, gross weight, and stacking guidance before the order is confirmed?
- What packaging options are available if we need retail-ready units, moisture protection, or transit protection for printed surfaces?
Quality-control points to confirm
- Finished dimensions should match the approved spec within the agreed tolerance, typically no more than ±1 cm on body dimensions for standard museum totes unless the product is intentionally oversized or hand-finished
- Handle drop and handle length should remain within a tighter tolerance that the buyer agrees in writing; if the tote will carry books or boxed items, handle symmetry matters as much as raw length
- Seams should be straight, secure, and free from skipped stitches, loose thread clusters, puckering, needle damage, or visible seam opening under normal handling
- Handle attachment should show reinforcement at the stress point; verify both sides of the bag and pull evenly so the seam does not distort or tear under load
- A practical load check should use the intended contents or an agreed test weight; the bag should be carried repeatedly without handle slip, seam opening, or excessive deformation
- Print registration should be centered and aligned within the approved artwork placement; check skew, offset, haloing, pinholes, ink bleed, and edge breakup
- Artwork color should be checked under neutral light and daylight-style light; approve by physical reference, not by phone photo or monitor image alone
- Canvas surface should be visually clean with no oil stains, dye marks, heavy streaks, broken yarns at the face, or obvious thin spots that show through the print
- Cut edges and inside seams should be trimmed and clean, with no long thread tails, lint bundles, or exposed raw sections beyond the agreed construction
- If there is a lining, pocket, zipper, snap, or woven label, confirm that each accessory is positioned correctly, functions smoothly, and does not interfere with retail use