Why coffee brands need a tighter sample approval step
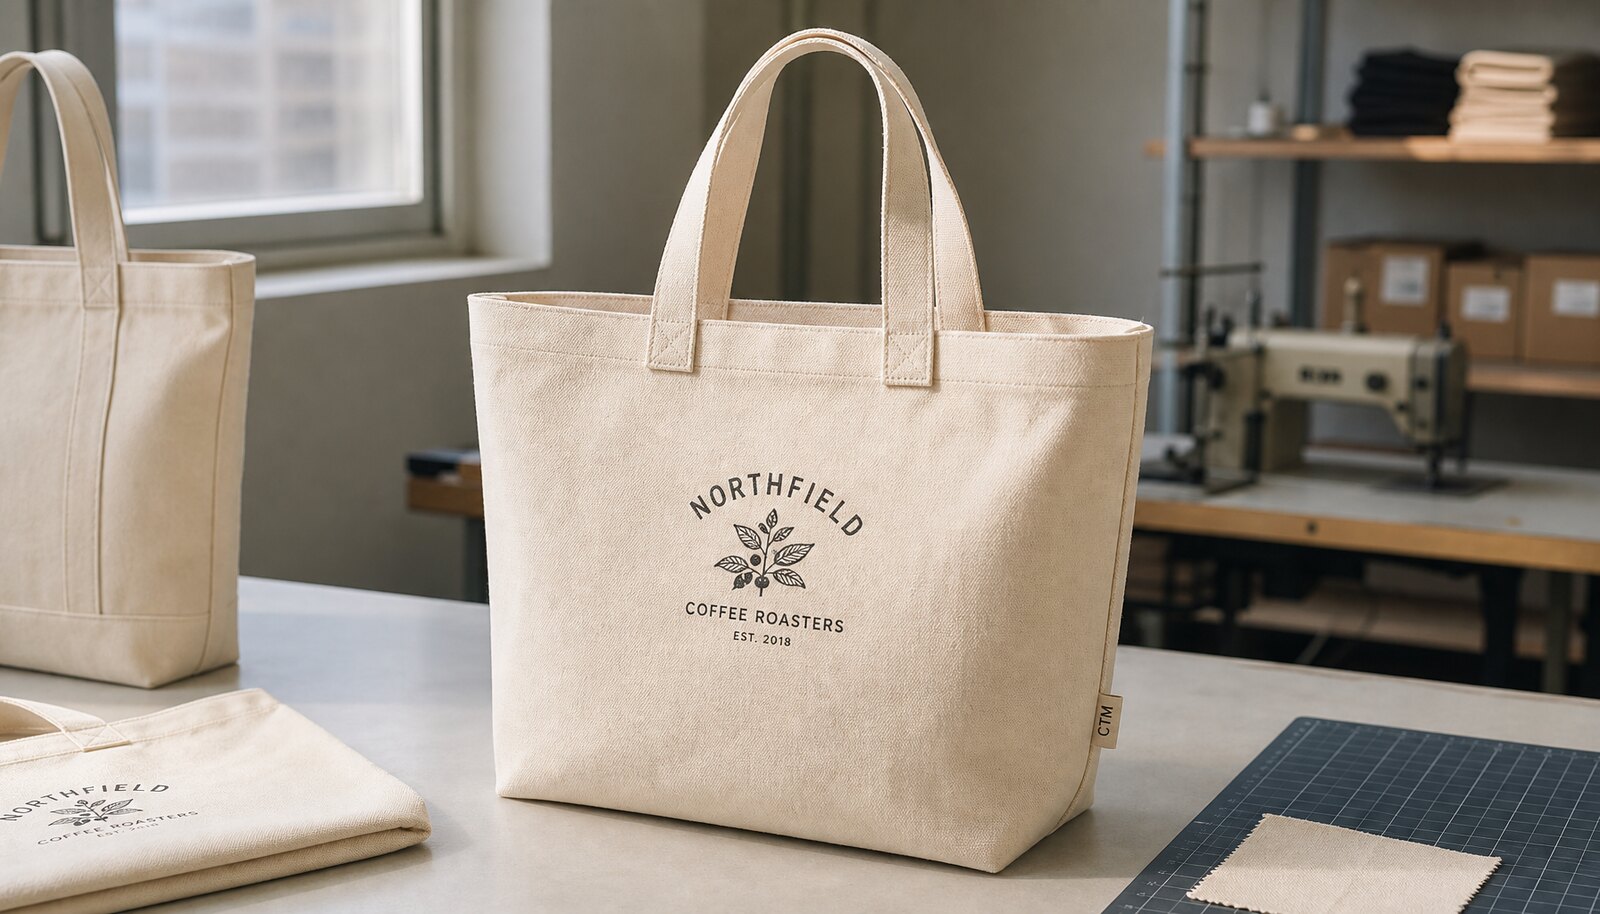
For a coffee brand, an exhibition tote is not just a giveaway. It carries beans, tasting cards, brochures, and the visual identity that buyers will see again at the next event or retail visit. That means the sample has to prove more than the artwork. It has to show whether the bag stands upright, the handles feel secure, the print sits cleanly on the canvas, and the packing will survive transport.
The biggest mistake is treating the sample as a formality. If the first sample is only a rough sales piece, the bulk order can still fail on fabric weight, stitch quality, or color match even when the logo looks correct. A better approach is to treat sample approval as a controlled gate: one reference sample, one written spec sheet, and one clear list of accepted tolerances before the factory starts cutting bulk fabric.
- Use the sample to validate structure, not only artwork.
- Separate sample approval from price approval.
- Write down any exception before the PO is issued.
Start with the base bag spec, not the print file
The bag body should be defined before the design team starts polishing artwork. For canvas exhibition tote bags for coffee brands, a practical starting point is 12 oz to 14 oz canvas, or roughly 340 to 470 GSM, when the tote needs to hold shape and keep a premium feel. Lighter canvas can work for low-cost handouts, but it usually looks softer and can wrinkle or collapse after a short period of use.
Size and construction matter just as much as fabric weight. Coffee brands often need a tote that can carry a product sample plus printed material, so a medium gusset and a stable base are usually better than a flat shopping bag. If the order is meant for repeat event use or retail resale, the buyer should also confirm whether the bag needs a hemmed top edge, inside binding, or a boxed bottom to improve structure.
- 10 oz canvas can work for lightweight giveaways, but it is often too soft for premium event use.
- 12 oz to 14 oz is the most balanced range for structure and cost.
- Check finished size, gusset depth, and handle drop before approving print.
Choose the right supplier route for the sample stage
The supplier route changes the risk profile. A direct factory with in-house cutting and screen printing usually gives the cleanest control over sample consistency, because one team handles fabric, sewing, and decoration. That is usually the better route when the order is likely to repeat, the artwork needs tight color control, or the buyer wants one factory to own the full process from sample to shipment.
A trading company or local converter can still make sense when the team needs faster communication, a small initial quantity, or a more flexible sourcing path. The tradeoff is that the buyer must do more work to verify who actually makes the bag, who prints it, and who owns the quality issue if the sample passes but the bulk order shifts subcontractors. For this product, that hidden handoff is where many quote comparisons break down.
- Direct factory works best for repeat programs and tighter process control.
- Trading route works best when communication speed matters more than margin.
- Ask who prints, who sews, and who signs off the final sample.
What the first sample must prove
A useful sample is not only a visual reference. It should prove that the factory can reproduce the same result in bulk without changing the canvas hand feel, the handle placement, or the print sharpness. The buyer should inspect the sample as if it were a shipment arriving at the warehouse: open it, measure it, press on the seams, and compare it to the approved tech sheet instead of relying on appearance alone.
The cleanest method is to distinguish among three sample types. A sales sample is acceptable for rough concept review. A pre-production sample should be made from final materials and final decoration methods. A golden sample becomes the physical reference that sits with the PO file and is used to resolve disputes later. If the factory skips from a sales sample straight to mass production, the buyer has very little leverage if the bulk result drifts.
- Measure finished size, not only flat pattern size.
- Confirm that the sample uses final canvas, final thread, and final label construction.
- Approve one golden sample and keep one backup reference in the file.
Print and color control for coffee branding
For most coffee brands, the best print method is a simple screen print with one to three colors. It gives good opacity on natural canvas, keeps logos readable, and is usually easier to repeat than complex decoration methods. If the brand artwork has fine gradients, the buyer should expect compromises or a different print route, because canvas texture and ink spread can soften small detail. In many cases, a cleaner one-color mark on a good bag looks more premium than a crowded full-color graphic on a weak bag.
Color control needs discipline. If the brand color matters, the quote should call out Pantone target, print area, and acceptable shade variation. The sample should be viewed under daylight and under the same warm light used in retail or exhibition booths, because canvas can look warmer or flatter depending on the environment. If the logo sits too close to the seam or the ink bleeds into the weave, it usually means the artwork or print screen was not adapted to the actual fabric.
- Use screen print for clean logos and text-heavy brand marks.
- Use Pantone targets, not vague color names.
- Reject samples with blurred edges, poor registration, or weak opacity on dark canvas.
Construction details that affect how buyers judge quality
A tote bag often passes the artwork review and still fails in the hand. Handle reinforcement is one of the first issues to inspect. The bar-tack should be aligned, the stitch density should be consistent, and the handle should not pull the top edge into a twist. The buyer should also look at seam allowance, corner finishing, and whether the gusset sits flat instead of rippling after the bag is loaded.
For exhibition and coffee sampling use, the bag should feel stable when it is half full, not only empty. If the tote will carry packaged coffee, printed leaflets, and a small product sample, the buyer should specify a realistic static load target and a simple pull test standard. That does not need to be over-engineered, but it does need to be written into the approval file so the factory knows what the bag must survive.
- Look for even seam allowance and no loose thread at the stress points.
- Specify handle reinforcement and bar-tack placement.
- Use a simple pull test or load test that matches the intended use.
Packing and labeling deserve the same approval discipline
Packing is often treated as a minor detail, but it can destroy a good bag before it reaches the buyer. Canvas totes should be packed in a way that protects the print surface, limits dust, and keeps carton loading efficient. For export or long warehouse storage, the buyer usually needs an individual polybag, a clear carton count, and visible carton marks so the receiving team can identify the correct lot without opening every box.
The buyer should also think about climate and transit. If the route is humid, a desiccant pack may be worth the small added cost. If the bags are going to a retail distribution center, the carton size and weight limit matter because overly heavy cartons slow down receiving and increase crush risk. Packing approval should include the exact inner count, carton dimensions, gross weight target, and any barcode or country-of-origin label the market requires.
- Approve polybag type, carton count, and carton markings before bulk start.
- Keep carton weights practical for warehouse handling.
- Request humidity protection if the transit route is damp or slow.
MOQ and lead time only make sense when the quote is broken down
MOQ should not be treated as one fixed number for every version of the tote. It changes with canvas weight, dyeing method, print color count, label type, and whether the factory needs to reserve special fabric or a custom trim. A stock natural canvas bag with one-color screen print can usually be produced at a lower threshold than a custom dyed bag with woven label, zipper, or lining. That is why the buyer should always ask for MOQ by construction detail, not by product name alone.
Lead time also has two parts: sample time and bulk time. A straightforward tote sample may take roughly 5 to 10 working days, while a bulk order often needs 25 to 45 days after sample approval, depending on material reservation and print queue. The important issue is not the average number. It is whether the factory has already reserved fabric, whether art files are final, and whether the quote includes a second sample round if the first one misses the target.
- Ask for MOQ by fabric, print color count, and trim type.
- Separate sample lead time from bulk lead time.
- Confirm whether the quote assumes one round of revisions or more.
Use landed-cost comparison instead of unit-price comparison
A low unit price is not a useful comparison if it hides setup charges, sample fees, carton upgrades, or freight assumptions. Procurement teams should compare offers on a landed-cost basis, even if the shipment is still in the quote stage. That means separating ex-works price, freight, duty, inland delivery, inspection cost, and any packaging upgrade needed to make the bag warehouse-ready. If those items are mixed together, one supplier may look cheaper only because part of the cost has been moved out of the line item you are staring at.
The other hidden problem is inconsistency between sample and bulk pricing. Some suppliers quote a reasonable sample, then change fabric weight, print method, or carton spec in the bulk run to recover margin. The quote should name the same spec used for the sample and should state which items are included in the unit price. For coffee brands that run seasonal events or multi-market launches, that clarity is worth more than a small unit discount.
- Compare ex-works, FOB, CIF, or DDP only after understanding what each term includes.
- Separate sample fee, plate fee, print setup, and packing cost.
- Reject quotes that do not match the sample spec line by line.
Final approval workflow before you release the PO
The cleanest approval flow is simple. First, confirm the bag spec in writing. Second, review the physical sample against the spec. Third, correct any issues and request a revised sample if needed. Fourth, sign off the golden sample and attach it to the PO file. Only after that should the buyer release production. This sequence protects both sides because the factory knows exactly which version must be repeated and the buyer knows which details can no longer change without a formal revision.
For coffee brands, that final step matters because the tote is often part of a broader launch package. If the bag is late, the whole event plan can slip. If the print shade is wrong, the bag cannot be mixed into the same campaign as the rest of the marketing material. Treat the sample approval file like a production control document, not a design review. That is what keeps the bulk order aligned with the brand launch.
- Keep the approved sample with the PO and packing file.
- Do not release bulk until the final spec, artwork, and packing details are frozen.
- Record any allowed overrun, under-run, or substitute material in writing.
Specification comparison for buyers
| Spec decision | Recommended option | When it fits | Buyer risk to check |
|---|---|---|---|
| Production route | Direct factory with in-house cutting and screen printing | Best when you need one accountable owner for sample fit, color, and packing | Risk of subcontracted printing or cutting if the factory outsources part of the job |
| Production route | Trading company with named factory and written process control | Useful when your buying team wants one English-speaking contact and can tolerate extra margin | Risk of unclear factory identity and weaker change control |
| Sample type | Pre-production sample made from final canvas, handles, and print method | Use before bulk PO release | Risk if the sample is only a sales sample or uses lighter fabric |
| Fabric weight | 12 oz to 14 oz canvas, about 340 to 470 GSM | Fits exhibition handouts that need structure and repeated use | Risk of shrinkage, limp shape, or underweight fabric after wash testing |
| Print method | 1 to 3 color screen print with Pantone target | Best for coffee logos, text, and clean brand marks | Risk of blur, poor registration, or color shift on dark canvas |
| Decoration route | Woven label or side label for brand identity, not full embroidery | Use when you want premium perception without distorting canvas | Risk of puckering, higher cost, and longer sample lead time |
| Packing route | Individual polybag plus master carton with carton marks | Export orders, retail-ready presentation, and humid routes | Risk of staining, crushed corners, or missing carton data |
| Supplier route | Direct source for repeat programs, local converter for urgent reorders | Choose by timeline and control needs | Risk of hidden margin, slower clarification, or inconsistent color across reruns |
Buyer checklist before sampling
- Lock finished size, gusset depth, handle length, and fabric weight before sample approval.
- Request the exact print method, ink type, color target, and artwork file format in writing.
- Confirm whether the sample uses final fabric, final handles, and final label construction.
- Measure seam allowance, handle placement, and stitch density against your internal standard.
- Inspect the sample under daylight and store lighting, not only on a screen.
- Approve packing format, polybag thickness, carton quantity, and shipping marks.
- Ask for MOQ by fabric, print color count, and trim type rather than a single generic number.
- Compare lead time for sample, bulk production, and any second-round correction sample.
- Keep one signed golden sample and one sealed production reference in your file.
- Record all exceptions before PO release, including overrun tolerance and carton weight limit.
Factory quote questions to send
- Is the quoted sample made from final canvas weight and final print method, or only a sales sample?
- What is the exact GSM or ounce weight of the canvas after finishing, and what tolerance do you allow?
- Which print process is included, and is the quoted price based on one color, two colors, or a full-panel print?
- What is the MOQ by fabric type, print color count, and any added trim such as zipper, lining, or woven label?
- What items are included in the unit price, and which are separate charges for sample, plate, setup, carton, and inner packing?
- What is your normal sample lead time and bulk lead time after sample approval?
- What carton size, inner pack count, and master carton weight are you planning for export packing?
- Will any part of the bag be subcontracted, and if so, which step is handled outside your factory?
Quality-control points to confirm
- Finished size matches the approved spec within the agreed tolerance.
- Canvas weight is verified against the approved GSM or ounce target.
- Print position, registration, and edge sharpness match the signed sample.
- Handle length, handle drop, and reinforcement stitching are consistent on both sides.
- Bar-tacks, seam ends, and base corners show no loose thread or skipped stitch.
- Color shade is acceptable under daylight and indoor retail lighting.
- Polybag, carton marks, and shipping labels match the packing list and PO.
- One golden sample is retained and matched to the bulk run before shipment release.