Start With the Use Case
Canvas conference bags for charity campaigns are not interchangeable with generic promotional totes. Procurement has to start with the way the bag will actually be used. A registration handout bag that only carries a program, lanyard, and brochure set can be lighter and simpler than a donor gift bag that also holds a water bottle, book, or boxed item. If the event team cannot define the load, the bag spec will drift toward a vague compromise that is either too flimsy or too expensive.
The most useful first step is a contents list, not a mood board. Write down the item dimensions, total weight, and whether the bag needs to stand upright on a table or collapse flat for storage. Then decide whether the bag is expected to be reused after the event. Reuse pushes the spec toward stronger handles, better stitch density, and a cleaner print method because the bag will stay in circulation long after the campaign ends.
- List the actual inserts and their total weight before requesting prices.
- Decide whether the bag is disposable, reusable, or intended for repeated carrying.
- Match the look of the bag to the audience: donor-facing, sponsor-facing, or internal distribution.
Build the Spec Around Load and Size
Once the use case is clear, size is the next decision that affects everything else. A bag that is too small forces overstuffing, which stresses seams and makes the print warp. A bag that is too large wastes fabric, increases freight, and can look empty even when it carries the right items. The right finished size is usually the smallest bag that accepts the contents without forcing corners, zipper strain, or awkward bulging.
Write the spec in finished dimensions, not only approximate statements like medium or large. Include width, height, gusset, handle drop, and the acceptable tolerance. If the bag will hold odd-shaped items, give the supplier a packing diagram or sample contents instead of expecting them to infer the shape. That prevents the common mistake where the factory prices a tote that fits the spec on paper but not the actual inserts in the field.
- Use finished dimensions with tolerances, not descriptive sizing language.
- Allow extra depth if the contents include bottles, folders, or boxed gifts.
- Ask the supplier to confirm fit using the exact insert list before sampling.
Fabric, Structure, and Hand Feel
For most event bags in this category, 10 oz to 12 oz canvas is the practical starting point. It gives enough body for a clean print surface and a more durable feel without driving the price as high as a heavy retail tote. Move to 14 oz when the bag must carry heavier contents, when the event wants a more structured presentation, or when the bag will be reused often enough that early wear matters. Very light canvas can still work, but it should be a deliberate cost choice, not an accident.
Do not quote fabric by ounce weight alone. Ask for the weave density, whether the cloth is bleached or unbleached, whether it is pre-shrunk, and whether the factory is quoting the same lot that will be sewn. Natural canvas gives a warmer, more campaign-friendly look; bleached canvas usually gives cleaner print contrast. If the bag is printed in a dark ink or carries fine text, fabric surface consistency matters more than many buyers expect.
- Use 10 oz to 12 oz for general conference and charity event use.
- Move to 14 oz when the bag needs structure or carries heavier inserts.
- Ask for the exact fabric lot, finish, and shrinkage assumption that will be used in production.
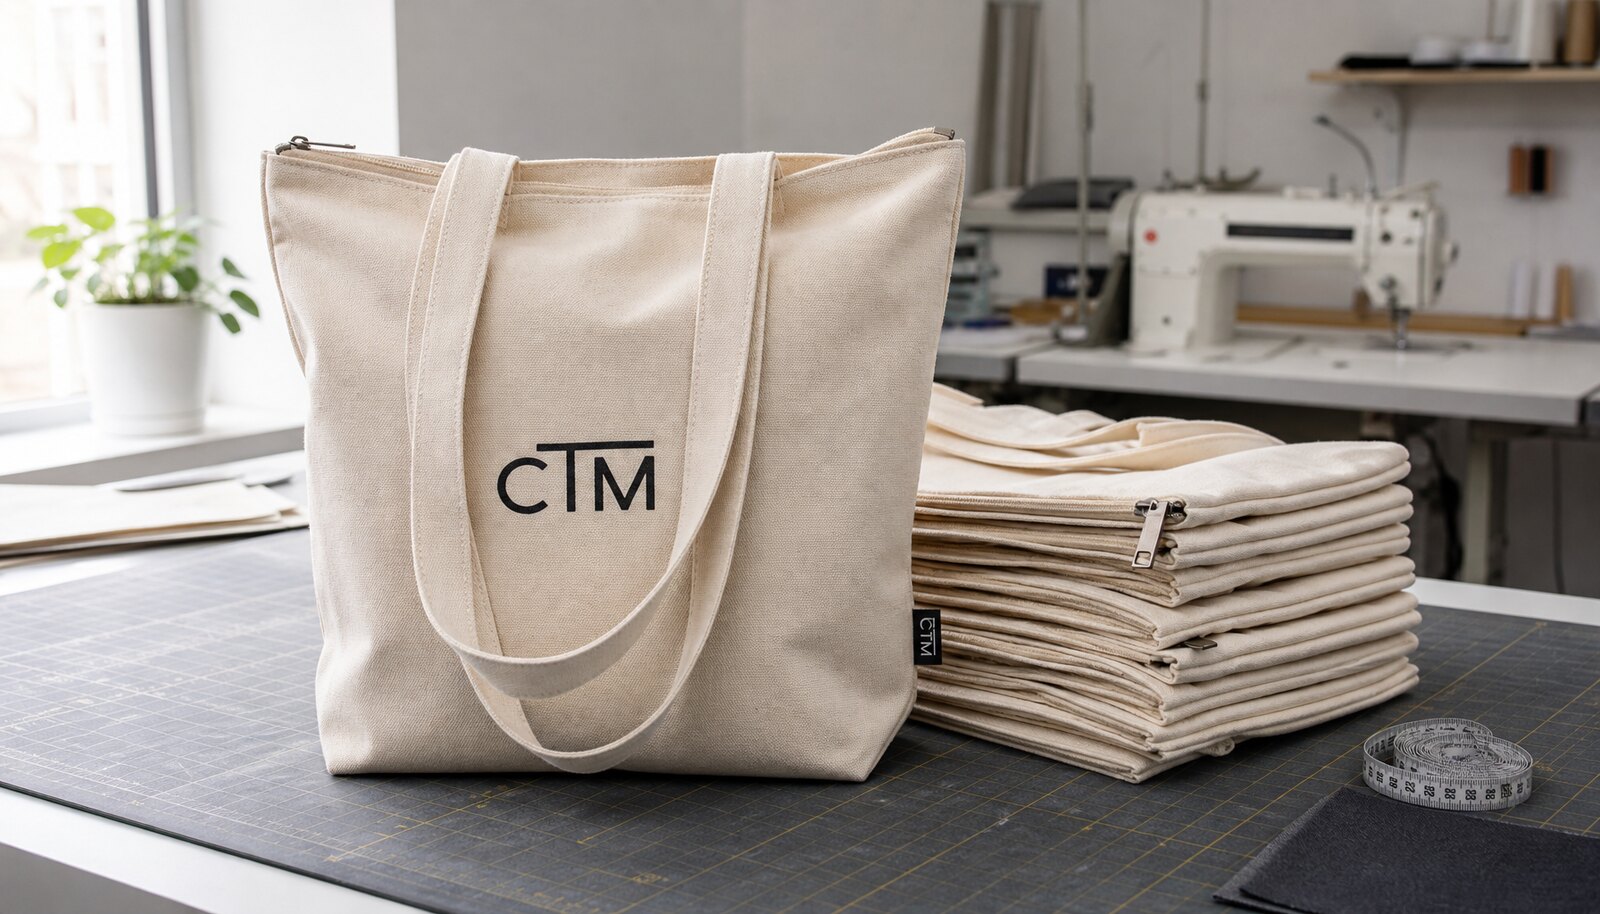
Handles, Closures, and Construction Details
Handle construction is where low-cost bags often fail. A weak handle join, short carry drop, or loose bar-tack can make the bag feel cheap immediately, even if the print is perfect. For reusable event bags, reinforced handles with dense stitching are usually worth the small cost increase. If the bag will be worn on the shoulder, the handle drop should be long enough to clear bulky clothing and still hang comfortably without digging into the shoulder line.
Closures should follow the contents, not the other way around. Open-top bags are efficient for handout packs and event inserts, but they do little to protect donated goods or higher-value items. A zipper adds cost and setup time, but it improves security and keeps contents contained in transit. If a closure is included, ask for the zipper gauge, puller style, and whether the tape color must match the fabric. Those details affect both appearance and defect risk.
- Specify handle width, drop, reinforcement method, and stitch density in the RFQ.
- Use open tops for handout packs and zipper tops only when protection or reuse justifies the extra cost.
- Confirm the seam allowance and reinforcement layout at the handle join before approving the sample.
Branding and Artwork Control
Most charity campaign bags use simple logos, which is why screen print remains the default choice for bulk orders. It is usually the best value when the artwork is flat, the color count is low, and the quantity is high enough to spread setup costs. The key is not the print method itself but whether the method matches the art. A logo with a solid mark and one accent color should not be forced into a more expensive process just because the supplier suggests it. Conversely, a design with gradients, tiny type, or multiple sponsor marks may need a different method to stay legible.
Print approval should happen on a fully sewn sample, not on loose fabric. A print that looks centered on a flat panel can shift once the panel is stitched into a gusseted bag. Ask for the artwork box, placement distance from seam or top edge, and the curing method. If the logo is close to the stitch line, you need to know how the factory will prevent distortion. A buyer-ready approval is based on legibility, alignment, and rub resistance, not on a simple yes or no to a mockup.
- Use screen print for simple logos and larger runs, and reserve digital or transfer methods for artwork that truly needs them.
- Approve placement on the sewn bag, not only on a flat print proof.
- Tie the art file version to the sample approval so production cannot switch to an older logo file.
Supplier Verification and Compliance Files
A quote is only useful if the supplier can actually produce the version being offered. Before comparing prices, verify who the seller is, where the bags will be made, and what documentation they can supply. At a minimum, ask for a business registration, export capability, and a factory profile tied to the production site. If the order is sensitive to material claims or internal procurement review, request a material declaration and any available test report that matches the exact fabric and print process. If the supplier cannot connect the documents to the production site, treat that as a risk, not a clerical issue.
Cross-border orders also fail on landed-cost assumptions. A low EXW or FOB quote can become expensive once inland freight, customs brokerage, duties, bank fees, and destination handling are added. That is why the buyer should not compare quotes that use different Incoterms. Ask the factory to identify every excluded cost in plain language and to name the party responsible for export paperwork. If the seller will not separate the costs, the quote is hard to defend internally and even harder to manage if the shipment is delayed.
- Request supplier registration, export capability, and factory identity before discussing price.
- Ask which material and compliance documents are available for the exact bag specification.
- Compare only quotes that use the same Incoterm and the same cost exclusions.
Compare Quotes on a Landed-Cost Basis
The right comparison is never just unit price. For this product, the main price drivers are fabric weight, handle construction, print setup, closure style, packing, and the size of the carton. A quote that looks cheap may be hiding a lighter cloth, fewer print colors, a smaller print area, or a packing method that creates extra labor at the warehouse. The buyer should request an itemized quote with the same assumptions across suppliers so the real difference is visible.
Carton efficiency matters more than many teams expect. If the bags are nested flat and the carton is sized correctly, freight cost can drop materially compared with a poorly packed carton full of air. Ask for carton dimensions, gross weight, and units per carton, then check whether the box cubes efficiently. A carton that is too large is wasteful in air freight and awkward in storage; a carton that is too tight creates crushed edges, distorted bags, and higher damage rates on arrival.
- Separate the bag price from print setup, packing, cartons, inland movement, and freight assumptions.
- Check carton dimensions and unit counts to see whether the quote wastes cube space.
- Challenge any quote that does not state whether duties, brokerage, and destination charges are included.
Sampling That Reflects Production
A sample only protects you if it reflects the production version. That sounds obvious, but it is where many bulk orders go wrong. The first sample might use a different fabric lot, a lighter zipper, or a temporary print method that does not match the final production process. To avoid that problem, ask for a blank prototype if the construction is new, then a printed sample, and finally a pre-production gold sample if anything changes after approval. The goal is not more paperwork; it is to make sure the signed-off sample is actually tied to the run on the floor.
The best sample review uses the real contents, not an empty bag on a table. Fill the sample with the intended insert set, carry it by the handles, inspect the print under normal light, and check how the gusset holds shape. Measure width, height, depth, and handle drop after the bag is sewn. If the bag will be distributed in quantity at a fixed event, take photos of the approved sample next to the ruler and the artwork file reference. That makes later disputes much easier to resolve.
- Require the final sample to use the same fabric, print method, handles, and closure as production.
- Test the sample with the actual insert list and carry weight.
- Keep the approved sample tied to the exact art file, material lot, and sewing spec.
QC Checks and Acceptance Thresholds
QC should be written as measurable acceptance criteria, not as a vague promise to inspect carefully. For this product, the most useful checks are dimensions, seam quality, handle reinforcement, print placement, closure function, odor, and carton condition. A buyer should know exactly what passes and what fails before production starts. That avoids the common problem where the factory thinks loose threads are normal and the buyer thinks they are sloppy workmanship.
Use a simple lot-based inspection plan and enforce it consistently. For a low-risk bag, a practical threshold is zero critical defects, no more than two major defects, and no more than five minor defects in the inspected sample. Size should stay within plus or minus 0.5 cm on width and height, plus or minus 0.5 cm on gusset depth, and plus or minus 1 cm on handle drop. Print registration should stay within 3 mm of the approved location. If a zipper is included, it should cycle cleanly for ten consecutive open-close tests without snagging. Those numbers are easy to communicate and hard to misunderstand.
- Write the defect thresholds into the PO or quality appendix before production begins.
- Use a sample size tied to lot quantity so the inspection is not arbitrary.
- Reject any shipment with critical defects, open seams, major print shifts, or carton damage that threatens transit.
Schedule, Freight, and Delivery Risk
Lead time is often quoted too aggressively because the supplier is only counting sewing days. In reality, the schedule also includes artwork approval, screen or transfer preparation, material booking, sample review, carton sourcing, packing, and export handoff. If any of those steps slip, the event date slips with them. That is why the buyer should request a schedule that names the dependency points, not just one optimistic production window. If the supplier cannot tell you what will happen if art approval is late, the schedule is not ready for procurement.
The safest planning method is to work backward from the delivery date and add a buffer for customs clearance, inland movement, and warehouse receiving. For campaign orders, a small delay can force emergency courier costs or cause the bags to miss the event entirely. Freeze the spec early, avoid late artwork changes, and do not change the packing plan after production has started unless the operational benefit is worth the reset. The cheapest production run is not useful if it arrives after the campaign opens.
- Separate sample time, production time, export time, transit time, and receiving time.
- Freeze the artwork before the factory books print setup.
- Keep a buffer for customs clearance, inland delivery, and warehouse intake.
Specification comparison for buyers
| Spec decision | Recommended option | When it fits | Buyer risk to check |
|---|---|---|---|
| Supplier route | Direct factory with export experience and written QC process | You need quote transparency, repeatability, and control over sewing, print, and packing | Confirm who actually cuts, sews, prints, and cartons the bags; intermediary quotes can hide pass-through costs |
| Fabric weight | 10 oz to 12 oz canvas for standard event use; 14 oz when the bag carries books, bottles, or gift sets | The bag should feel substantial and survive a full event day or repeated reuse | Ask whether the quote is based on finished fabric weight or base cloth weight, and confirm shrinkage allowance |
| Stitch construction | Double-needle side seams, reinforced handle attachment, and dense bar-tacks at stress points | The tote will be loaded, carried on the shoulder, or reused after the campaign | Single-needle seams and weak handle joins are the most common failure points; ask for stitch density and seam allowance |
| Print method | Screen print for simple logos and stable volume; digital or transfer only when the artwork truly needs it | The design is limited to one to two colors or needs a reliable unit cost at scale | Check color count, curing method, rub resistance, and whether print placement crosses a seam |
| Closure style | Open top for handout packs; zipper top only when contents need protection or a premium feel | The bag holds donor gifts, notebooks, or mixed contents that can spill out | A zipper changes cost, lead time, and fault risk; confirm zipper gauge, puller style, and color match |
| Carton pack and cube | Nested flat packing with a defined inner count and carton size that uses the box efficiently | You want lower freight cost and faster warehouse receiving | Oversized cartons waste air freight or cube space, while overfilled cartons crush corners and deform bags |
| Compliance documents | Supplier business license, export capability, material declaration, origin statement, and any applicable test reports | You need a traceable file for internal procurement approval or import review | Do not accept a quote without knowing which documents are available, current, and tied to the exact fabric and print process |
| Sample package | Blank proto, printed sample, and pre-production gold sample for higher-value orders | Artwork, handle spec, or closure detail needs sign-off before mass production | A sample made from different fabric or with a different zipper can create false confidence |
| Quote format | Itemized quote with fabric, sewing, print, packing, carton, and freight assumptions separated | You need a clean apples-to-apples comparison across suppliers | A lump-sum quote can hide setup fees, excluded packaging, or a cheaper spec than the buyer expects |
Buyer checklist before sampling
- Define the actual use case first: registration handout, donor gift, volunteer pack, sponsor pack, or resale item, because the load requirement changes fabric, handles, and closure.
- Build the bag around the contents list, including dimensions and weight of notebooks, brochures, bottles, gifts, or inserts, rather than guessing a generic tote size.
- Lock the finished dimensions in writing, including width, height, gusset, handle drop, and acceptable tolerance, so samples and production can be measured against the same spec.
- Choose the fabric weight band and surface finish, then state whether you want natural, bleached, dyed, or pre-washed canvas.
- Limit the artwork to the number of colors your budget and MOQ can support, and define the exact print box with a measured artwork file.
- Decide whether the bag needs an open top, zipper, snap, or internal pocket before you request pricing, because those choices change both cost and lead time.
- Ask for a blank prototype, a printed sample, and a pre-production gold sample whenever the order is large enough that a mistake would be expensive.
- Require itemized pricing for fabric, sewing, print setup, sample charges, packing, cartons, and the freight basis, not just one blended unit price.
- Request supplier documents that match the exact production site, including business registration, export capability, country-of-origin statement, and any available test reports or material declarations.
- Set the packing standard in advance: units per inner pack, units per carton, carton dimensions, carton marks, and whether palletizing is required.
Factory quote questions to send
- What exact fabric weight, weave density, and shrinkage allowance are included in the quote, and how will you handle a mill substitution if stock changes?
- Is the price based on finished cloth weight or base cloth weight, and does it include pre-shrinking, washing, or any surface treatment?
- How many print colors are included, what is the setup charge per color, and does the quote cover one side, two sides, or a print that crosses the seam?
- What are the exact stitch details at the handle and side seam, including seam allowance, stitch density, and reinforcement method?
- What is the MOQ by design, by fabric color, and by closure style, and how does the MOQ change if we add a zipper, lining, or pocket?
- What sample stages are included: blank proto, printed sample, and pre-production gold sample, and how long does each stage take?
- What packing method is assumed, including inner pack count, carton count, carton dimensions, gross weight, and carton markings?
- Which documents can you provide for compliance and import review, such as material declaration, origin statement, test report, or factory profile?
- What inspection standard do you use before shipment, and can you share photos, a checklist, or a third-party report if we request one?
- Are freight, duties, brokerage, and destination charges excluded, and which Incoterm is this quote based on?
Quality-control points to confirm
- Use a simple acceptance plan tied to lot size: inspect 32 units for lots up to 500, 50 units for 501 to 1,200, 80 units for 1,201 to 5,000, and 125 units above 5,000.
- Set defect thresholds in advance: 0 critical defects, no more than 2 major defects, and no more than 5 minor defects in the sampled lot, unless your internal QA standard is stricter.
- Finished dimensions should stay within plus or minus 0.5 cm for width and height, plus or minus 0.5 cm for gusset depth, and plus or minus 1 cm for handle drop.
- Fabric weight should stay within plus or minus 5 percent of the approved ounce or GSM target, and no panel should appear obviously thinner when held under tension.
- Handle attachment must show complete bar-tacks or reinforced stitching with no skipped stitches, no open seam ends, and no loose thread bundle longer than 2 cm at the stress point.
- Print registration should stay within 3 mm of the approved position, with no pinholes, smudging, ghosting, or visible seam distortion in the artwork area.
- If a zipper is used, it should open and close cleanly for 10 consecutive cycles without catching the seam allowance, separating teeth, or exposing uneven tape attachment.
- Cartons should match the approved count and mark format, with no crushed corners, split seams, or excessive bulging that would suggest overpacking or poor stacking strength.