Define the product like a procurement brief, not a mood board
For boutiques, canvas conference bags sit in a tricky middle ground. They are not disposable event swag, but they are not hard goods either. They need to look retail-ready, carry comfortably, survive handling, and still leave enough margin for the brand and the buyer. That means procurement should start with a product brief, not with the logo file. If the brief is vague, every factory will fill in the blanks differently, and you will end up comparing prices that do not describe the same bag.
Write the use case first. Is the bag meant to hold a catalog and samples for a conference, serve as a branded retail gift, support a trunk show, or work as a resale item at boutique checkout? Each use case changes the structure you need. A giveaway bag can tolerate lighter fabric and simpler packing. A retail bag has to hold shape, present cleanly on display, and survive repeated touchpoints without loose threads, crooked branding, or a weak handle attachment.
The fastest way to make quotes usable is to freeze the buyer’s own decisions before sending RFQs. Set the finished size, gusset depth, handle drop, max load expectation, print zone, and packing requirement first. Then ask suppliers to quote against that same spec. If one factory pushes back, that is useful information. It tells you where your assumptions are incomplete before they become production problems.
- Treat the bag as a retail SKU when it will be sold or gifted in front of customers.
- Define expected load by contents, not by a vague “heavy duty” note.
- Keep the print area and handle geometry fixed before requesting pricing.
- Separate aesthetic wants from functional must-haves so suppliers can quote to the real target.
Choose canvas weight, weave, and finish for the channel
Canvas weight is usually the first number buyers ask for, but it should not be the only one. For canvas conference bags for boutiques wholesale buying checklist decisions, a useful range is often 10 oz to 14 oz natural canvas, with the final choice depending on how much body the bag needs and how premium it should feel in hand. A 10 oz bag can be perfectly workable for a light insert kit or a bag that needs to fold flat. A 12 oz or 14 oz bag usually gives a more structured silhouette, better print stability, and a more retail-like appearance.
The fabric finish matters as much as weight. Raw canvas tends to look more natural and economical, but it may show more irregularity and can feel stiffer. Washed or softened canvas often gives a better hand feel and less initial stiffness, but the buyer should ask whether washing changes shrinkage, shade, or seam stability. Dyed canvas can strengthen brand presentation, yet it can also affect MOQ, lead time, and color consistency across reorders. If the bag must match other boutique packaging or adjacent products, request fabric swatches before quoting the full order.
Weave density, yarn consistency, and finish affect how the bag performs under printing and sewing. A light but tight weave may hold ink cleanly and look sharp. A heavier but loose weave may show slubs or distortion after stitching. Ask the supplier to identify whether the canvas is standard woven, duck canvas, or another common construction, and how they manage shade control across production lots. Procurement teams do not need textile lab jargon, but they do need enough specificity to compare one factory’s “12 oz canvas” to another factory’s version of the same phrase.
- Use 10 oz for lighter use, lower price points, and fold-flat programs.
- Use 12 oz for the most balanced mix of structure, print quality, and cost.
- Use 14 oz when the bag must feel substantial or carry heavier contents.
- Ask whether quoted fabric weight is finished weight or greige weight.
- Request swatches and confirm shade tolerance if the order will be reordered later.
Specify the bag construction details that actually change usability
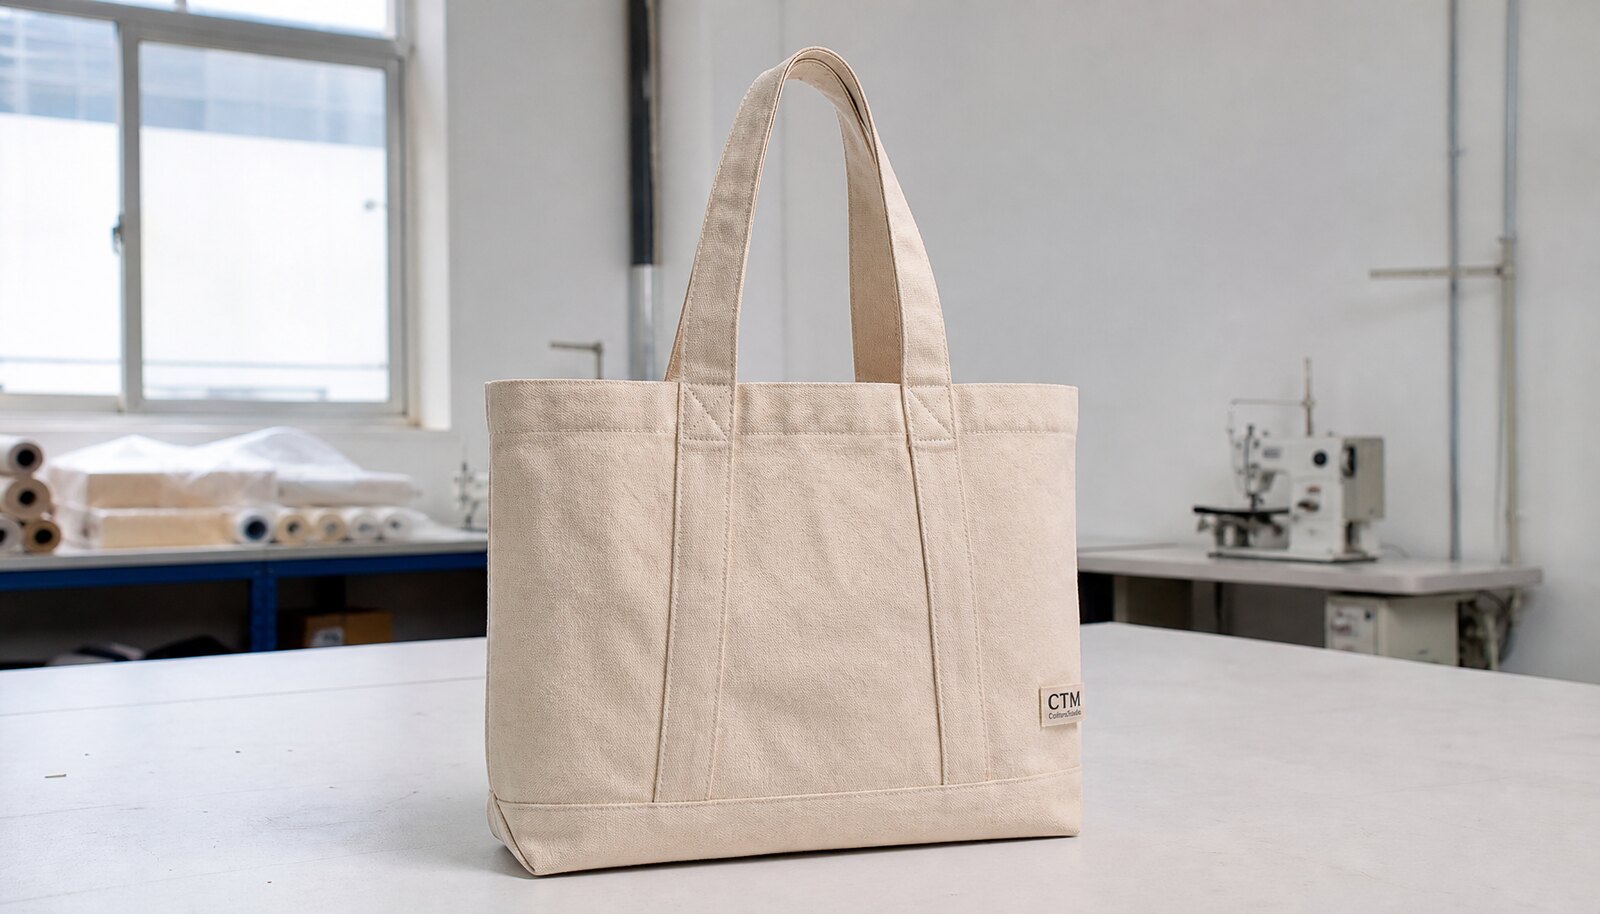
Boutique buyers often over-focus on the logo and under-spec the structure. In reality, handle design, seam finish, lining, and closure style change how the bag feels to the customer and how it behaves in production. The difference between a bag that looks custom and one that feels generic is often found in details that do not show up in a one-line quote. That is why the RFQ should specify construction, not just dimensions.
Start with the handles. Ask for handle width, handle length, and handle drop. A handle that is too short can make the bag awkward to shoulder, while a handle that is too long may twist or hang badly. Self-fabric handles create a cleaner, more integrated look. Webbing handles can improve durability and hold shape better, but they may change the visual tone. Either way, ask for folded edge treatment and reinforcement at the attachment points. A handle that is sewn on without proper reinforcement can fail long before the body fabric wears out.
Then decide whether the bag should be lined, partially lined, or left unlined. Unlined bags are simpler and cheaper, but lining improves perceived value and protects the interior from loose fibers. A bottom board or insert can also help the bag sit upright, which is useful for boutique display. Closures deserve the same discipline. Open-top bags are easier to make and more economical. Zippers and snaps add value, but they also add material cost, labor, and potential failure points. If a closure is included, the buyer should specify alignment expectations and whether it should be decorative or load-bearing.
Seam construction matters too. Ask whether the factory will use side seams with overlock, binding, French seams, or another method appropriate to the design. For a premium retail bag, a clean interior edge is worth paying for if the bag will be visible when opened. The practical rule is simple: if a detail changes the product’s function, pack-out, or retail feel, it belongs in the quote, not in a later discussion after sample approval.
- Define handle width, handle length, and handle drop in inches or centimeters.
- Specify whether the bag is open-top, zip top, snap top, or another closure.
- Ask for lining, pocket, and bottom board as separate line items if they matter.
- Require reinforcement at every handle attachment point.
- State whether interior seam edges must be finished for retail display.
Match decoration method to artwork, price point, and repeatability
Decoration is where many boutique programs lose margin without realizing it. A simple logo can be decorated in several ways, and each method affects both the look and the production risk. Screen print is usually the baseline option for simple one- or two-color artwork. It offers strong coverage, clear edges, and dependable unit economics when the design stays fixed. If the logo is large and uses flat fills, screen print is often the most practical choice. The buyer should still confirm ink type, cure method, and print placement tolerance so the result does not look shifted or patchy.
If the brand wants a subtler retail aesthetic, woven labels, patches, embroidery, or a side trim detail can work better than a full front print. These options can make the bag feel more boutique-friendly, but they often carry higher labor and setup costs. Embroidery can look premium, yet it may pucker lighter canvas or distort a large logo. Patches and woven labels add tactile value, but they need attachment specs, edge finishing, and placement control. A label that curls at the edge can undermine the entire retail impression.
When artwork is more complex, buyers sometimes consider heat transfer, digital print, or a combination approach. Those can be useful for short runs or detailed graphics, but they should be evaluated carefully for hand feel, durability, and color consistency. Ask the supplier to quote separate pricing for each decoration method rather than recommending one too early. The right method is the one that fits the artwork, the unit economics, and the reorder plan. If the brand expects replenishment, the chosen decoration should be repeatable without constant re-approval or re-tooling.
- Use screen print for simple logos and repeat orders.
- Use embroidery, woven labels, or patches for a quieter premium look.
- Ask how the method affects print area, hand feel, and MOQ.
- Require cure or finishing confirmation for any ink or transfer process.
- Request that decoration placement be measured on the sample, not estimated visually.
Build a quote comparison that normalizes every hidden variable
Procurement buyers do not lose margin because suppliers are expensive; they lose margin because quotes are not comparable. One factory may quote only the shell bag, another may include lining and polybagging, and a third may hide part of its cost in sample or setup fees. Before comparing unit price, normalize the quote by using the same spec sheet, the same packing method, the same destination term, and the same decoration assumptions. If the pricing basis is different, the cheapest quote may simply be the least complete quote.
A useful quote-comparison framework starts with line-item transparency. Ask for fabric cost, labor, decoration setup, accessories, packing, cartonization, and any administrative or testing costs separately if possible. Then compare the same Incoterm across all suppliers. EXW, FOB, and DDP are not interchangeable. If one supplier is quoting factory gate price and another is quoting a delivered price, the difference may disappear once freight, duty, local handling, and clearance are added. Procurement teams should normalize to landed cost wherever possible, or at minimum create a standard comparison worksheet that includes freight assumptions and import charges.
There are also price traps that matter specifically for canvas conference bags. A low quote may exclude handle reinforcement, use a lighter fabric than requested, charge extra for each ink color, or quietly change the packing method to reduce labor. Another common issue is quoting a low MOQ price that is not available on reorder. That matters for boutiques, because the first drop may sell well and the second order needs to match the first. Ask suppliers how pricing changes by quantity break, by color, and by packaging. If the quote seems unusually low, ask what was removed to get there. That question usually reveals the real difference.
- Compare quotes on the same fabric weight, same dimensions, same decoration, and same packing route.
- Ask for separate line items when the quote seems suspiciously low or unusually bundled.
- Normalize all quotes to one Incoterm before judging unit cost.
- Request reorder pricing, not only first-order pricing.
- Use a comparison sheet that separates product cost from freight, duty, and local handling.
Read MOQ as a production logic issue, not just a sales number
MOQ is often treated like a barrier, but it is really a production equation. A factory sets MOQ based on fabric booking, cutting efficiency, print setup, labor content, and packing complexity. If the bag uses natural canvas with a simple one-color logo, MOQ can often be lower than for a dyed bag with lining, zipper, and retail inserts. If the supplier gives you a low MOQ but the price rises sharply, that is usually not generosity; it is the factory recovering inefficiency elsewhere in the quote.
For boutique buyers, the important question is whether the MOQ supports a test run without making the unit cost unrealistic. A launch order may be modest, but the spec should still be stable enough to repeat. If the first run is designed as a market test, choose a spec that can be re-ordered with minimal changes. If the factory says a small quantity is possible only if the bag becomes simpler, ask what is being removed. Reducing order quantity by dropping reinforcement, changing fabric weight, or simplifying packing can create a bag that is no longer the same product.
MOQs also shift when you change color, closure, lining, or decoration method. Dyed canvas often raises the bar because of material booking and color consistency. Custom zippers, metal snaps, pockets, and branded inserts all add extra setup. That means buyers should sort their requirements into two groups: what is essential for the product to work, and what is merely desirable. The fewer moving parts you add, the easier it is to hold MOQ, control cost, and keep replenishment simple.
- Expect MOQ to rise when you add dyed fabric, lining, closure hardware, or custom inserts.
- Use the first order to test the market, but preserve the exact spec if replenishment is likely.
- Ask the factory which spec change has the biggest effect on MOQ before you decide what to simplify.
- Do not accept a lower MOQ if it changes the product into a different SKU.
- Keep the sample and reorder construction identical whenever possible.
Use samples to verify construction, not just artwork approval
A sample that only proves the logo is not enough. For canvas conference bags, the sample has to prove how the product behaves when made at scale. That means the pre-production sample should match the final fabric weight, handle length, reinforcement, print method, closure, and packing method. If the sample arrives with the right artwork but the wrong hand feel or seam finish, the buyer should not treat it as a pass. Production defects often come from the details that looked small in the sample stage.
The most useful sample review is practical and comparative. Put the sample next to the spec sheet and measure the parts that can drift: finished dimensions, gusset depth, handle drop, logo placement, and pocket position if relevant. Then inspect the details that affect durability. Look at handle folds, bar tacks, stitch start and stop points, seam allowance, and the cleanliness of the interior edges. If the bag has a zipper, open and close it several times and check alignment. If it has a snap, confirm that it closes evenly and does not distort the top edge.
A simple load test is worth doing before bulk approval. Use a realistic weight for the intended use case and let the bag hang or carry that load long enough to reveal weak stitching or twisting handles. You do not need a lab to spot obvious issues. You need consistency. If one side seam is tighter than the other, or the handle angle pulls the bag off center, that problem will scale with the order. Review the sample in daylight or neutral light so you can see shade variation, print opacity, and edge quality accurately. The purpose of the sample is not to admire it. It is to decide whether the production process is safe to start.
- Measure the sample against the written spec, not against memory.
- Check print placement, handle symmetry, and seam finish under daylight.
- Pull-test handles and inspect bar tacks before approving bulk.
- Use the sample to confirm final packing method as well as product construction.
- If the sample differs from the spec in a material way, reset approval rather than “fixing it in bulk.”
Write a QC plan with measurable acceptance criteria
A procurement QC checklist should be specific enough that a supplier can understand it and a receiving team can use it. For canvas bags, that means moving beyond “good stitching” and “nice print.” Set measurable criteria before production starts. For example, define allowed variance for finished size, gusset depth, and handle length. Smaller tolerances should apply to logo placement than to soft-goods overall dimensions, because the customer will notice a crooked mark faster than a 5 mm size drift on a fabric tote.
Stitch quality deserves more than a visual glance. Ask for a defined stitch density range and a clear reinforcement pattern at the handles. Handle attachment should show consistent bar tacks or equivalent reinforcement, with no skipped stitches, loose thread ends, or uneven load distribution. Seam allowance should be consistent enough that the bag does not twist or distort when weight is added. If the supplier cannot describe the stitch standard, they probably do not control it tightly enough for a repeat boutique program.
Print QC also needs a concrete method. Ink should be checked for registration, opacity, cure, and rub resistance. A print that looks fine under the factory light can still crack, stick, or transfer when stacked in a carton. If heat or transfer decoration is used, verify curing or bonding before packing. For bags with lining, pockets, closures, or inserts, add checks for functional alignment and edge finishing. Finally, use an AQL-style sampling approach for inbound inspection. You do not need to make the article depend on one formal standard, but you do need a disciplined sampling plan: inspect across cartons, not just the top layer; review from multiple pallet positions; and increase scrutiny on the first cartons opened from each shipment.
The most useful QC plan is the one that names what will trigger rejection or rework. For example: print off-center beyond the agreed tolerance, visible stains, broken stitching, handle reinforcement gaps, incorrect barcode placement, wrong carton count, or units that arrive compressed beyond acceptable retail presentation. When the team knows what “pass” and “fail” look like, the factory can manage to the same target instead of guessing.
- Set tolerances for finished size, handle length, and logo placement before production starts.
- Define stitch density expectations and reinforcement type at handles and high-stress seams.
- Test print cure or adhesion with a practical rub/flex check.
- Inspect multiple cartons from different pallet positions, not just the easiest ones to open.
- Document reject reasons so the supplier can correct process drift on the next run.
Make packing and carton specs part of the product, not an afterthought
Packing can make or break the retail value of a canvas conference bag. A bulk-packed bag may save unit labor and reduce packaging waste, but if it arrives creased, dusty, or compressed, the buyer will pay for that later in labor or presentation problems. If the bags are going to a warehouse that can rework them, bulk packing may be perfectly appropriate. If they need to go straight to stores or arrive shelf-ready, packing becomes part of the product specification.
The buyer should choose the packing route based on how the bag moves after import. For warehouse-only programs, cartons can be packed by style and size with clear count labels, protective tissue, and a reasonable stack method that prevents permanent creasing. For retail distribution, individual polybags, barcode stickers, inserts, and neatly folded units may be worth the extra cost because they reduce downstream labor. If a supplier says “standard packing,” ask what standard means in unit count, fold method, polybag thickness, and moisture protection. Without that detail, the quote is incomplete.
Carton planning also affects freight. Bigger bags or heavier canvas can create carton weight and volume issues that change landed cost quickly. Ask for carton dimensions, gross weight, and recommended stack height. If the cartons are too full, the bag can crease or deform. If they are too loose, the units shift around and arrive looking inconsistent. The same is true for carton markings. Production code, PO number, style number, and carton sequence should all be agreed before goods are packed. Inbound teams work faster when the outer packaging is readable and consistent, and that improves the odds that the shipment is accepted without friction.
- Specify bulk pack or individual polybag in the RFQ, not after production starts.
- Confirm carton count, carton size, gross weight, and stack height.
- Require clear carton marks, style code, PO number, and quantity per carton.
- Add moisture protection if the shipment will travel through humid routes or long transits.
- Align packing choice with the receiving workflow at the destination.
Plan lead time, shipping terms, and replenishment before you place the order
Lead time problems usually begin with change. A simple natural canvas bag with one-color print can move faster than a bag that needs dyed fabric, lining, multiple closures, and custom retail packing. Each added detail expands the number of decisions the factory has to coordinate. That is why buyers should ask suppliers to break lead time into stages: material booking, sample approval, bulk production, inspection, and packing. A single calendar number is less useful than a staged schedule because it shows where the real risk sits.
Shipping terms matter because they change the way procurement compares offers. EXW, FOB, and DDP are not just commercial labels; they determine which party controls freight booking, export handling, customs exposure, and local delivery. If you compare one quote at factory gate and another quote delivered to your warehouse, you are not comparing the same thing. For procurement teams, landed cost should include the bag, decoration, packing, freight, duty, and last-mile handling wherever possible. Even a small difference in freight method can turn a slightly lower factory price into a higher total cost.
Replenishment should be planned while the first order is being written. Boutique programs often sell through faster than expected, and a second order needs to match the first order’s approved spec. If the bag is likely to reorder, keep the construction stable and avoid one-off customization that cannot be repeated without delay. Ask the factory what minimum advance notice they need to hold fabric, screens, labels, or packaging materials for the next run. That question is a useful indicator of how well the supplier manages repeat business. A factory that can repeat the order cleanly is usually more valuable than one that only offers a sharp opening price.
If the program is seasonal, build contingency time into the calendar. A missed print approval, a late fabric booking, or a carton label correction can push the order into the wrong selling window. For boutique buyers, that is often more damaging than a small unit-cost increase. The best sourcing plan is the one that leaves enough time to approve, inspect, correct, and still ship before the merchandise loses its commercial value.
- Ask for a stage-by-stage lead time, not a single delivery promise.
- Compare all offers on the same shipping term and destination basis.
- Protect repeatability by keeping the first-order spec easy to reorder.
- Confirm how much notice the factory needs to book materials for replenishment.
- Build a buffer for artwork approval, packing corrections, and final inspection.
Specification comparison for buyers
| Buying decision | Practical option | Best-fit use case | Quote trap to avoid |
|---|---|---|---|
| Fabric weight | 10 oz natural canvas | Low-cost promotional drops, fold-flat gifting, or lighter literature kits | Do not accept a quote that uses greige or unfinished weight while comparing it to finished fabric pricing |
| Fabric weight | 12 oz natural canvas | Balanced option for boutiques that need body, print clarity, and repeatability | Check whether shrinkage was already accounted for before the finished dimensions were set |
| Fabric weight | 14 oz canvas or heavier | Premium retail feel, heavier inserts, or bags that must stand upright better | Watch for higher freight and carton weight that can erase the fabric savings |
| Handle spec | Self-fabric handles with wide attachment points | Most boutique retail programs where a clean, minimal look matters | Confirm handle drop, width, and reinforcement because a long handle can twist if bartacks are too short |
| Handle spec | Webbing handles or reinforced self-fabric handles | Higher-load bags or orders where durability matters more than an all-fabric aesthetic | Ask whether the quote includes extra stitching, folded edges, and color-matched thread |
| Closure style | Open top | Quick access, lower cost, and simpler bulk packing | Do not assume open-top bags are acceptable if the bag will be sold as a premium gift item |
| Closure style | Zip top or snap top | Higher-perceived value, security for contents, and better shelf presentation | Confirm whether the closure changes usable print area and leads to extra labor or material charges |
| Interior build | Unlined shell | Best for price-sensitive programs and short lead times | Check if seam edges are clean enough for retail display without fraying or loose fibers |
| Interior build | Full lining with pocket or board insert | Premium boutique programs that justify a higher selling price | Make sure the quote specifies lining fabric, pocket count, and board material instead of assuming they are included |
Buyer checklist before sampling
- Lock the finished size, gusset depth, handle length, handle drop, and usable print area before requesting quotes.
- State fabric weight in both oz and gsm, and specify whether the canvas should be raw, washed, dyed, or softened.
- Choose the construction level up front: unlined shell, lined body, bottom board, pocket, zipper, snap, or open top.
- Define branding details in writing: print method, ink colors, print size, print position, and whether the logo needs front, back, side, or gusset placement.
- Ask suppliers to quote the same packing method, carton count, carton dimensions, and whether units are bulk packed or individually polybagged.
- Request a pre-production sample that matches the approved fabric, trim, print, and packing format, not just a visual artwork proof.
- Set measurable QC limits for stitch density, seam allowance, print registration, shade variation, and handle reinforcement before bulk approval.
- Normalize all quotes to the same Incoterm, shipping destination, and included line items so factory price and landed cost can be compared fairly.
- Confirm lead time by stage: sampling, material booking, bulk production, inspection, and packing, and ask what events trigger delay.
- Require inbound inspection criteria for carton condition, unit count, barcode legibility, odor, moisture, and visible defects before goods are accepted.
Factory quote questions to send
- What is the exact fabric specification, including oz, gsm, weave type, finishing, and whether the weight is finished or greige?
- What are the finished dimensions, gusset depth, handle length, handle width, and usable print area for this quote?
- Does the unit price include lining, pocket, board insert, zipper, snap, piping, or only the shell bag?
- What print method is quoted, how many colors are included, what is the registration tolerance, and what are the setup charges?
- What thread type, stitch density, seam allowance, and reinforcement pattern are included at the handle and bottom seams?
- What is the MOQ by spec change, such as color, lining, closure, print colors, or packaging format?
- Can you break the sample schedule into artwork proof, strike-off, pre-production sample, and bulk approval milestones?
- What is excluded from the quote: freight, duty, testing, carton labeling, barcode application, inserts, or polybags?
- What carton pack count, carton size, gross weight, and stack height do you recommend for this bag size?
- Can you share a photo set, inspection report, or QC checklist from a similar canvas bag order so we can review your process?
Quality-control points to confirm
- Measure finished dimensions, gusset depth, and handle drop against the approved spec with an agreed tolerance, typically tighter on print placement than on overall soft-bag dimensions.
- Check stitch density in multiple locations and require consistent spacing, with special attention to handles, side seams, and bottom seams where stress concentrates.
- Inspect reinforcement details such as bar tacks, boxed X stitching, folded handle ends, and seam overlap to make sure the load path is continuous.
- Perform a simple load test using a realistic weight for the bag’s use case, then recheck seams, handles, and distortion after the bag is lifted and held.
- Review print registration, ink opacity, edge crispness, and cure quality in daylight or neutral light, not only under factory lamps.
- Rub-test or flex-test the print lightly to see whether cracking, tackiness, or transfer appears after curing or packing.
- Check fabric for slubs, shade banding, stains, oil marks, loose threads, needle holes, and weave irregularity before goods are packed.
- Verify lining attachment, pocket placement, zipper alignment, snap placement, and top-edge finishing if those features are part of the order.
- Open cartons from different pallet positions and inspect for count accuracy, compression marks, moisture, and packing drift.
- Use a practical AQL-style sampling plan for inbound inspection: check more units from the first cartons, then randomize across the shipment to catch process variation.