1. Why museum book fair totes need a different print decision than standard promo bags
Canvas book fair totes for museums sit in a procurement category that is easy to underestimate. They are not only a giveaway item, and they are not quite a fashion tote either. In a museum shop, the same bag may be used as a retail SKU, an event carry bag, a member gift, or a packaging alternative for books and catalogs. That mixed use changes the buying logic. The print method must support visual quality, repeat-order stability, and enough durability to survive handling without driving the landed cost out of range.
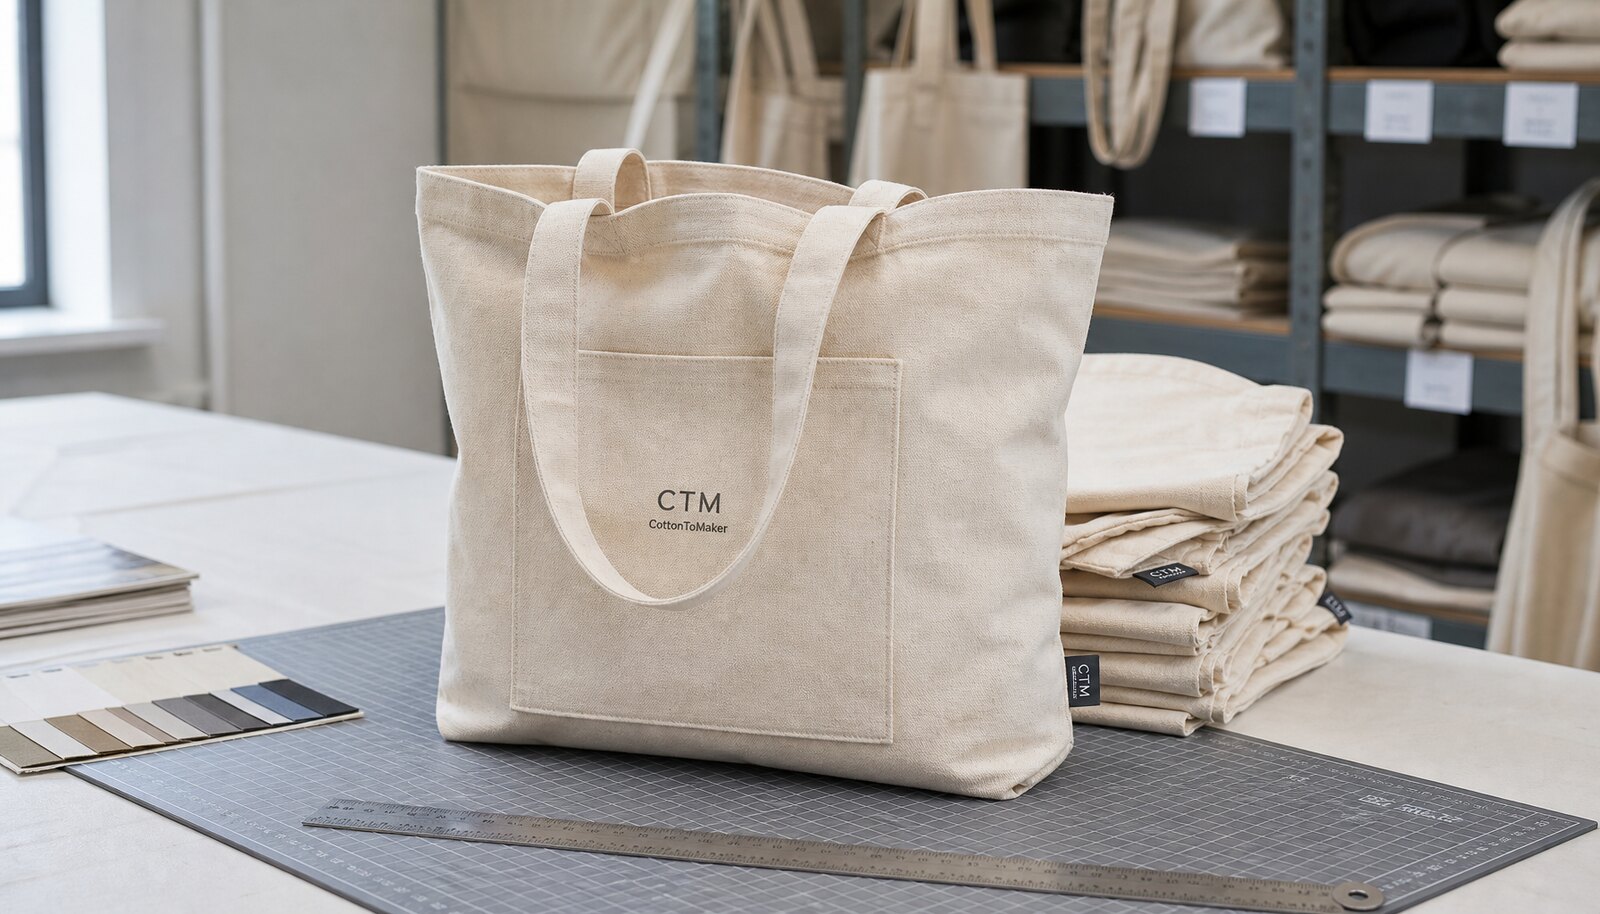
For museum buyers, the decoration decision is usually the point where a tote either becomes a credible retail item or stays in the promo bucket. A simple logo printed on natural canvas can look elegant if the ink density, bag weight, and placement are right. The same logo can look cheap if the canvas is too thin, the print is patchy, or the artwork is oversized and fights the bag shape.
The practical question is not, “Which print method is best?” It is, “Which print method best matches the artwork, order size, and usage pattern?” That answer changes when the tote is for a one-day book fair, a year-round museum shop, or a seasonal exhibition with a one-off visual identity.
- Retail use favors cleaner finishing and tighter print control than a pure giveaway tote.
- Museum artwork often needs restraint rather than oversized promotional graphics.
- The right method depends on artwork complexity, order volume, reorder likelihood, and expected load.
2. Bag body specification first: canvas weight, weave, and structure
Before a buyer compares print methods, the bag body needs to be defined. The same decoration can look good on one canvas weight and poor on another. For most museum book fair programs, 12 oz to 16 oz canvas is the practical range. A lighter bag can reduce cost, but it may not stand up well when loaded with books. A heavier bag improves structure and shelf presence, but it also increases sewing effort, folding bulk, and freight weight.
The spec should use more than one fabric descriptor. Ask for the finished fabric weight in GSM or oz, the fiber composition, whether the canvas is natural, bleached, dyed, or washed, and whether the weave is tight enough to support the intended artwork. A loose weave gives a softer, more rustic look, but it can make fine text less crisp and can let lighter inks show unevenly. A tighter weave generally gives better print definition and helps the bag keep its shape on a shelf.
Handle construction matters as much as fabric weight. Museum and book fair totes usually need reinforced handles, especially if the bag is expected to carry books flat. Self-fabric handles are common, but the handle attachment point should be reinforced with bar-tacks or a comparable stitch reinforcement. If the tote is sold retail, buyers should also define the finished handle drop, because a short drop looks awkward on the shoulder and a long one can make the bag feel oversized for a shop display.
- 12 oz: suitable for lighter event bags and lower-cost distribution.
- 14 oz: a common middle ground for museum shops and book fair carry use.
- 16 oz: stronger shelf presence and better support for heavier books or catalog bundles.
- Specify natural, bleached, washed, or dyed canvas because the print contrast changes materially.
3. Print method comparison: what changes in setup cost, color limits, and reorder behavior
The main decoration methods for canvas book fair totes are screen print, heat transfer, digital print, embroidery, and in some cases a sewn label or patch. Each method behaves differently on canvas, and buyers should compare them on the factors that affect procurement decisions rather than only on appearance.
Screen print is usually the baseline for a simple museum logo. It offers strong opacity on natural canvas, handles solid fills well, and becomes cost-efficient once the screens are made. The setup cost is the tradeoff. Every color generally adds a screen, and every new artwork version can add new setup work. If the tote is reordered next season with the same design, the economics are usually favorable. If the design changes often, the setup burden becomes more noticeable.
Heat transfer is useful when the artwork is more detailed or when the order quantity is too small to justify multiple screens. It can reproduce color detail that screen print would simplify, but the buyer should ask about edge lift, pressure settings, and whether the transfer stays stable after repeated folding. Transfer methods vary widely in durability, so a sample that looks sharp may still be weak in wear.
Digital print is useful for complex or color-heavy artwork. It can reduce the need for screens and is usually easier to use for lower MOQ orders or changing graphics. The limitation is not just cost. On natural canvas, the weave can affect how the image resolves, and some buyers dislike the softer hand-feel or less saturated appearance compared with a well-executed screen print.
Embroidery is a premium option for small marks, initials, or restrained branding. It is generally not the right method for large exhibition graphics, because the stitch density can add weight, create puckering, and push cost up quickly. A sewn patch or woven label can also work well when the museum wants subtle branding rather than a large front-panel graphic.
- Screen print: best for bold logos, text, and repeat reorders.
- Heat transfer: good for short runs and more complex art, but durability needs testing.
- Digital print: useful for detailed artwork and lower setup burden, but unit cost can stay high.
- Embroidery: suitable for small premium marks, not large graphic coverage.
- Sewn labels or patches: useful for subtle branding or layered retail positioning.
4. Side-by-side procurement comparison of print methods
The most useful comparison is the one that helps a buyer choose under real procurement constraints. The table below focuses on the decisions that matter to B2B buyers: setup cost, color limits, durability tradeoffs, decoration tolerance, and how the method behaves on a reorder. It is less about what looks good in a sample photo and more about what survives an RFQ, a production run, and a second order.
For museum buyers, reorder behavior matters because many programs repeat annually or by exhibition cycle. A method with lower unit cost but high setup cost may be ideal if the same artwork returns every year. The opposite can be true for one-off exhibitions with short runs and changing visuals.
- Compare methods on the full cost structure, not just the piece price.
- Evaluate how many colors the artwork truly needs, not how many are in the original file.
- Treat durability as a function of both material and decoration process.
5. Supplier route matters: factory vs trader, and in-house vs outsourced decoration
The sourcing route changes accountability. A direct factory can give better control over cutting, sewing, and decoration if the print is done in-house. That makes sample approval, color control, and rework responsibility easier to pin down. If the factory also packs and ships the order, there are fewer handoffs where mistakes can happen.
A trader or sourcing agent can still be useful, especially when the buyer manages multiple items across different product categories. The tradeoff is that responsibility may become less direct. If the trader outsources decoration to another workshop, the buyer should ask who controls the print run, who signs off on the sample, and who pays for correction if the first production batch is off color or off placement. The same question applies when a factory outsources embroidery, digital print, or a specialty transfer process.
In-house decoration is not automatically better, but it usually reduces coordination risk. Outsourced decoration can work well if the supplier has a clear QC process and can show that the same production route will be used for both the sample and the bulk order. The warning sign is a sample made in one workshop and a bulk run made in another without a written approval trail.
For museum procurement, the safest route is the one that documents the production chain. If the order is event-driven and the artwork is fixed, direct factory sourcing with in-house decoration often gives the cleanest line of accountability. If the order is design-heavy and the run is short, a supplier with strong specialized decoration capability may be more appropriate than a generic tote factory.
- Direct factory: stronger accountability for spec, sample, and bulk consistency.
- Trader: useful for multi-item sourcing, but verify the actual production site and decoration route.
- In-house decoration: usually simpler for reorders and color control.
- Outsourced decoration: acceptable only if sample, bulk, and QC ownership are clearly documented.
6. What to ask in the RFQ so quotes are actually comparable
Many tote quotes cannot be compared because each supplier assumes a different product. One supplier prices a lighter canvas, another includes stronger handles, a third quotes the blank bag separately from decoration, and a fourth silently changes the packing method. The result is a false price comparison. The RFQ needs enough detail to force the quote onto the same basis.
A practical RFQ for museum book fair totes should identify the finished size, fabric weight, exact print method, artwork color count, print placement, handle length, gusset depth, reinforcement requirements, and packing format. If the order is likely to repeat, ask whether screens, plates, or digital setup files can be reused on reorder and whether the price drops when setup is already in place.
It also helps to ask for the quote in layers. Break it into blank bag cost, decoration cost, packing cost, and freight assumptions. That structure exposes where one supplier is cheaper and another is hiding cost in labor or materials. It also makes it easier to compare a factory quote against a trader quote or a local stock offer.
Finally, ask for the supplier’s assumption about artwork complexity. A quote that works for a one-color logo may not work for a four-color exhibition image. If the quote does not state how many colors are included and what happens when the artwork changes, it is incomplete for procurement use.
- Ask for separate line items: blank bag, decoration, packing, and freight.
- Confirm whether setup charges repeat on reorder.
- State artwork file type, color count, and print area size.
- Require the supplier to identify the decoration method in writing, not just in a sample photo.
7. Sample approval should test the final construction, not only the graphic
A decorated sample is only useful if it matches the final order route. A blank tote with a pasted logo, a different fabric weight, or a substituted decoration method can give a misleading sign-off. For museum buyers, the sample must show the actual bag body, the actual print method, and the actual finishing detail that will be used in bulk production.
Sample approval should include both visual and physical checks. Visually, the buyer should inspect print placement, color strength, line sharpness, and balance on the bag front. Physically, the buyer should fold the tote twice, check how the print behaves at the fold line, feel whether the ink or transfer changes the hand-feel too much, and inspect the handles and bottom seam for symmetry. If the tote is a retail SKU, the sample also needs a shelf test: does it stand up neatly, does it collapse awkwardly, and does it look intentional when folded?
If the museum expects multiple reorders, the supplier should retain the approved sample as a reference standard. That way, if the next run drifts in print density or stitch quality, there is a benchmark for correction. This matters especially when different shifts or subcontractors may be involved in later production.
The practical rule is simple: approve the exact combination of bag body, decoration method, and finishing. A good graphic on the wrong bag is still the wrong product.
- Approve exact fabric, color, size, and decoration route.
- Inspect fold behavior and handle symmetry, not only front appearance.
- Keep one approved sample as the master reference for reorders.
- Do not sign off on a blank bag if the bulk order will be decorated differently.
8. Quality-control thresholds that buyers can use before shipment
A serious tote QC plan should define measurable checks. Vague language such as “good quality” or “nice printing” is not enough for a shipment that will be sold in a museum shop or handed out at a timed event. The buyer should set pass/fail criteria that a factory inspector can apply before packing starts.
For fabric, check the agreed weight and confirm there are no visible thin spots in the print area. For dimensions, specify a tolerance window for length, height, and gusset. For handles, define acceptable variance in handle length and check reinforcement points for skipped stitches or loose threads. For print, inspect opacity, registration, edge sharpness, and color consistency. On screen prints, a simple fold and rub check helps expose cracking or weak curing. On transfers, a tape test and edge lift check are useful. For embroidery, test puckering and stitch density.
The buyer should also define an acceptable defect threshold. For example, the order might allow a very small number of minor thread trims but no misaligned artwork, no print that is visibly off-center, and no seam failures. The point is not to copy a lab standard; it is to make the factory and the buyer agree on what can pass and what must be reworked.
Carton QC deserves equal attention. Count accuracy, carton label accuracy, mixed-SKU control, and carton strength all matter. If the bags are moving directly to a museum event, an incorrect carton count can cause an operational problem even when the bags themselves are acceptable.
- Use a ruler or template for placement and finished size checks.
- Run a fold test, rub test, and tape test on decorated samples.
- Set a written defect threshold for print misplacement, seam skips, and loose threads.
- Verify carton count, carton label, and mix control before shipment release.
9. Packing, cartonization, and freight are part of the tote spec
Packing often gets treated as an afterthought, but it affects cost, appearance, and damage risk. Bulk packing usually gives the best freight efficiency and the lowest labor cost. Individual polybags improve retail presentation and protect the decoration surface, but they add material and handling cost. For museum book fair totes, bulk folded packing is often enough when the bags are going into event distribution or warehouse stock. Retail presentation may justify a polybag or tissue wrap if the tote is sold as a premium SKU.
The buyer should define the folded size and carton count early, because those choices affect volume and freight. A tote that folds more compactly may ship more efficiently, but a heavy canvas tote can still create substantial carton weight. Ask the supplier for carton dimensions, net weight, gross weight, and whether the bags are packed with the handles inside or outside the fold.
Protecting the print matters during packing. If the decoration can rub or transfer, use carton dividers or a barrier sheet. If the print is cured well and the bags are folded cleanly, overpacking is usually unnecessary. The practical goal is to avoid a situation where the bag arrives with scuffing, moisture marks, or print transfer from one bag to another.
For international procurement, freight planning should be based on carton volume and weight, not only on unit quantity. A quote that looks low per piece can still become expensive once the carton plan is finalized.
- Bulk pack for lower freight and faster handling.
- Use polybags only when retail presentation or surface protection justifies the cost.
- Ask for carton dimensions, gross weight, and folded dimensions before PO placement.
- Check whether the print can rub during transit and whether a barrier layer is needed.
10. Lead time, reorder planning, and the decision that usually saves money
Museum tote programs are often tied to a fixed event date, so lead time should be broken into three separate clocks: sample approval, production, and shipping. A supplier may quote a short bulk lead time, but if artwork changes after approval or if the decoration method needs new screens or plates, the timeline can slip. The buyer should ask what parts of the schedule are dependent on final file approval and what parts can run in parallel.
Reorders are where a well-chosen print method pays off. Screen print often becomes more cost-effective when the same artwork comes back for a second or third run because the setup is already done. Digital and transfer methods can be better when the artwork changes seasonally or when the museum wants to test a small run before committing to a larger one. Embroidery is usually only worth it when the branding is small and the product can support the higher decoration cost.
The best procurement decision is usually the one that matches the method to the lifecycle of the product. If the tote is a recurring museum shop item, choose a method that supports repeat stability and predictable cost. If the tote is tied to a one-time exhibition graphic, choose the method that preserves the art without forcing an oversized MOQ.
One useful internal rule is to compare the expected number of reorders against the setup fee. If the artwork will repeat, screen print can become more attractive quickly. If the artwork will change, a lower-setup method may be better even if the first-unit cost is higher.
- Separate sample timing, production timing, and shipping timing in the schedule.
- Ask whether screens, plates, or files can be reused on reorder.
- Match the print method to the expected product life cycle, not only the first order.
- Build a buffer for proof correction and freight booking when the event date is fixed.
Specification comparison for buyers
| Print method | Setup cost and MOQ | Color and artwork limits | Durability and decoration tolerance | Best procurement use case |
|---|---|---|---|---|
| Screen print | Moderate setup cost; economical once screens are made; usually strongest at medium to higher quantities | Best for 1-3 spot colors, bold logos, text, and simple illustration blocks | Very good abrasion resistance when ink is properly cured; tolerates folding better than many transfers; watch for cracking on heavy fold lines and poor registration on large fills | Museum book fair totes, shop giveaways, member events, and repeat seasonal reorders with stable artwork |
| Heat transfer / transfer print | Low to moderate setup cost; useful at lower MOQ and for changing artwork | Handles multi-color art, gradients, fine detail, and small runs better than screen print; size and placement can be constrained by film format | Durability varies widely by film and press control; edges can lift if curing and pressure are inconsistent; can feel less premium on canvas if the transfer is thick | Short-run exhibition totes, launch programs, and designs that change frequently |
| Digital print | Low setup for artwork, but unit cost often stays higher; strong for short runs and variable designs | Best for complex art, illustrated exhibition visuals, and photographic or high-detail graphics; color matching can be less predictable on natural canvas than on coated substrates | No screen cracking, but print rub resistance, wash resistance, and color shift need testing; lighter canvas weave can show fiber texture through the image | Small museum shop runs, design-heavy artwork, and orders where speed matters more than lowest unit cost |
| Embroidery | Higher labor cost and digitizing time; better for small logos than large artwork | Limited to restrained branding, initials, or small marks; not suitable for fine detail, gradients, or broad fills | Excellent stitch durability, but heavy stitching can pucker lighter canvas and distort the bag front; can add weight and bulk | Premium donor gifts, limited retail SKU, or a logo zone on a higher-priced tote |
| Woven label / sewn patch | Moderate setup, depending on label type; economical when combined with a plain bag body | Good for small branding marks and secondary identity; not a replacement for full artwork | Strong durability if stitched well; patch edge quality and stitch count matter; less exposed to print abrasion | When the museum wants subtle branding and a cleaner retail look than a large front print |
| Material | 8-12 oz cotton canvas, 120-220 gsm cotton, recycled cotton, or blended fabric selected by use case and target price | Before price comparison | Different cloth weights, backing, or certification claims make quotes hard to compare | |
| Construction | bag size, gusset, handle drop, seam allowance, stitch density, reinforcement patch, and loading expectation | Before sampling | Weak stress points create returns and failed inspections | |
| Decoration | screen print, heat transfer, embroidery, woven label, or hangtag matched to fabric texture and brand durability needs | Before artwork approval | The wrong method can crack, bleed, pucker, or fail on the chosen fabric |
Buyer checklist before sampling
- Confirm the finished fabric weight in GSM or oz, and ask whether it is measured before or after washing, dyeing, or finishing.
- State the bag size, gusset depth, handle drop, and intended load so the supplier can size the construction correctly.
- Match the print method to the artwork: one- to three-color logo, multi-color illustration, gradient, or photographic image.
- Request a decorated pre-production sample in the exact fabric color and decoration method, not a blank sample with a substituted logo.
- Ask for setup charges separately from unit price: screen fees, plate fees, digitizing fees, transfer setup, and reorder fees.
- Require a written tolerance for print placement, handle length, finished dimensions, and carton count.
- Specify the acceptable defect threshold for print misregistration, ink pinholes, seam skips, loose threads, and carton damage.
- Clarify packing format: folded dimensions, polybag or bulk, tissue use, carton count, and whether mixed artwork is allowed.
- Ask for production photos or first-run approval if the order is tied to a museum event date.
- Get the supplier to confirm whether decoration is in-house, outsourced, or split across multiple sites, because that affects rework responsibility.
Factory quote questions to send
- What is the finished canvas weight, and what tolerance do you hold on the fabric weight supplied to this order?
- Which print method do you recommend for this artwork, and why is it better than the other methods for this size and color count?
- What is the setup cost for each decoration method, and is the charge repeated on every reorder or only on the first order?
- What is the MOQ per artwork, per color, and per size, and does the MOQ change if we switch from screen print to transfer or digital print?
- Can you quote the blank bag, decoration, packing, and freight assumptions separately so we can compare factory and trader offers fairly?
- How many colors can you print cleanly on this canvas weight without visible registration risk or color bleed?
- What durability test do you run for the print: rub test, fold test, tape test, or wash test, and what result do you regard as pass?
- What seam reinforcement do you use at the handle joins and bottom corners, and can you share the stitch count or bar-tack spec?
- What are the acceptable tolerances for finished bag dimensions, handle length, and print placement?
- If the order is repeated next season, what stays the same in price and what changes because of setup, dye lot, or print plate reuse?
Quality-control points to confirm
- Fabric verification: confirm the approved canvas weight, weave appearance, and color before cutting; reject panels with visible thin spots, slubs in the print zone, or shade variation across the lot.
- Finished size tolerance: measure length, height, and gusset at a minimum of three bags per carton sample; keep a defined tolerance window so retail display and carton counts remain stable.
- Handle construction: check handle length consistency, stitch symmetry, and reinforcement at the stress point; bar-tacks or reinforced stitching should not show skipped stitches, loose ends longer than the allowed limit, or uneven placement.
- Seam strength: inspect side seams, bottom seam, and gusset joins for broken stitches, puckering, or burst risk; use a simple pull test on sample bags to confirm the construction matches the intended load.
- Print placement: verify artwork centerline, top-down placement, and left-right alignment against a physical ruler; approve an allowed deviation before bulk printing starts.
- Print quality: inspect opacity, edge sharpness, registration between colors, and coverage uniformity; reject visible canvas show-through where the artwork is supposed to be solid.
- Decoration tolerance: fold the bag on the normal use line and check for cracking, edge lift, transfer lift, or excessive hand-feel change; for embroidery, confirm that puckering is within the approved sample standard.
- Curing / adhesion check: for screen or transfer prints, run a rub test and a tape test on the approved sample and on early production pieces to confirm adhesion before full packing.
- Carton packing: confirm carton count, folded orientation, and whether the lot is mixed or single-artwork; mixed counts or mixed SKUs require written approval.
- Outer carton condition: check carton strength, corner crush, label accuracy, and moisture protection; cartons should withstand normal export handling without visible collapse or water damage.