Why Cosmetic-Brand Tote Specs Are Different
A tote for a cosmetic book fair is not the same brief as a generic event bag. The load is often a mix of paper, sample sachets, small boxed products, and branded inserts, so the bag has to behave well when it is partly full and when it is visibly carried in public. Cosmetic brands also care more about surface neatness, logo accuracy, and how the bag looks when set on a counter or in a display stack.
That changes the sourcing logic. The right tote is not the cheapest canvas bag in the catalog; it is the one that supports the brand moment without creating rework in production or embarrassment at handoff. A bag that wrinkles badly, sags under load, or prints poorly on the chosen fabric can undermine the perceived quality of the products inside it.
The practical takeaway is simple: treat the tote as part of the customer-facing brand system. The material choice, the print method, and the construction details should all support the same outcome, which is a bag that feels intentional, carries safely, and arrives in a condition the warehouse can receive without sorting or rework.
- A cosmetic tote is judged as a branded object, not just a carrier.
- The contents and the handoff moment should drive the spec.
- The cheapest unit price is often not the lowest landed cost.
Start With The Contents And Carry Profile
The most useful sourcing question is not "what canvas do you sell?" It is "what does the tote need to carry, for how long, and in what presentation state?" A brochure-only giveaway can use a much lighter build than a sample kit with hard corners or glass-like packaging. Once the intended load is clear, the rest of the spec becomes easier to set.
For very light programs, a lighter canvas is acceptable if the bag only needs to make a short trip from table to car. For mixed kits, the tote should have enough structure to keep the contents from printing through the front panel or dragging the bottom seam down. If the bag needs to stand on a counter, show the logo cleanly, and be reused after the event, that is a stronger case for heavier canvas and a better finishing spec.
A useful decision threshold is whether the bag is expected to be reused beyond the first handoff. If the answer is yes, the tote becomes part of the brand's longer shelf life, and the value of better structure, cleaner seams, and a more stable surface goes up. If the answer is no, then over-specifying the bag only adds cost and freight without returning any meaningful buyer value.
- Brochure-only kits can stay in the lighter range if the tote is not load-critical.
- Mixed product kits usually need more body, stronger handles, and better bottom support.
- Reusable bags justify tighter finish control because they keep carrying the brand after the event.
Choose The Fabric By Weight, Weave, And Finish
Canvas weight is only one part of the decision. Two bags with the same nominal oz can feel very different if one is loosely woven and the other is tightly woven, or if one has been prewashed and the other has not. For that reason, the buyer should ask for a proper fabric spec sheet, not just a weight number.
In practical sourcing terms, 8 oz canvas usually sits at the lightest end of a cosmetic tote program. It folds easily and prints well with bold artwork, but it can feel too soft if the bag needs to stand up on a counter. 10 oz is the most common middle ground because it gives better body without becoming heavy or expensive. 12 oz and 14 oz move the bag into a more premium or more durable category, but they also add sewing difficulty, freight weight, and a firmer hand that may not fit every campaign.
Finish matters because it changes both the appearance and the use behavior. Raw natural canvas has a warmer, more artisanal look. Bleached cloth creates a cleaner background for color-critical branding. Recycled cotton canvas can support sustainability messaging, but the surface is often more textured and variable, so the artwork needs to be designed with that in mind. Cotton-poly blends are useful when the bag will be flat-packed, handled repeatedly, or shipped long distance, but the buyer should verify that the blend still fits the brand story.
- Ask for GSM or oz, weave description, and finish on the same line item.
- Treat prewash or shrinkage control as a commercial requirement, not an optional note.
- Approve the actual cloth lot before the factory cuts bulk fabric.
Match Print Method To The Surface And Artwork
The print route should follow the material and the artwork, not the other way around. For simple logos and repeat orders, screen print is usually the most predictable option because it gives strong color and a controlled unit cost. It is especially practical when the artwork uses one or two spot colors and the brand can tolerate a slightly tactile ink feel.
When the design includes fine text, gradients, or frequently changing copy, transfer-based methods are often easier to manage in short runs. The tradeoff is that the print hand feel can change, and some transfer methods are more sensitive to heat, fold lines, or long transit. On looser or more textured canvas, the smallest details can also lose sharpness if the artwork was not adjusted for the fabric surface.
A clear approval rule helps here: if the logo includes small type, fine lines, or thin registration marks, the factory should confirm the minimum legible size on the actual fabric, not just on artwork software. For canvas, a practical caution threshold is anything below about 4.5 mm letter height or 0.4 mm line width, which can disappear once ink sits on a textured weave. Embroidery and woven labels can add a premium feel, but they should be used where they genuinely improve the product, not as automatic extras.
- Use screen print for bold, repeatable artwork and stable unit cost.
- Use transfer routes when the artwork is short-run, complex, or variable.
- Check minimum type size and line thickness on the actual fabric swatch.
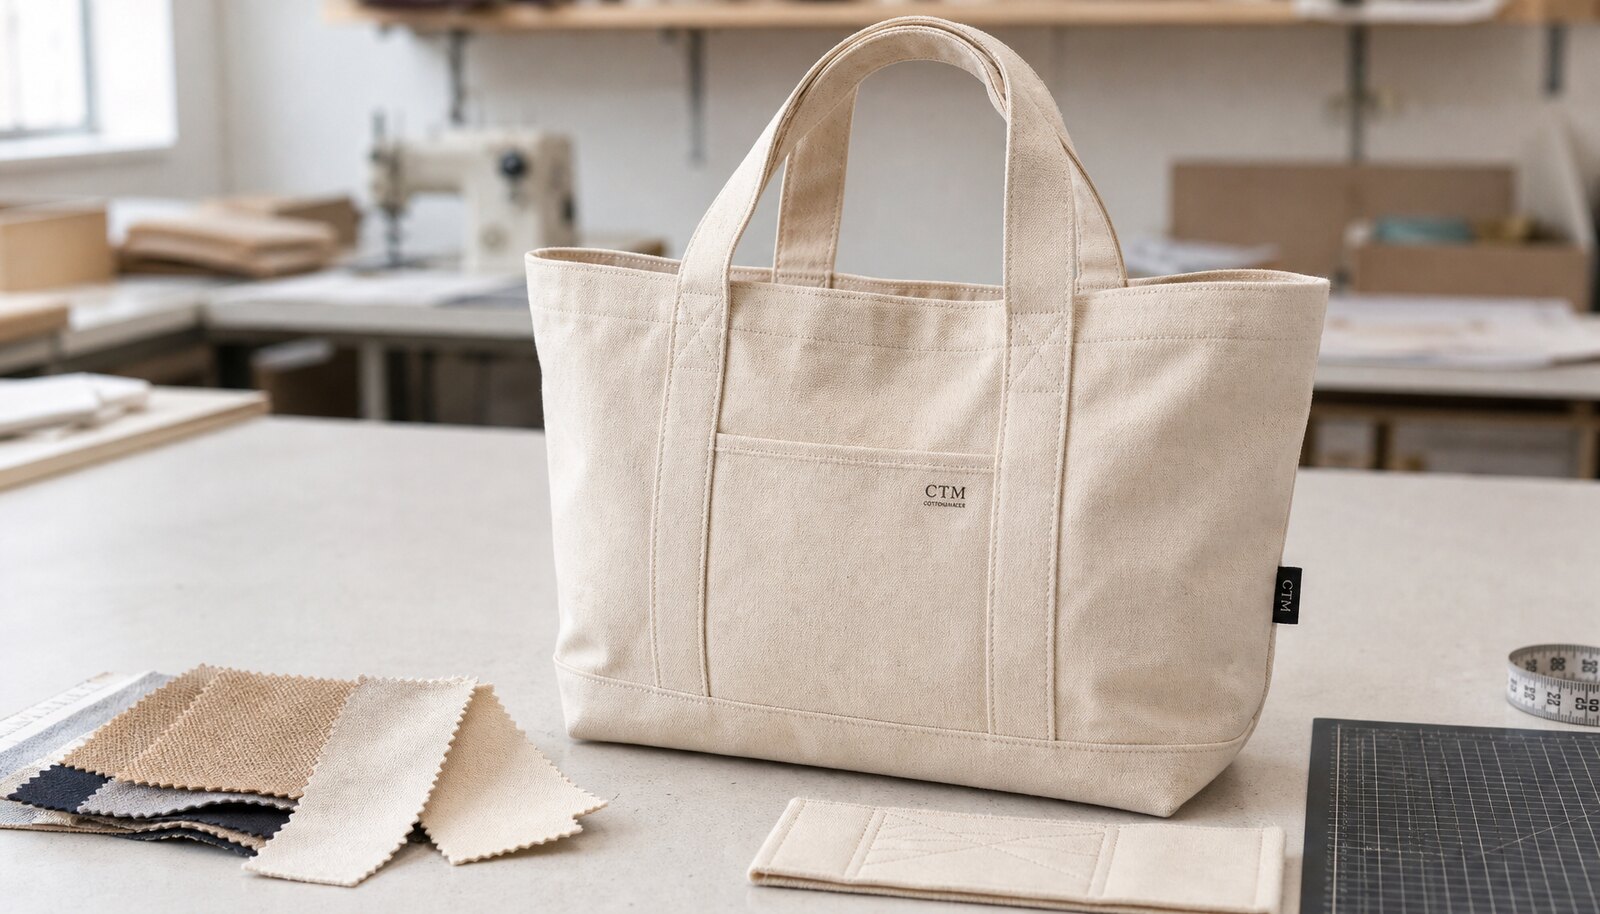
Construction Details That Influence Carry And Shelf Presence
Handle construction is one of the first places where a tote feels cheap or well made. If the bag is meant to hold boxed cosmetics or a mixed sample kit, the handle needs enough width and reinforcement to spread the load comfortably. A narrow handle can dig into the hand, while a weak attachment point can fail even when the fabric body still looks fine.
For light programs, a simple handle can be enough if the bag is only carrying paper and a few small items. For heavier kits, the buyer should specify a wider handle, a defined handle drop, and bartacks or another reinforcement method at the load points. As a practical threshold, many programs move to a wider 35-40 mm handle once the tote starts carrying heavier sample sets, while lighter programs can stay narrower if comfort is not a concern.
The base and side seams matter just as much. A gusset helps the bag stand and carry boxes better, but the corners need clean sewing so the bag does not bunch or twist. A bottom insert can help with shape retention, but it adds cost and should only be used when the contents justify it. Linings can create a more premium interior, yet they also increase sewing complexity and inspection time. The best construction is usually the simplest one that safely carries the intended load and still looks clean at handoff.
- Specify handle width, handle drop, and attachment length in the tech pack.
- Use bartacks or equivalent reinforcement on every load-bearing point.
- Add lining or a base insert only when the use case genuinely needs it.
Commercial Sourcing Needs More Than A Good Unit Price
A realistic quote has to include the full production setup, not just the stitched bag. Many sourcing mistakes happen because one factory quotes a bare tote while another includes heavier fabric, printing, labels, polybags, and cartons. The headline unit price looks different because the product definition is different. Before comparing numbers, normalize the spec line by line.
MOQ and lead time should be asked early, especially if the bag must arrive for a launch or fair date. Smaller factories or nearshore suppliers may offer quicker sampling and easier communication, but the unit price can be higher. Offshore factories often have better piece pricing at scale, but they may require longer booking windows and firmer approvals before production starts. A buyer should know whether the order is being treated as a standard repeat or a custom development run.
Compliance documents matter more once the tote is tied to a retailer, export market, or sustainability claim. If recycled content is being marketed, the supplier should be able to document that claim. If the destination market requires specific safety or chemical documentation, ask for it before the purchase order is released. At minimum, the supplier should be able to show where the fabric came from, where the tote was sewn, and which steps were done in-house versus outsourced.
- Ask for MOQ by design, not just by factory.
- Separate the cost of fabric, print, sewing, packing, and freight.
- Request the compliance documents before the order is placed, not after the sample is approved.
Write QC Standards The Factory Can Sign Off Against
Good tote QC should be measurable enough that the factory can inspect against it without guessing. Start with the approved sample and define the dimensional, visual, and functional limits in the PO or tech pack. If a factory has to interpret "good enough" on its own, the buyer will end up paying for that ambiguity later in rework or reprints.
Fabric weight should be checked on the approved lot and held within a practical tolerance. For many programs, plus or minus 5 percent is a reasonable starting point unless the brand needs a tighter band. Finished size should be measured on relaxed bags, not only hot off the line, because canvas can settle after sewing and finishing. A good baseline is plus or minus 1 cm on body dimensions and plus or minus 0.5 cm on handle length, with tighter control when the tote must fit a fixed insert or carton.
Print and sewing checks should be equally specific. Ask for seam consistency, no skipped stitches, no loose thread tails beyond a small visible threshold, no open seams, and no wrong-color ink or off-position artwork. If the tote is being treated as a reusable item, run a static load test on a fully built sample at roughly twice the intended filled weight for one minute. The goal is simple: no seam rupture, no handle tear, and no obvious permanent stretch at the attachment points.
- Use ASTM D3776 or an equivalent method for fabric weight checks.
- Use a defined AQL plan instead of a vague visual-only inspection.
- Treat one packed sample as a release gate, not a courtesy sample.
Packing, Transit, And Warehouse Receiving Can Change The Outcome
A tote that passes sewing inspection can still arrive in poor condition if the packing is wrong. The most common problems are abrasion on the print, folded creases that do not release, dusty fabric, and cartons that crush the bag body during transit. For cosmetic brands, this is especially visible because the bag often goes straight from carton to customer-facing handoff.
Packing should match the route. One-piece polybagging is useful when presentation matters or when the bag could rub against other items in transit. Bulk packing is cheaper and often fine for simple event use, but it needs a clean folding method and a carton spec that prevents over-compression. If the route is sea freight or the warehouse is humid, moisture protection becomes part of the product spec rather than a logistics afterthought.
The buyer should also think about receiving. Clear carton counts, carton marks, and SKU separation make it easier for the warehouse to put the order away without re-sorting. If the order will be palletized, ask for the planned stack height and carton strength so the receiving team is not discovering those details at delivery. A simple packed sample often reveals problems that a flat sewn sample never will.
- Approve the fold pattern and packed look before bulk packing starts.
- Use moisture protection when the freight lane or storage environment makes it necessary.
- Keep carton counts and SKU labels simple enough for fast warehouse receiving.
Use A Buying Scenario, Not A One-Size Spec
Most cosmetic-brand tote programs fit one of four practical scenarios. A brochure-only book fair tote can usually stay in the lighter 8 oz to 10 oz range with a simple print and minimal structure. The bag only needs enough body to look deliberate and carry paper without collapsing.
A mixed sample kit needs more help from the fabric and construction. That is where 10 oz to 12 oz canvas, reinforced handles, and a gusset start to make sense. If the kit includes boxed items or heavier containers, the tote should be designed to hold shape when partially full rather than only when neatly packed at the factory.
For a premium gift-with-purchase or retail-adjacent bag, 12 oz duck canvas often gives the best balance of structure and cost. The bag should feel more deliberate in hand, have cleaner edge finishing, and hold the brand mark cleanly from a short viewing distance. If the program is meant to be reused often, 14 oz heavy canvas can be justified, but only if the freight, carry comfort, and additional sewing cost still make sense.
Recycled cotton and cotton-poly options should be selected for a reason, not just because they are available. Recycled canvas makes sense when the material story is important and the print can tolerate a more textured surface. Cotton-poly makes sense when crease resistance, transit stability, or flat packing are more important than a purely natural-fiber narrative.
- Use lighter canvas when the bag is a short-distance carrier for paper and small samples.
- Use medium canvas for mixed kits and most standard cosmetic events.
- Use heavier canvas only when the bag itself is part of the perceived value.
Compare Quotes By Normalizing The Production Setup
The quote comparison step is where many good briefs fail. One supplier may include a denser weave, a wider handle, a printed label, and polybagging, while another is quoting a bare tote with simpler sewing and bulk packing. The unit price difference can look dramatic even though the products are not actually the same. That is why the quote has to be normalized before the commercial decision is made.
The cleanest way to compare is to break the quote into fabric, print, sewing, accessories, packing, carton work, and freight basis. Then ask each supplier to restate the quote against the same approved spec. If the factory can only offer a lower price by changing the cloth weight, the print route, or the packing method, that should be visible immediately rather than discovered after PO release.
It also helps to ask for pricing at multiple quantities. A factory that gives useful step pricing at 500, 1,000, 3,000, and 5,000 pieces is usually showing you where the setup cost is actually absorbed. If the order is being spread across multiple print colors or sizes, make sure the supplier says whether those variations share the same production line or trigger separate setup charges. That is often where the real quote difference lives.
- Normalize all quotes to the same fabric, print, sewing, packing, and freight basis.
- Ask for stepped pricing so setup costs and scale breaks are visible.
- Treat outsourced printing or packing as a schedule and quality risk, not just a sourcing note.
Specification comparison for buyers
| Material option | Typical weight / weave | Handfeel and structure | Print compatibility | Buyer risk to check |
|---|---|---|---|---|
| 8 oz natural cotton canvas | About 270-300 GSM; typically a looser plain weave with a soft drape. | Light, easy to fold, and least structured when empty or lightly loaded. | Best for bold 1-color screen print, simple transfers, and large logos with generous spacing. | Check opacity, panel sag, and whether the tote collapses once brochures or boxed samples are added. |
| 10 oz natural cotton canvas | About 340-360 GSM; medium plain weave with better body than 8 oz. | Balanced handfeel, good everyday structure, and still comfortable to carry. | Strong fit for screen print and most simple brand marks; usually the safest all-round choice. | Confirm shrinkage allowance, handle reinforcement, and whether the chosen weave is dense enough for small type. |
| 12 oz duck canvas | About 400-450 GSM; tighter and firmer with a denser surface. | More structured, more premium in hand, and better at standing on its own. | Good for screen print, woven labels, and artwork that benefits from a cleaner panel surface. | Watch for higher sewing cost, more freight weight, and a feel that may be too rigid for a light giveaway. |
| 14 oz heavy duck canvas | About 470-520 GSM; dense heavy canvas with a strong plain weave. | Very firm, high perceived value, and the best shape retention of the group. | Works well for simple screen print and premium retail-adjacent branding with large, bold artwork. | Check carry comfort, carton volume, and whether the bag is genuinely worth the extra cost for the use case. |
| Recycled cotton canvas | Weight varies by fiber input; commonly offered across the 8-12 oz range with more visible slub. | Textured, slightly irregular surface with a natural, less uniform appearance. | Best with bold graphics, simple logos, and print layouts that do not depend on hairline detail. | Request recycled-content documentation, confirm shade band, and review print sharpness on the actual lot. |
| Cotton-poly canvas blend | Often about 300-380 GSM depending on ratio and finish; usually more dimensionally stable. | Flatter, less wrinkled, and often better for flat-packed programs and transit stability. | Usually strong for screen print and transfer routes; check ink handfeel and heat sensitivity. | Confirm fiber claims, any sustainability language, and whether the blend changes the brand look you want. |
Buyer checklist before sampling
- Define the real use case first: brochures only, a single sample pouch, boxed skincare, or a mixed gift kit. The load determines canvas weight, handle width, base support, and whether the bag needs a gusset or insert board.
- Set the finished size around the contents, not around a generic tote template. If the package must fit a fixed carton, mailer, or sample set, state the required internal clearance and acceptable finished-size tolerance in the spec.
- Lock the fabric spec in measurable terms: fiber content, nominal weight in GSM or oz, weave type, finish, and whether the cloth is prewashed or sanforized. Do not approve a quote that only says "canvas".
- Request a production swatch from the exact mill lot or approved shade band, not a generic sample card. The handfeel, weave openness, and print behavior should match what will be cut and sewn.
- State the print method up front and set minimum artwork rules for the fabric surface, including smallest text height, minimum line thickness, and whether the logo needs crisp edges or a softer vintage look.
- Specify handle width, handle drop, attachment length, and reinforcement method. For heavier sample kits, the handle is a structural part, not a decorative choice.
- Ask for a production schedule with sample lead time, bulk lead time, and the point at which the factory starts buying fabric. A cheap quote is not useful if it misses your launch date.
- Compare quotes on the same basis: fabric, printing, sewing, packing, carton spec, and freight basis. If any of those change, the unit price is not comparable.
- Confirm the compliance documents you need before order release. For cosmetic-brand programs, that usually means fiber declaration, recycled-content proof if claimed, and any required safety or market-access documents for the destination market.
- Define packed-unit requirements early: polybag or bulk, carton count, carton marks, palletization, moisture protection, and warehouse labeling. Those choices affect receiving speed and arrival condition.
Factory quote questions to send
- What exact fabric are you quoting, including fiber content, nominal GSM or oz, weave type, finish, and whether the cloth is prewashed, dyed, bleached, or left natural?
- Can you confirm the fabric weight tolerance you will hold on production, and what method you use to measure it?
- Where is the fabric sourced and where is the tote sewn, packed, and finished? Please identify any subcontracted printing, embroidery, labeling, or packing steps.
- What is your MOQ by design, colorway, and print method, and does a logo change or size change reset the MOQ?
- What are your sample lead time and bulk lead time after art approval and deposit, and what production step is usually the bottleneck?
- What packing spec is included in the price: polybag, tissue, insert card, desiccant, carton marks, palletization, and outer carton count?
- Which compliance documents can you provide for this order, such as fiber content declaration, recycled-content certificate, OEKO-TEX or REACH support if applicable, and factory audit documentation if required?
- Can you quote the same tote at 500, 1,000, 3,000, and 5,000 pieces so we can see the real price break and not just the headline unit cost?
- What is your policy on shade variation, print rework, and replacement if the bulk output does not match the approved sample?
- If the quote relies on a standard factory pattern, can you show the exact finished dimensions and seam construction so we can compare like for like?
Quality-control points to confirm
- Measure fabric weight on the approved production lot using the same method the factory will use in production control, such as ASTM D3776 or an equivalent internal method. A practical acceptance band is within plus or minus 5 percent of the approved nominal GSM or oz value unless the order calls for a tighter band.
- Check finished dimensions on a relaxed bag, not only immediately after sewing. For most unstructured totes, a working acceptance band is plus or minus 1 cm on body length and height and plus or minus 0.5 cm on handle length, unless the insert or artwork placement requires tighter control.
- Require logo placement to be measured from the top edge and centerline. A practical tolerance is plus or minus 3 mm for small logos and plus or minus 5 mm for larger front-panel graphics, because small drift is much more visible on compact branding.
- If shade consistency matters, approve one master shade band and keep bulk output within it. When instruments are available, use a Delta E target of 2.0 or less against the approved lab dip; otherwise, require no obvious panel-to-panel mismatch under standard daylight inspection.
- Set a stitch target for structural seams and ask the factory to document it on the approved sample. A common starting range is 7 to 10 stitches per inch on load-bearing seams, with bartacks or equivalent reinforcement at handle ends and other stress points.
- Inspect for defect thresholds the factory can actually sign off against. Zero tolerance should apply to holes, open seams, broken handles, wrong artwork, oil stains, and needle damage; minor thread tails or small puckering should be limited by an AQL plan rather than handled informally.
- Run a static load test on a fully built sample at about 2x the intended filled weight for 1 minute. The bag should show no seam rupture, no handle tear, and no meaningful permanent stretch at the handle attachment points.
- For washable or reusable totes, run one wash or steam-conditioning cycle on approval samples and check shrinkage afterward. A practical acceptance band is no more than 3 percent length shrinkage and 4 percent width shrinkage unless the bag is intentionally pre-shrunk.
- Use an AQL sampling plan, such as ANSI/ASQ Z1.4 or an equivalent factory-standard system, and separate major and minor defects in writing. The point is to make inspection repeatable, not subjective.
- Approve one packed sample before bulk packing starts. The packed sample should show the final fold, the final print contact points, and the carton build so you can see whether the bag stays presentable through transit and receiving.