What Buyers Really Need From An Embroidered Canvas Bag
A canvas bag with embroidery is usually bought for one of two reasons: it needs to look more premium than a printed tote, or the buyer wants a decoration method that survives repeated use and does not fade quickly. That makes the product closer to a decorated retail item than a simple promo bag. The mistake many sourcing teams make is treating embroidery as a cosmetic add-on instead of a production constraint that affects fabric choice, hooping, stitch count, and packing.
If the art is simple and the bag body is stable, embroidery can give a cleaner result than print. If the logo contains small text, thin lines, gradients, or detailed illustration, embroidery quickly becomes expensive or unreadable. The buyer should define the commercial goal first: premium shelf appearance, long wear, or low-cost branded distribution. Once that is clear, the rest of the spec becomes easier to lock.
- Use embroidery when the logo can survive simplification into thread.
- Keep the decoration area large enough for stable hooping and readable letters.
- Treat embroidery as a construction decision, not only a logo decision.
Choose The Right Canvas Weight Before You Choose The Logo
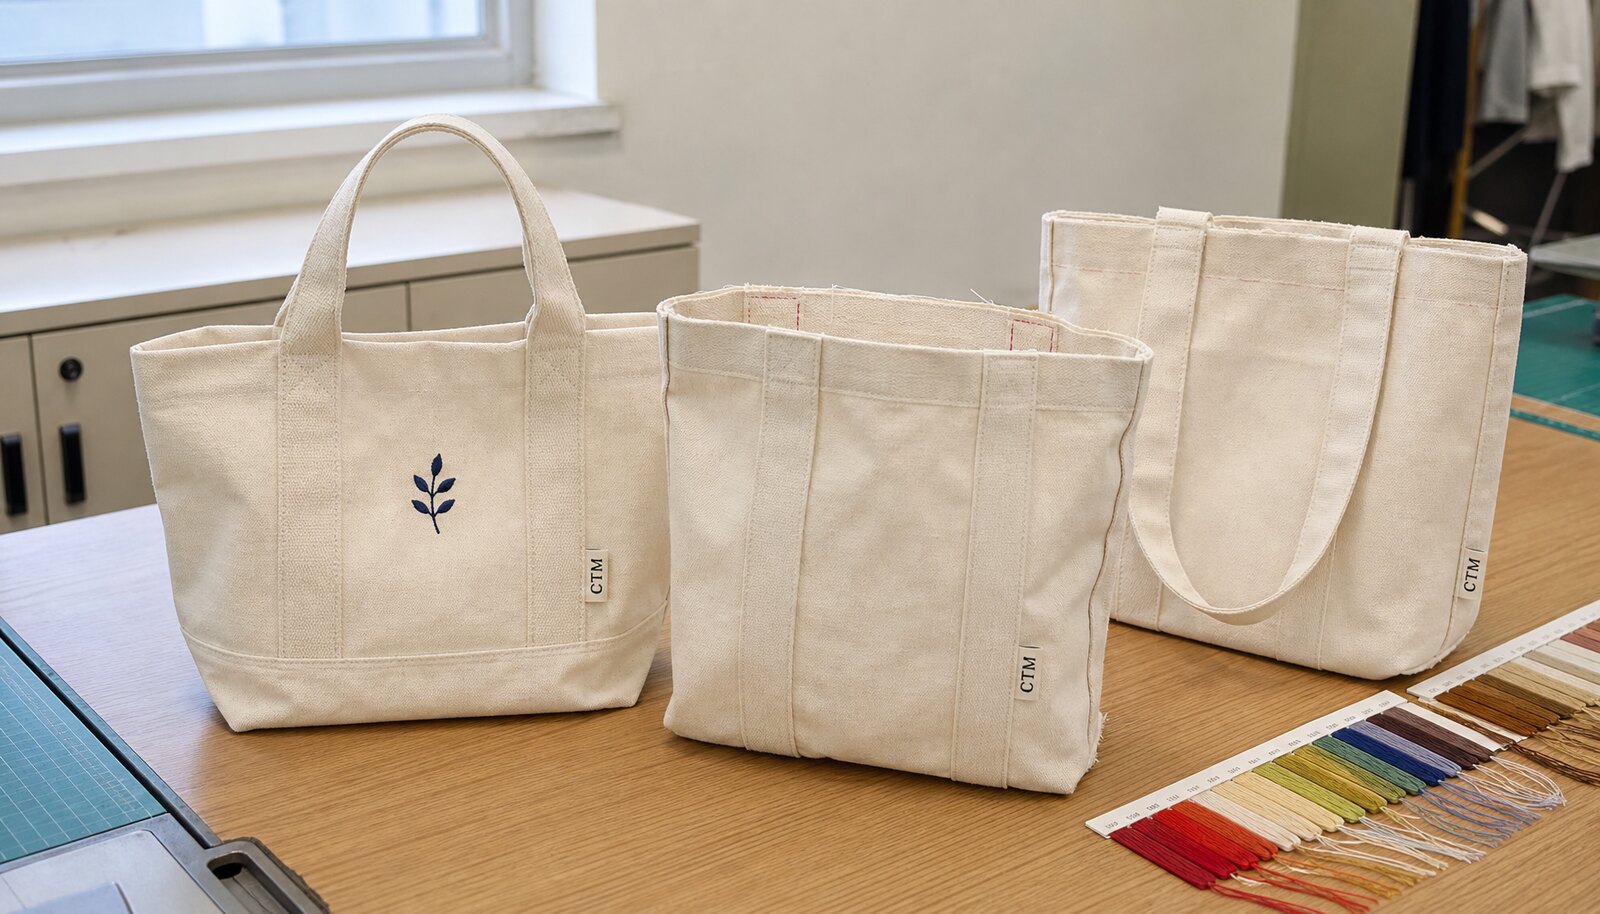
Canvas weight controls how the bag behaves under embroidery. A light body around 8 oz may work for promotional distribution, but dense stitching can pull the panel out of shape. For most buyer-facing programs, 10 oz to 12 oz cotton canvas is the safer range because it gives the embroidery enough structure without making the tote overly stiff. If the bag will carry a heavier load, a reinforced handle and stronger top hem matter as much as the canvas weight itself.
The weave finish also matters. A smooth, tighter weave usually gives cleaner stitch edges than a loose open weave. If the bag needs a gusset, lining, pocket, or base board, those details should be stated before the sample is made. The sample must show how the embroidery behaves on the actual panel construction, not on a loose fabric swatch that hides distortion.
- 8 oz is usually the floor for light promo use, not premium retail presentation.
- 10 oz to 12 oz is the safer band for structured embroidery work.
- Ask the supplier to state shrinkage allowance and whether the fabric is prewashed or raw.
Pick The Decoration Method Based On Artwork, Not Habit
Direct embroidery is the best route for short names, icons, simple monograms, and bold shapes. It gives a tactile finish and works well when the buyer wants the logo to feel sewn into the bag rather than sitting on top of it. Woven patches are better when the art includes tiny letters or fine details that would disappear in thread. Applique is useful for larger graphic blocks, but it adds sewing steps and can increase edge bulk.
The most common production failure is trying to force a print-style logo into embroidery. A good factory will translate the art, not copy it blindly. As a practical rule, keep small text tall enough to stay legible after thread fill, and avoid very thin strokes that would break during trimming or washing. If the design depends on precision branding, get a stitched sample before the PO is released.
- Direct embroidery fits simple logos, initials, and premium lifestyle branding.
- Woven patches fit dense text and small legal marks better than thread fill.
- Applique suits larger graphics but raises sewing time and edge-control risk.
Read Supplier Quotes Like A Production Engineer
A useful quote for a canvas bag with embroidery should separate the bag body from the decoration work. If the supplier only gives one lump sum, you cannot tell where the cost is coming from or whether the factory is charging for digitizing, setup, sample, backing, and packing in a hidden way. The buyer should request line-item pricing for canvas fabric, cutting and sewing, embroidery digitizing, embroidery run, thread color changes, labels, and carton packing.
Quote clarity is especially important when comparing a bag factory with an embroidery subcontractor. A supplier who controls the whole process may look slightly higher on paper, but it often reduces rework and delays because one team owns the final result. A low quote that ignores embroidery setup, hand-feel changes from backing, or extra trimming work usually becomes more expensive after sample revisions and schedule slips.
- Separate body cost, decoration cost, sample cost, and packing cost.
- Ask for stitch count or decoration area limits, not just a logo description.
- Compare quotes on the same canvas weight, same logo size, and same pack method.
Use MOQ To Control Risk, Not Just To Chase A Lower Unit Price
MOQ for embroidered canvas bags is driven by more than sewing capacity. The factory has to buy or reserve canvas, set up embroidery digitizing, load thread colors, test placement, and sometimes create stabilizer or hooping fixtures. That means the MOQ for one embroidered style can rise quickly if the buyer changes both the bag body and the logo in the same order. The cleanest way to manage MOQ is to keep the bag base constant and vary only the decoration details or thread colors.
For a new program, a small test order is useful only if the test is production-relevant. A 20-piece showroom sample run teaches very little if the final PO is 3,000 pieces on a different canvas lot. Better practice is to run a pre-production sample using the exact fabric, same logo size, same thread colors, and the same packing specification. That sample becomes the approval standard for the full order.
- Reduce SKU count before you negotiate minimums.
- Keep the same bag size and canvas weight across the first run.
- Use the pre-production sample as the signed control standard.
Approve Samples By Appearance And By Process
A sample is not approved only because the logo looks close. It must prove the process is stable. Inspect the embroidery face, the reverse side, the panel shape, the handle attachment, and the final fold after packing. Dense embroidery should not wrinkle the front panel, and the backing should not show through in a way that makes the bag look cheap. If the bag has a side label or brand tab, confirm that the label placement does not interfere with sewing or packing.
A proper approval cycle usually includes at least one corrected sample if the first version has placement or tension issues. The buyer should mark the sample directly with acceptable and unacceptable zones. Common red flags are skewed logos, needle punctures outside the embroidery field, thread tails left untrimmed, and uneven stitch height across repeated units. Once the sample is signed off, the factory should keep that exact sample at the line as the workmanship reference.
- Inspect front face, reverse face, seams, and folded finish.
- Reject samples with visible puckering, loose threads, or off-center placement.
- Keep the signed sample at the factory and in the buyer file.
Set QC Thresholds Before Bulk Sewing Starts
Embroidery QC should include both appearance and durability. A canvas bag can pass a casual visual check and still fail because the stitch tension is inconsistent, the logo sits too close to a seam, or the backing creates a hard patch that feels uncomfortable in use. The buyer should define measurable acceptance criteria: placement tolerance, thread color match, no skipped stitches, no loose ends, and no distortion that affects the bag outline. If the logo includes text, define the minimum legible size in millimeters so the factory knows where simplification is allowed.
You also need to decide whether the bag is a wholesale item or a retail presentation piece. A wholesale item can tolerate a slightly more utilitarian internal finish if the exterior is clean and consistent. A retail-ready bag needs cleaner trimming, better pressing, and more careful fold control. The same factory can often do both, but it should be priced and packed differently.
- Set placement tolerance and thread-color acceptance in writing.
- Define what counts as a defect: skipped stitch, puckering, loose tail, or seam distortion.
- Match QC level to the sales channel, not to a generic ideal.
Packing Choices Change The Final Cost And The Damage Rate
Packing is not an afterthought on decorated canvas bags because embroidery can be crushed, marked, or abraded in transit. Bulk packing is efficient for wholesale replenishment, but the bags need separation so the stitched face does not rub against rough seams or carton walls. Retail packing usually means one bag per polybag with an insert or stiffener, but that adds labor, film, and carton volume. If the bag carries a brand story, packing quality is part of the product presentation and should be included in the quote comparison.
The buyer should specify fold direction, pack count, carton dimensions, outer marks, and barcode rules before production. If the warehouse uses dimensional receiving or shelf-ready cartons, the factory needs those limits early. A bag with embroidery often does better with a protective insert between folds, especially if the stitch density is high or the logo sits near the center panel. Small details here prevent crushed logos and customer complaints after opening.
- State whether you want bulk pack, polybag, insert card, or retail-ready folding.
- Protect the embroidered face from rubbing against zippers, seams, or carton edges.
- Give the supplier your carton marks and barcode format before packing starts.
Compare Sourcing Routes By Schedule, Not Only By Unit Price
When buying a canvas bag with embroidery, the cheapest route on paper is not always the safest route on schedule. A bag factory with in-house decoration usually gives tighter control over placement and lead time. A trading company can be useful if it manages multiple factories and can source hard-to-find materials, but the buyer loses some direct visibility into embroidery handling. A separate decoration house can be suitable for complex artwork, yet it adds handoff risk between sewing and embellishment unless the process is tightly coordinated.
Lead time should be discussed as a chain, not a single date. Fabric booking, cutting, embroidery setup, sample approval, sewing, packing, and carton release all have separate timing risk. If the supplier is vague about which stage controls the critical path, treat the quote as incomplete. For recurring programs, the better supplier is usually the one that can repeat the same output with the fewest approval loops, not the one that promises the fastest first sample.
- Prefer one owner for fabric, sewing, embroidery, and packing when possible.
- Separate sample lead time from bulk lead time in every quote.
- Treat schedule risk as part of landed cost because it affects stockouts and freight choices.
Use Landed Cost To Decide Whether Embroidery Is Worth It
Embroidery adds value, but the buyer should still model the full landed cost. The real comparison is not between embroidery and no embroidery in isolation. It is between an embroidered tote and the selling price, margin target, freight mode, packing format, and expected sell-through. A slightly higher factory price can still be the better business choice if it reduces returns, improves perceived quality, or supports a higher retail tag.
For first buys, it helps to compare three scenarios: a basic printed canvas tote, a direct-embroidered tote, and a woven-patch version of the same design. The printed tote is usually cheaper and faster. The direct-embroidered tote often looks more premium on simple art. The woven-patch route can rescue detailed logos that embroidery would blur. The right answer depends on how the bag will be sold, displayed, and handled by the end customer.
- Model the cost of decoration, packing, freight, and expected retail positioning together.
- Use embroidery when the premium look justifies added setup and slower throughput.
- Switch to woven patch or print if the art is too detailed for thread.
Specification comparison for buyers
| Spec decision | Recommended option | When it fits | Buyer risk to check |
|---|---|---|---|
| Canvas weight | 10 oz to 12 oz cotton canvas | Retail-ready totes, structured shapes, and logos that need a flatter embroidery surface | Too-light fabric can pucker under dense stitch fills and deform after pressing |
| Logo execution | Direct embroidery for simple artwork, woven patch for small text, applique for larger graphic blocks | When the logo must look premium and survive repeated handling | Fine text, thin strokes, and gradients do not translate well into thread |
| Supplier route | Bag factory with in-house embroidery | When you need one owner for fabric, cutting, sewing, and decoration | Subcontracted embroidery can create color, placement, and schedule mismatch |
| MOQ strategy | Standardize one bag body and vary only thread color or placement | When you need a test order without multiplying SKUs | Too many fabric colors or logo versions raise setup charges and slow approvals |
| Stitch density | Moderate fill, not full-solid coverage unless the logo demands it | For medium-size chest logos and side marks | Overdense embroidery can stiffen the panel and cause tunneling or dimpling |
| Placement | Flat front panel, centered or slightly offset from seam lines | When the bag has enough uninterrupted area for hooping | Seams, gussets, and pocket edges can distort the logo and damage alignment |
| Packing method | Bulk pack with size/division marks for wholesale, polybag plus insert for retail | Based on channel and warehouse handling rules | Retail packing can add cost and volume; bulk packing can lead to scuffing if not separated |
| Production route | Sea freight for replenishment, air only for urgent launches or sample refreshes | When lead time is predictable and inventory planning is stable | Air freight hides unit-cost problems and masks poor demand planning |
Buyer checklist before sampling
- Lock the canvas weight, weave, and finished bag size before approving embroidery art.
- Provide the logo in vector format and state the minimum text height you will accept.
- Specify embroidery area in centimeters, stitch count target, and thread color references.
- State whether the bag must pass retail appearance standards or only wholesale functional standards.
- Request a pre-production sample with the exact fabric lot, thread, backing, and packing method.
- Ask for line-item pricing for digitizing, sampling, embroidery setup, packing, and cartons.
- Confirm placement tolerance, seam allowance, and whether hoop marks must be removed before packing.
- Set carton pack count, inner pack method, and outer carton labels before mass production starts.
Factory quote questions to send
- What canvas weight, weave, and shrinkage allowance are included in the quote?
- Is embroidery done in-house or subcontracted, and who owns final placement approval?
- How many stitches are included in the quoted decoration area, and what happens if the logo exceeds it?
- What are the setup, digitizing, sample, and color-change charges broken out by line item?
- Which backing or stabilizer will be used, and will it affect hand feel or panel stiffness?
- What is the minimum order quantity for one logo version, one thread palette, and one packing spec?
- What is the production lead time after sample approval, and what can delay the schedule?
- How will the bags be packed, labeled, and carton-marked for our warehouse or retail route?
Quality-control points to confirm
- Embroidery placement should stay within the agreed tolerance, typically about 5 mm on a standard front panel.
- Text should remain readable at the approved size; thin letters, open counters, and small punctuation must not collapse.
- No skipped stitches, loose threads, bobbin exposure, or thread breaks are acceptable on the visible face.
- The backing should not create hard ridges, puckering, or print-through that changes the bag appearance in normal use.
- Seams near the embroidery area must remain flat and secure after sewing, trimming, and pressing.
- Color match should stay within the approved thread card or signed sample, especially across repeat orders.
- Cartons and inner packs must protect the embroidered face from crush marks, rubbing, and moisture during transit.